
CSS Border Properties: A Comprehensive Guide to Styling Borders in CSS
Contents
CSS Border Properties: Styling Borders in CSS
CSS (Cascading Style Sheets) border properties allow you to control the appearance of borders around HTML elements. Borders can be applied to various types of elements, such as divs, paragraphs, images, tables, and more.
All CSS Border Properties
Here are all the CSS border properties:
border-width:
Specifies the width of the border.
border-style:
Defines the style of the border.
border-color:
Sets the color of the border.
border-top-width:
Specifies the width of the top border.
border-top-style:
Defines the style of the top border.
border-top-color:
Sets the color of the top border.
border-right-width:
Specifies the width of the right border.
border-right-style:
Defines the style of the right border.
border-right-color:
Sets the color of the right border.
border-bottom-width:
Specifies the width of the bottom border.
border-bottom-style:
Defines the style of the bottom border.
border-bottom-color:
Sets the color of the bottom border.
border-left-width:
Specifies the width of the left border.
border-left-style:
Defines the style of the left border.
border-left-color:
Sets the color of the left border.
border-image:
Specifies an image to be used as the border.
border-image-source:
Specifies the source URL of the border image.
border-image-slice:
Specifies how the border image is sliced into sections.
border-image-width:
Specifies the width of the border image.
border-image-outset:
Specifies the amount by which the border image area extends beyond the border box.
border-image-repeat:
Specifies how the border image is repeated or stretched.
border-radius:
Defines the radius of the border corners.
These properties allow you to control the width, style, color, and other aspects of borders in CSS.
You can use them individually or in combination to achieve various border designs for your HTML elements.
Border-width: complete code in html
How to set the border-width property to an HTML element ?
To apply the border-width property to an HTML element, you can use inline CSS
or an external CSS file.
Here’s an example of both approaches:
1)Open notepad then write the CSS code inside the HTML code as the following
By Inline CSS:
<!DOCTYPE html> <html> <head> <title>Inline CSS Example</title> </head> <body> <div style="border-style:solid;border-width:10px;"> This is a div element with a border width of 2 pixels. </div> </body> </html>

2) from file menu >> save the file with name (test.html)
In the above example, the border-width property is directly applied to the
<div> element using the style attribute.
3)Open any browser to see the following

The second method:
By External CSS:
1)HTML file (test.html):
<!DOCTYPE html> <html> <head> <title>External CSS Example</title> <link rel="stylesheet" href="styles.css"> </head> <body> <div class="example">This is a div element with a border width of 2 pixels.</div> </body> </html>
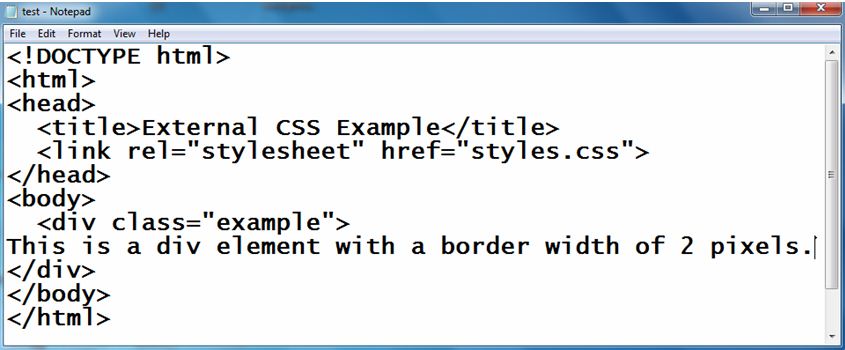
2) create CSS file
CSS file (styles.css):
.example {
border-width: 2px;
border-style:solid;
}

Explanation:
1-In the external CSS approach, the border-width property is defined in a
separate CSS file (styles.css).
2-The file is linked to the HTML file using the <link> tag in the <head> section.
3- Both methods achieve the same result of applying a border width of 2 pixels to
the specified HTML element.
Choose the method that suits your needs and coding style.
3) open test.html by any web browser the see the following

Border-style:complete code in html
How to set the border-style property to an HTML element ?
To apply the border-style property to an HTML element, you can use inline CSS
or an external CSS file.
Here’s an example of both approaches:
Crete HTML file the write the css code inside it as the following
By Inline CSS:
<!DOCTYPE html> <html> <head> <title>Inline CSS Example</title> </head> <body> <div style="border-style: dotted;">This is a div element with a dotted border style.</div> </body> </html>
In the above example, the border-style property is directly applied to the
<div> element using the style attribute.
The output:

We can do the previous example by using External CSS file
1- create HTML file (test.html):open notepad the write the following code:
<!DOCTYPE html> <html> <head> <title>External CSS Example</title> <link rel="stylesheet" href="styles.css"> </head> <body> <div class="example">This is a div element with a dotted border style.</div> </body> </html>
2-create CSS file (styles.css):
.example {
border-style: dotted;
}
In the external CSS approach, the border-style property is defined in a separate CSS file (styles.css).
The file is linked to the HTML file using the <link> tag in the <head> section.

Both methods achieve the same result of applying a dotted border style to the
specified HTML element.
Choose the method that suits your needs and coding style.
Border-color: complete code in html
How to set the border-color property to an HTML element ?
To apply the border-color property to an HTML element, you can use inline CSS
or an external CSS file.
Here’s an example of both approaches:
Open notepad then write the following code:
By Inline CSS:
<!DOCTYPE html> <html> <head> <title>Inline CSS Example</title> </head> <body> <div style="border-color:red;border- style:solid;">This is a div element with a red border color.</div> </body> </html>
In the above example, the border-color property is directly applied to the
<div> element using the style attribute.
Open the file by any web browser to see the following

By External CSS:
1-create HTML file (test.html):then write the following code
<!DOCTYPE html> <html> <head> <title>External CSS Example</title> <link rel="stylesheet" href="styles.css"> </head> <body> <div class="example">This is a div element with a red border color.</div> </body> </html>
2)create CSS file (styles.css):
.example {
border-color: red;
border-style:solid;
}
Explanation:
In the external CSS approach, the border-color property is defined in a
separate CSS file (styles.css). The file is linked to the HTML file using the
<link> tag in the <head> section.
Both methods achieve the same result of applying a red border color to the
specified HTML element. Choose the method that suits your needs and coding
style.
3- open the test.html file to see the same result

Border-top-width: complete code in html
How to apply the border-top-width property to an HTML element ?
To apply the border-top-width property to an HTML element, you can use inline
CSS or an external CSS file.
Here’s an example of both approaches:
By Inline CSS:
1-Create test.html file by Opening notepad then write the following code:
<!DOCTYPE html> <html> <head> <title>Inline CSS Example</title> </head> <body> <div style="border-top-width:20px; border-style:solid;">This is a div element with a top border width of 2 pixels.</div> </body> </html>
In the above example, the border-top-width property is directly applied to the
<div> element using the style attribute.
2-open the test.html file by web browser to see the following result

By external method
External CSS:
1)create HTML file (test.html):
<!DOCTYPE html> <html> <head> <title>External CSS Example</title> <link rel="stylesheet" href="styles.css"> </head> <body> <div class="example">This is a div element with a top border width of 2 pixels.</div> </body> </html>
2)create CSS file
CSS file (styles.css):
.example {
border-top-width: 2px;
border-style:solid;
}
In the external CSS approach, the border-top-width property is defined in a
separate CSS file (styles.css). The file is linked to the HTML file using the
<link> tag in the <head> section.
Both methods achieve the same result of applying a top border width of 2
pixels to the specified HTML element. Choose the method that suits your needs
and coding style.
3)open the test.html file by web browser to see the same result
Border-top-style:complete code in html
How to set the border-top-style property to an HTML element
To apply the border-top-style property to an HTML element, you can use inline
CSS or an external CSS file.
Here’s an example of both approaches:
By Inline CSS:
1-create test.html
<!DOCTYPE html> <html> <head> <title>Inline CSS Example</title> </head> <body> <div style="border-top-style:dashed;"> This is a div element with a dashed top border style. </div> </body> </html>
In the above example, the border-top-style property is directly applied to the
<div> element using the style attribute.
2- open the test.html file by web browser to see the following result

By External CSS:
1)create HTML file (test.html):
<!DOCTYPE html> <html> <head> <title>External CSS Example</title> <link rel="stylesheet" href="styles.css"> </head> <body> <div class="example">This is a div element with a dashed top border style.</div> </body> </html>
2)create css file (styles.css)
CSS file (styles.css):
.example {
border-top-style: dashed;
}
In the external CSS approach, the border-top-style property is defined in a
separate CSS file (styles.css).
The file is linked to the HTML file using the <link> tag in the <head> section.
3)open the test.html file to see the same result
Both methods achieve the same result of applying a dashed top border style to
the specified HTML element.
Choose the method that suits your needs and coding
style.
Border-top-color:complete code in html
How to set the border-top-color property to an HTML element ?
To apply the border-top-color property to an HTML element, you can use inline
CSS or an external CSS file.
Here’s an example of both approaches:
By Inline CSS:
1)create test.html file including the CSS code by notepad text Editor
<html> <head> <title>Inline CSS Example</title> </head> <body> <div style="border-top-color: blue;border-style:solid;"> This is a div element with a blue top border color. </div> </body> </html>
In the above example, the border-top-color property is directly applied to the
<div> element using the style attribute.
2) open the test.html file by web browser to see

By External CSS Method:
1)create HTML file (test.html):
<!DOCTYPE html> <html> <head> <title>External CSS Example</title> <link rel="stylesheet" href="styles.css"> </head> <body> <div class="example">This is a div element with a blue top border color.</div> </body> </html>
2)create CSS file (styles.css):
.example {
border-top-color: blue;
border-style:solid;
}
Explanation:
In the external CSS approach, the border-top-color property is defined in a
separate CSS file (styles.css).
The file is linked to the HTML file using the
<link> tag in the <head> section.
Both methods achieve the same result of applying a blue top border color to
the specified HTML element. Choose the method that suits your needs and coding
style.
3) open test.html file to see the following result

Border-right-width: complete code in html
How to set the border-right-width property to an HTML element ?
To apply the border-right-width property to an HTML element, you can use
inline CSS or an external CSS file.
Here’s an example of both approaches:
By Inline CSS:
1)create test.html file the write the following code
<!DOCTYPE html> <html> <head> <title>Inline CSS Example</title> </head> <body> <div style="border-right-width:15px;border-style:solid;"> This is a div element with a right border width of 2 pixels. </div> </body> </html>
In the above example, the border-right-width property is directly applied to
the <div> element using the style attribute.
2) Open the test.html to see the following result

By External CSS Method:
1-create HTML file (test.html):
<!DOCTYPE html> <html> <head> <title>External CSS Example</title> <link rel="stylesheet" href="styles.css"> </head> <body> <div class="example">This is a div element with a right border width of 2 pixels.</div> </body> </html>
2)create CSS file (styles.css):
.example {
border-right-width: 2px;
border-style: solid;
}
In the external CSS approach, the border-right-width property is defined in a
separate CSS file (styles.css). The file is linked to the HTML file using the
<link> tag in the <head> section.
Both methods achieve the same result of applying a right border width of 2
pixels to the specified HTML element. Choose the method that suits your needs
and coding style.
Border-right-style: complete code in html
How to apply the border-right-style property to an HTML element
To apply the border-right-style property to an HTML element, you can use
inline CSS or an external CSS file.
Here’s an example of both approaches:
By Inline CSS:
1-create HTML file (test.html)
<!DOCTYPE html> <html> <head> <title>Inline CSS Example</title> </head> <body> <div style="border-right-style: dotted;">This is a div element with a dotted right border style.</div> </body> </html>
In the above example, the border-right-style property is directly applied to
the <div> element using the style attribute.
2)open the test.html by web browser to see

By External CSS:
1-create HTML file (test.html):
<!DOCTYPE html> <html> <head> <title>External CSS Example</title> <link rel="stylesheet" href="styles.css"> </head> <body> <div class="example">This is a div element with a dotted right border style.</div> </body> </html>
2-create CSS file (styles.css):
.example {
border-right-style: dotted;
}
In the external CSS approach, the border-right-style property is defined in a
separate CSS file (styles.css). The file is linked to the HTML file using the
<link> tag in the <head> section.
3- open the test.html file by web browser to see the same result
Both methods achieve the same result of applying a dotted right border style
to the specified HTML element. Choose the method that suits your needs and
coding style.
Border-right-color: complete code in html
How to set the border-right-color property to an HTML element ?
To apply the border-right-color property to an HTML element, you can use
inline CSS or an external CSS file.
Here’s an example of both approaches:
By Inline CSS:
1-create HTML file (test.html)
<!DOCTYPE html> <html> <head> <title>Inline CSS Example</title> </head> <body> <div style="border-right-color: red;border-style:solid;"> This is a div element with a red right border color. </div> </body> </html>
2-open the test.html file by web browser
In the above example, the border-right-color property is directly applied to
the <div> element using the style attribute.

By External CSS:
1-create HTML file (test.html):
<!DOCTYPE html> <html> <head> <title>External CSS Example</title> <link rel="stylesheet" href="styles.css"> </head> <body> <div class="example">This is a div element with a red right border color.</div> </body> </html>
2- create CSS file (styles.css):
.example {
border-right-color: red;
border-style:solid;
}
In the external CSS approach, the border-right-color property is defined in a
separate CSS file (styles.css).
The file is linked to the HTML file using the
<link> tag in the <head> section.
3- open the test.html file by web browser to see the same result
Both methods achieve the same result of applying a red right border color to
the specified HTML element. Choose the method that suits your needs and coding
style.
Border-bottom-width:complete code in html
How to apply the border-bottom-width property to an HTML element
To apply the border-bottom-width property to an HTML element, you can use
inline CSS or an external CSS file.
Here’s an example of both approaches:
By Inline CSS:
1-create HTML file (test.html):
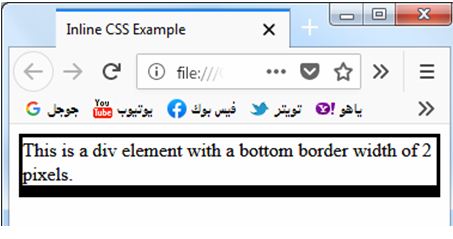
<!DOCTYPE html> <html> <head> <title>Inline CSS Example</title> </head> <body> <div style="border-bottom-width:10px;border-style:solid;"> This is a div element with a bottom border width of 2 pixels. </div> </body> </html>
In the above example, the border-bottom-width property is directly applied to
the <div> element using the style attribute.
2- open the test.html file see the following result
By External CSS:
1-create HTML file (test.html):
<!DOCTYPE html> <html> <head> <title>External CSS Example</title> <link rel="stylesheet" href="styles.css"> </head> <body> <div class="example">This is a div element with a bottom border width of 2 pixels.</div> </body> </html>
2- create CSS file (styles.css):
.example {
border-bottom-width: 2px;
border-style:solid;
}
In the external CSS approach, the border-bottom-width property is defined in a
separate CSS file (styles.css).
The file is linked to the HTML file using the
<link> tag in the <head> section.
3- open the test.html file by web browser the see the same result
Both methods achieve the same result of applying a bottom border width of 2
pixels to the specified HTML element. Choose the method that suits your needs
and coding style.
Border-bottom-style:complete code in html
How to apply the border-bottom-style property to an HTML element?
To apply the border-bottom-style property to an HTML element, you can use
inline CSS or an external CSS file. Here’s an example of both approaches:
By Inline CSS:
1-create HTML file :test.html
<!DOCTYPE html> <html> <head> <title>Inline CSS Example</title> </head> <body> <div style="border-bottom-style: dashed;">This is a div element with a dashed bottom border style.</div> </body> </html>
In the above example, the border-bottom-style property is directly applied to
the <div> element using the style attribute.
2- open the test.html file by web browser to see the following result

By External CSS:
1- create HTML file (test.html):
<!DOCTYPE html> <html> <head> <title>External CSS Example</title> <link rel="stylesheet" href="styles.css"> </head> <body> <div class="example">This is a div element with a dashed bottom border style.</div> </body> </html>
2- create CSS file (styles.css):
.example {
border-bottom-style: dashed;
}
In the external CSS approach, the border-bottom-style property is defined in a
separate CSS file (styles.css).
The file is linked to the HTML file using the
<link> tag in the <head> section.
3- open the test.html file to see the same result
Both methods achieve the same result of applying a dashed bottom border style
to the specified HTML element.
Choose the method that suits your needs and coding style.
Border-bottom-color: complete code in html
How to apply the border-bottom-color property to an HTML element?
To apply the border-bottom-color property to an HTML element, you can use
inline CSS or an external CSS file. Here’s an example of both approaches:
By Inline CSS:
1-create HTML file (test.html)
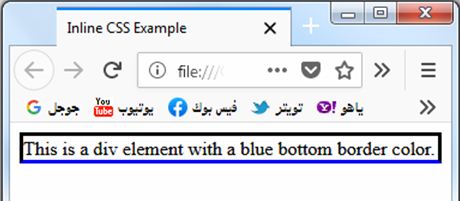
<!DOCTYPE html> <html> <head> <title>Inline CSS Example</title> </head> <body> <div style="border-bottom-color: blue;">This is a div element with a blue bottom border color.</div> </body> </html>
In the above example, the border-bottom-color property is directly applied to
the <div> element using the style attribute.
2- open the test.html file to see the following result
By External CSS:
1-create HTML file (test.html):
<!DOCTYPE html> <html> <head> <title>External CSS Example</title> <link rel="stylesheet" href="styles.css"> </head> <body> <div class="example">This is a div element with a blue bottom border color.</div> </body> </html>
2-create CSS file (styles.css):
.example {
border-bottom-color: blue;
border-style:solid;
}
In the external CSS approach, the border-bottom-color property is defined in a
separate CSS file (styles.css). The file is linked to the HTML file using the
<link> tag in the <head> section.
3- open the test.html file to see the same result
Both methods achieve the same result of applying a blue bottom border color to
the specified HTML element. Choose the method that suits your needs and coding
style.
Border-bottom-color: complete code in html
Here’s the complete code to apply the border-bottom-color property
to an HTML element using both inline CSS and external CSS:
By Inline CSS:
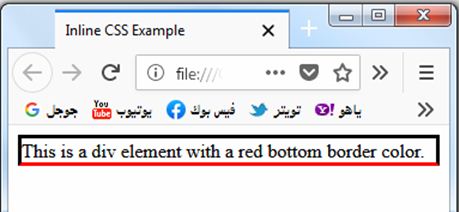
<!DOCTYPE html> <html> <head> <title>Inline CSS Example</title> </head> <body> <div style="border-bottom-color:red;border-style:solid;">This is a div element with a red bottom border color.</div> </body> </html>
In the above example, the border-bottom-color property is directly applied to
the <div> element using the style attribute.
External CSS:
1- create HTML file (test.html):
<!DOCTYPE html> <html> <head> <title>External CSS Example</title> <link rel="stylesheet" href="styles.css"> </head> <body> <div class="example">This is a div element with a red bottom border color.</div> </body> </html>
2- create CSS file (styles.css):
.example {
border-bottom-color: red;
}
In the external CSS approach, the border-bottom-color property is defined in a
separate CSS file (styles.css). The file is linked to the HTML file using the
<link> tag in the <head> section.
Both methods achieve the same result of applying a red bottom border color to
the specified HTML element. Choose the method that suits your needs and coding
style.
Border-left-width: complete code in html
How to apply the border-left-width property to an HTML element ?
To apply the border-left-width property to an HTML element, you can use inline
CSS or an external CSS file. Here’s an example of both approaches:
By Inline CSS:
1-create HTML file (test.html)
<!DOCTYPE html> <html> <head> <title>Inline CSS Example</title> </head> <body> <div style="border-left-width:10px;border-style:solid"> This is a div element with a left border width of 3 pixels. </div> </body> </html>
In the above example, the border-left-width property is directly applied to
the <div> element using the style attribute.
2- open the test.html file by web browser to see the following result

By External CSS:
1- create HTML file (test.html):
<!DOCTYPE html> <html> <head> <title>External CSS Example</title> <link rel="stylesheet" href="styles.css"> </head> <body> <div class="example">This is a div element with a left border width of 3 pixels.</div> </body> </html>
2- create CSS file (styles.css):
.example {
border-left-width: 3px;
border-style:solid;
}
In the external CSS approach, the border-left-width property is defined in a
separate CSS file (styles.css). The file is linked to the HTML file using the
<link> tag in the <head> section.
3- open the test.html file by web browser to see the same result
Both methods achieve the same result of applying a left border width of 3
pixels to the specified HTML element.
Choose the method that suits your needs and coding style.
Border-left-style:complete code in html
How to apply the border-left-style property to an HTML element
To apply the border-left-style property to an HTML element, you can use inline
CSS or an external CSS file.
Here’s an example of both approaches:
By Inline CSS:
1-create HTML file :test.html
<!DOCTYPE html> <html> <head> <title>Inline CSS Example</title> </head> <body> <div style="border-left-style: dotted;"> This is a div element with a dotted left border style.</div> </body> </html>
In the above example, the border-left-style property is directly applied to
the <div> element using the style attribute.
2- open the test.html file by web browser to see the following result

By External CSS:
1- create HTML file (test.html):
<!DOCTYPE html> <html> <head> <title>External CSS Example</title> <link rel="stylesheet" href="styles.css"> </head> <body> <div class="example">This is a div element with a dotted left border style.</div> </body> </html>
2- create CSS file (styles.css):
.example {
border-left-style: dotted;
}
In the external CSS approach, the border-left-style property is defined in a
separate CSS file (styles.css).
The file is linked to the HTML file using the <link> tag in the <head> section.
3- open the test.html file by web browser to see the same result
Both methods achieve the same result of applying a dotted left border style to
the specified HTML element.
Choose the method that suits your needs and coding style.
Border-left-color: complete code in html
How to apply the border-left-color property to an HTML element ?
To apply the border-left-color property to an HTML element, you can use inline
CSS or an external CSS file.
Here’s an example of both approaches:
By Inline CSS:
1- create HTML file :test.html
<!DOCTYPE html> <html> <head> <title>Inline CSS Example</title> </head> <body> <div style="border-left-color:red;border-style:solid;">This is a div element with a green left border color.</div> </body> </html>
In the above example, the border-left-color property is directly applied to
the <div> element using the style attribute.
3- open the test.html file by web browser to see the same result

By External CSS:
1- create HTML file (test.html):
<!DOCTYPE html> <html> <head> <title>External CSS Example</title> <link rel="stylesheet" href="styles.css"> </head> <body> <div class="example">This is a div element with a green left border color.</div> </body> </html>
2-create CSS file (styles.css):
.example {
border-left-color: red;
border-style:solid;
}
In the external CSS approach, the border-left-color property is defined in a
separate CSS file (styles.css). The file is linked to the HTML file using the
<link> tag in the <head> section.
Both methods achieve the same result of applying a green left border color to
the specified HTML element. Choose the method that suits your needs and coding
style.
border-image: complete code in html
The border-image property in CSS allows you to specify an image to be used as
the border of an element.
Here’s an example of how to use the border-image property in HTML using an external CSS file:
1) create HTML file (test.html):
<!DOCTYPE html> <html> <head> <title>Border Image Example</title> <link rel="stylesheet" href="styles.css"> </head> <body> <div class="example">This is a div element with a border image.</div> </body> </html>
2) create CSS file (styles.css):
.example {
border-image: url(image.jpg) 30 round;
border-width: 20px;
border-style: solid;
padding: 20px;
}
Explanation:
1-In the above example, the border-image property is used to specify the URL of
the border image (border-image.png)
2- The width of the border (30px)
3-The rounding behavior (round), and the border width and style are set separately
using the border-width and border-style properties.
Make sure to replace border-image.png with the actual URL or path to your
desired border image.
3) open the test.html file to see the following result

The border-image property provides more advanced border styling options using
images.
You can customize it further by adjusting the values of the border-width, border-style, and other related properties.
Remember to include the CSS file (styles.css) in the HTML file using the
<link> tag to apply the styles defined in the CSS file.
Choose the method that suits your needs and coding style for using the
border-image property.
Border-image-source:complete code in html
How to apply the border-image-source property to an HTML element ?
To apply the border-image-source property to an HTML element, you can use
inline CSS or an external CSS file.
Here’s an example of both approaches:
By Inline CSS:
1-create html file:test.html
<!DOCTYPE html>
<html>
<head>
<style>
#test {
border: 10px solid transparent;
padding: 40px;
border-image-source: url(image.jpg);
border-image-slice: 40;
}
</style>
</head>
<body>
<p id="test">Hello World!</p>
<img src="image.jpg">
</body>
</html>
In the above example, the border-image-source property is directly applied to
the <p> element.
The url(image.jpg)
specifies the path or URL to the border image file.
2- open the test.html by web browser to see the following result

By External CSS:
1- create HTML file (test.html):
<!DOCTYPE html> <html> <head> <title>External CSS Example</title> <link rel="stylesheet" href="styles.css"> </head> <body> <p id="test">Hello World!</p> </body> </html>
2- create CSS file (styles.css):
#test {
border: 10px solid transparent;
padding: 40px;
border-image-source: url(image.jpg);
border-image-slice: 40;
}
In the external CSS approach, the border-image-source property is defined in a
separate CSS file (styles.css).
The file is linked to the HTML file using the
<link> tag in the <head> section. The url(border-image.png) specifies the path
or URL to the border image file.
Both methods achieve the same result of applying a border image to the
specified HTML element.
Make sure to replace border-image.png with the actual
path or URL to your desired border image.
Choose the method that suits your needs and coding style.
3-open the test.html file to see the samresult
Border-image-slice:complete code in html
How to apply the border-image-slice property to an HTML element ?
To apply the border-image-slice property to an HTML element, you can use
inline CSS or an external CSS file.
Here’s an example of both approaches:
By Inline CSS:
1- create html file:test.html
<!DOCTYPE html>
<html>
<head>
<style>
#test1 {
border: 10px solid transparent;
padding: 15px;
border-image: url(image.jpg) round;
border-image-slice: 10%;
}
</style>
</head>
<body>
<h1>The border-image-slice Property</h1>
<p id="test1">border-image-slice: 10%;</p>
</body>
</html>
In the above example, the border-image-slice property is directly applied to the border
The value 10% specifies the size of the border image slices.
2- open the test.html file to see the following result

By External CSS:
1- create HTML file (test.html):
<!DOCTYPE html> <html> <head> <title>External CSS Example</title> <link rel="stylesheet" href="styles.css"> </head> <body> <div class="example">This is a div element with a sliced border image.</div> </body> </html>
2- create CSS file (styles.css):
.test1 {
border: 10px solid transparent;
padding: 15px;
border-image: url(image.jpg) round;
border-image-slice: 10%;
}
In the external CSS approach, the border-image-slice property is defined in a
separate CSS file (styles.css).
The file is linked to the HTML file using the <link> tag in the <head> section.
The value 10% specifies the size of the border image slices.
3- open the test.html to see the same result
Both methods achieve the same result of applying a sliced border image to the
specified HTML element. Adjust the value of border-image-slice to define the
size of the slices according to your needs.
Choose the method that suits your needs and coding style.
Border-image-width: complete code in html
How to apply the border-image-width property to an HTML element ?
To apply the border-image-width property to an HTML element, you can use
inline CSS or an external CSS file.
Here’s an example of both approaches:
By Inline CSS:
1-create HTML file(test.html)
<!DOCTYPE html> <html> <head> <title>Inline CSS Example</title> </head> <body> <div style="border-image: url(image.jpg)30 round;border-image-width: 10px;">This is a div element with a border image width of 10 pixels. This is a div element with a border image width of 10 pixels. </div> </body> </html>
2- open the test.html file to see the following result
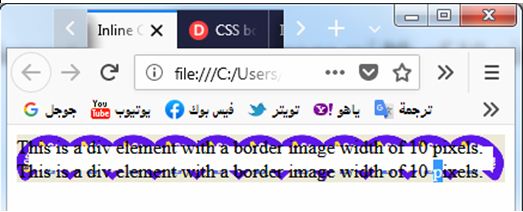
In the above example, the border-image-width property is directly applied to
the <div> element using the style attribute.
The value 10px specifies the width of the border image.
By External CSS:
1- create HTML file test.html):
<!DOCTYPE html> <html> <head> <title>External CSS Example</title> <link rel="stylesheet" href="styles.css"> </head> <body> <div class="example">This is a div element with a border image width of 10 pixels.</div> </body> </html>
2-create CSS file (styles.css):
.example {
border-image: url(image.jpg)30 round;
border-image-width:10px;
}
In the external CSS approach, the border-image-width property is defined in a
separate CSS file (styles.css).
The file is linked to the HTML file using the <link> tag in the <head> section.
The value 10px specifies the width of the border image.
3- open the test.html to see the same result
Both methods achieve the same result of applying a specified border image
width to the specified HTML element. Adjust the value of border-image-width to
define the desired width for the border image.
Choose the method that suits your needs and coding style.
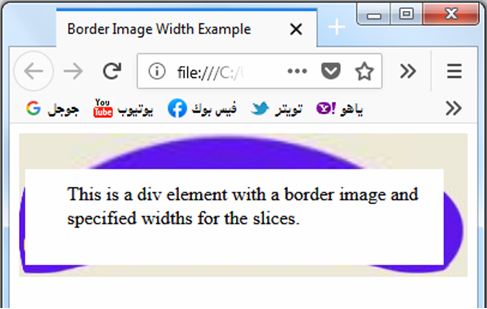
border-image-width:complete code in html
The border-image-width property is used to specify the widths of the border image slices.
Here’s an example of how to use the border-image-width property in HTML using an external CSS file:
1-create HTML file (test.html):
<!DOCTYPE html> <html> <head> <title>Border Image Width Example</title> <link rel="stylesheet" href="styles.css"> </head> <body> <div class="example">This is a div element with a border image and specified widths for the slices.</div> </body> </html>
2-create CSS file (styles.css):
.example {
border-image-source: url(image.jpg);
border-image-width: 30px 20px 10px 5px;
border-image-slice: 10%;
border-width: 20px;
border-style: solid;
padding: 20px;
}
Explanation:
In the above example, the border-image-width property is used to specify the
widths for the border image slices.
The values 30px 20px 10px 5px represent the widths for the top, right, bottom, and left slices, respectively.
Make sure to replace border-image.png with the actual URL or path to your
desired border image.
The border-image-width property is typically used in conjunction with the
border-image-source and border-image-slice properties to create custom border
designs using images.
Remember to include the CSS file (styles.css) in the HTML file using the
<link> tag to apply the styles defined in the CSS file.
Choose the method that suits your needs and coding style.
3- open the test.html to see the following
Border-image-width: complete code in html
The correct usage of the border-image-width property is to specify the widths of the border image slices.
Here’s an example of how to use the border-image-width property in HTML using an external CSS file:
1-create HTML file (test.html):
<!DOCTYPE html> <html> <head> <title>Border Image Width Example</title> <link rel="stylesheet" href="styles.css"> </head> <body> <div class="example">This is a div element with a border image and specified widths for the slices.</div> </body> </html>
2- create CSS file (styles.css):
.example {
border-image-source: url(image.jpg);
border-image-width: 30px;
border-image-slice: 10%;
border-width: 20px;
border-style: solid;
padding: 20px;
}
3- open the test.html to see the following result:

Explanation:
1-In the above example, the border-image-width property is used to specify the
width of the border image slices.
2-The value 30px represents the width for all four slices (top, right, bottom, and left).
Make sure to replace border-image.png with the actual URL or path to your
desired border image.
3-The border-image-width property is typically used in conjunction with the
border-image-source and border-image-slice properties to create custom border
designs using images.
Remember to include the CSS file (styles.css) in the HTML file using the
<link> tag to apply the styles defined in the CSS file.
Choose the method that suits your needs and coding style.
Here’s a complete example code that demonstrates the usage of the
border-image property in HTML:
<!DOCTYPE html>
<html>
<head>
<title>Border Image Example</title>
<style>
.example {
width: 300px;
height: 200px;
border-width: 20px;
border-style: solid;
border-image-source: url(image.jpg);
border-image-slice: 30;
border-image-width: 10px;
padding: 20px;
box-sizing: border-box;
}
</style>
</head>
<body>
<div class="example">This is a div element with a border image.</div>
</body>
</html>

Explanation:
1-In the above example, we define a <div> element with the class name example.
The CSS rules for this class are defined within the <style> tags in the <head>
section of the HTML file.
2-Inside the CSS rules, we set the width and height of the <div> to 300px and
200px respectively.
3-The border-width is set to 20px, and the border-style is set to solid. The border-image-source property specifies the URL of the border image (image.png).
4-The border-image-slice property sets the slice size to 30, and the border-image-width property sets the width of the border image slices to 10px.
5-We also add padding to create space inside the <div> and set box-sizing to border-box to include the border and padding in the specified width and height.
Make sure to replace image.jpg with the actual URL or path to your desired border image.
Save the HTML file with an appropriate name and open it in a web browser to
see the border image applied to the <div> element.
Try to modify the values and styles to suit your needs.
Border-radius property in HTML: complete code in html
How to apply border-radius ?
Here’s a complete example code that demonstrates the usage of the
border-radius property in HTML:
<!DOCTYPE html>
<html>
<head>
<title>Border Radius Example</title>
<style>
.example {
width: 200px;
height: 200px;
background-color: pink;
border-radius: 20%;
}
</style>
</head>
<body>
<div class="example">This is a div element with a rounded border.</div>
</body>
</html>
Explanation:
1-In the above example, we define a <div> element with the class name example.
2-The CSS rules for this class are defined within the <style> tags in the <head>
section of the HTML file.
3-Inside the CSS rules, we set the width and height of the <div> to 200px each.
4-We also set the background-color to #f1f1f1 to provide a visual contrast for
the rounded border.
4-The border-radius property is used to create a rounded border with a value of 20%.
5-This value indicates that the border should have a radius equal to half of the element’s width, resulting in a circular shape.
Save the HTML file with an appropriate name and open it in a web browser to
see the rounded border applied to the <div> element.

Try to modify the values and styles to suit your needs.
Quiz with answers
Sure! Here’s a multi-choice quiz based on the CSS border properties lesson.
Each question is followed by four possible answer options (A, B, C, D), and
the correct answer is indicated in brackets.
1-Which CSS property is used to set the width of the border?
A) border-width [ ]
B) border-style
C) border-color
D) border-image
2-Which CSS property is used to set the style of the border?
A) border-width
B) border-style [ ]
C) border-color
D) border-image
3-Which CSS property is used to set the color of the border?
A) border-width
B) border-style
C) border-color [ ]
D) border-image
4-Which CSS property is used to set the width of the top border only?
A) border-top-width [ ]
B) border-right-width
C) border-bottom-width
D) border-left-width
5-Which CSS property is used to set the style of the top border only?
A) border-top-width
B) border-right-style
C) border-bottom-style
D) border-top-style [ ]
6-Which CSS property is used to set the color of the top border only?
A) border-top-width
B) border-right-color
C) border-bottom-color
D) border-top-color [ ]
7-Which CSS property is used to set the width of the right border only?
A) border-right-width [ ]
B) border-top-width
C) border-bottom-width
D) border-left-width
8-Which CSS property is used to set the style of the right border only?
A) border-right-width
B) border-top-style
C) border-bottom-style
D) border-right-style [ ]
9-Which CSS property is used to set the color of the right border only?
A) border-right-width
B) border-top-color
C) border-bottom-color
D) border-right-color [ ]
10-Which CSS property is used to apply an image to the border?
A) border-width
B) border-style
C) border-color
D) border-image [ ]
Answers:
- A) border-width
- B) border-style
- C) border-color
- A) border-top-width
- D) border-top-style
- D) border-top-color
- A) border-right-width
- D) border-right-style
- D) border-right-color
- D) border-image
11-Which CSS property is used to apply rounded corners to an element?
- A) border-radius [ ]
- B) border-width
- C) border-style
- D) border-color
12-Which CSS property is used to create a custom border design using images?
A) border-image [ ]
B) border-width
C) border-style
D) border-color
13-Which CSS property is used to specify the size of the border image slices?
A) border-image-width [ ]
B) border-width
C) border-style
D) border-color
14-Which CSS property is used to define the source of the border image?
A) border-image-source [ ]
B) border-width
C) border-style
D) border-color
15-Which CSS property is used to slice the border image into regions?
A) border-image-slice [ ]
B) border-width
C) border-style
D) border-color
Answers:
- A) border-radius
- A) border-image
- A) border-image-width
- A) border-image-source
- A) border-image-slice
16-Which CSS property is used to specify the style of the four borders
simultaneously?
A) border-style [ ]
B) border-top-style
C) border-right-style
D) border-bottom-style
17-Which CSS property is used to set the width of all four borders
simultaneously?
A) border-width [ ]
B) border-top-width
C) border-right-width
D) border-bottom-width
18-Which CSS property is used to set the color of all four borders simultaneously?
A) border-color [ ]
B) border-top-color
C) border-right-color
D) border-bottom-color
19-Which CSS property is used to set the style of all four borders
simultaneously?
A) border-style [ ]
B) border-top-style
C) border-right-style
D) border-bottom-style
20-Which CSS property is used to set the width of the left border only?
A) border-left-width [ ]
B) border-right-width
C) border-top-width
D) border-bottom-width
Answers:
- A) border-style
- A) border-width
- A) border-color
- A) border-style
- A) border-left-width
18-Which CSS property is used to remove the border of an element?
- A) border-remove
- B) border-none
- C) border-style: none
- D) border-color: transparent
19-Which CSS property is used to create a dotted border?
- A) border-style: solid
- B) border-style: dashed
- C) border-style: dotted [ ]
- D) border-style: double
20-Which CSS property is used to create a double border?
- A) border-style: solid
- B) border-style: dashed
- C) border-style: dotted
- D) border-style: double [ ]
21-Which CSS property is used to specify the gap between border dashes?
- A) border-gap
- B) border-dash-gap
- C) border-spacing
- D) border-style: dashed
22-Which CSS property is used to create a border that is not connected at the
corners?
- A) border-joint
- B) border-corner-style
- C) border-collapse
- D) border-style: separated
Answers:
18.C) border-style: none
19.C) border-style: dotted
20.D) border-style: double
21.B) border-dash-gap
22.C) border-collapse
23-Which CSS property is used to specify the order of the border colors for a
multi-color border?
A) border-color-order
B) border-style
C) border-color
D) border-colors [ ]
24-Which CSS property is used to create a border that is partially transparent?
A) border-opacity
B) border-color: transparent
C) border-style: transparent
D) border: transparent [ ]
25-Which CSS property is used to create a border that is wider on one side than
the others?
A) border-width: var(–border-width)
B) border-width: inherit
C) border-width: initial
D) border-width: different [ ]
26-Which CSS property is used to create a border with a gradient effect?
A) border-gradient
B) border-color: gradient
C) border-image: linear-gradient [ ]
D) border-style: gradient
27-Which CSS property is used to create a border that animates or transitions
between styles?
A) border-transition
B) border-style: transition
C) border-style: animation
D) border-style: transform
Answers:
- D) border-colors
- B) border-color: transparent
- A) border-width: var(–border-width)
- C) border-image: linear-gradient
- B) border-style: transition
References
MDN Web Docs – CSS border property:
MDN Web Docs – CSS border-color property: