
HTML Canvas: How to draw different graphics?
HTML Canvas: How to draw different graphics?
With HTML Canvas, you can draw and animate shapes, lines, text, and images directly on the canvas using JavaScript.
The canvas provides a 2D or 3D rendering context that you can interact with to create and manipulate visual elements.
The 2D context provides a set of functions to draw various shapes and paths.
Some of the commonly used methods include:
fillRect() for drawing filled rectangles, strokeRect() for drawing the outline of rectangles, arc() for drawing arcs or circles, lineTo() for drawing lines, and fillText() for drawing text.
HTML Canvas: How to Draw a Circle?
Here’s a complete code example of an HTML file that creates a canvas and draws a circle using HTML Canvas:
complete code example
<!DOCTYPE html>
<html>
<head>
<title>Draw Circle Example</title>
<style>
canvas {
border: 1px solid black;
}
</style>
</head>
<body>
<canvas id="myCanvas" width="400" height="400"></canvas>
<script>
// Get the canvas element and the 2D rendering context
var canvas = document.getElementById("myCanvas");
var ctx = canvas.getContext("2d");
// Set the circle properties
var centerX = canvas.width / 2;
var centerY = canvas.height / 2;
var radius = 50;
var color = "red";
// Draw the circle
ctx.beginPath();
ctx.arc(centerX, centerY, radius, 0, 2 * Math.PI, false);
ctx.fillStyle = color;
ctx.fill();
ctx.closePath();
</script>
</body>
</html>
In this example:
1- we create a canvas with a width and height of 400 pixels.
2-We set the properties for the circle: the coordinates of the center (centerX and centerY), the radius (radius), and the color (color).
3-To draw the circle, we use the beginPath() method to start a new path.
4-Then, we use the arc() method to define the arc that makes up the circle.
5-The parameters for arc() are the x and y coordinates of the center, the radius, the starting angle (0 radians), the ending angle (2 * Math.PI radians, which is equivalent to 360 degrees), and whether the arc should be drawn in the clockwise direction (false in this case).
6-After defining the arc, we set the fill color using fillStyle and fill the circle using fill().
7-Finally, we use closePath() to close the path.
You can save this code in an HTML file, open it in a web browser, and see a red circle drawn in the canvas. Feel free to modify the properties such as the coordinates, radius, and color to experiment with different circle drawings.

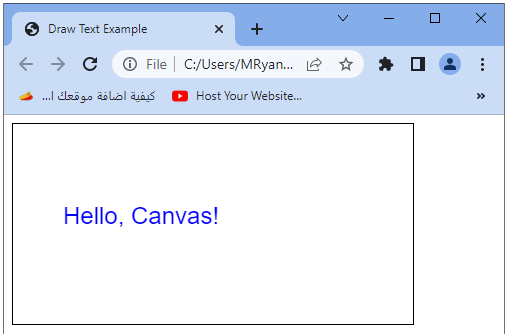
HTML Canvas :How to Draw a Text ?
Here’s a complete code example of an HTML file that creates a canvas and draws text using HTML Canvas:
<!DOCTYPE html>
<html>
<head>
<title>Draw Text Example</title>
<style>
canvas {
border: 1px solid black;
}
</style>
</head>
<body>
<canvas id="myCanvas" width="400" height="200"></canvas>
<script>
// Get the canvas element and the 2D rendering context
var canvas = document.getElementById("myCanvas");
var ctx = canvas.getContext("2d");
// Set the text properties
var text = "Hello, Canvas!";
var x = 50;
var y = 100;
var font = "24px Arial";
var color = "blue";
// Draw the text
ctx.font = font;
ctx.fillStyle = color;
ctx.fillText(text, x, y);
</script>
</body>
</html>
In this example:
1-we create a canvas with a width of 400 pixels and a height of 200 pixels.
2-We set the properties for the text: the text content (text), the x and y coordinates of the starting point (x and y), the font (font), and the color (color).
3-To draw the text, we first set the font properties using the font property of the 2D context. In this example, we set the font size to 24 pixels and the font family to Arial.
4-Then, we set the fill color for the text using the fillStyle property. In this example, we set it to blue.
5-Finally, we use the fillText() method of the 2D context to draw the text on the canvas.
The fillText() method takes the text content, the x and y coordinates of the starting point, and optionally the maximum width for the text.
You can save this code in an HTML file, open it in a web browser, and see the text “Hello, Canvas!” drawn in blue on the canvas.
Try to modify the properties such as the text content, position, font, and color to experiment with different text drawings.
HTML Canvas: How to draw stocked text ?
Stroke Text:complete code example
Here’s a complete code example of an HTML file that creates a canvas and draws stroked text using HTML Canvas:
<!DOCTYPE html>
<html>
<head>
<title>Stroke Text Example</title>
<style>
canvas {
border: 1px solid black;
}
</style>
</head>
<body>
<canvas id="myCanvas" width="400" height="200"></canvas>
<script>
// Get the canvas element and the 2D rendering context
var canvas = document.getElementById("myCanvas");
var ctx = canvas.getContext("2d");
// Set the text properties
var text = "Hello, Canvas!";
var x = 50;
var y = 100;
var font = "24px Arial";
var color = "blue";
var lineWidth = 2;
// Draw the stroked text
ctx.font = font;
ctx.strokeStyle = color;
ctx.lineWidth = lineWidth;
ctx.strokeText(text, x, y);
</script>
</body>
</html>
In this example:
1- we create a canvas with a width of 400 pixels and a height of 200 pixels.
2-We set the properties for the text: the text content (text), the x and y coordinates of the starting point (x and y), the font (font), the color (color), and the line width for the stroke (lineWidth).
3-To draw the stroked text, we first set the font properties using the font property of the 2D context. In this example, we set the font size to 24 pixels and the font family to Arial.
4-Then, we set the stroke color for the text using the strokeStyle property. In this example, we set it to blue.
5-We also set the line width for the stroke using the lineWidth property. In this example, we set it to 2 pixels.
6-Finally, we use the strokeText() method of the 2D context to draw the stroked text on the canvas. The strokeText() method takes the text content, the x and y coordinates of the starting point, and optionally the maximum width for the text.
You can save this code in an HTML file, open it in a web browser, and see the stroked text “Hello, Canvas!” drawn in blue on the canvas.
Tery to modify the properties such as the text content, position, font, color, and line width to experiment with different stroked text drawings.

HTML Canvas :How to Draw Linear Gradient?
Here’s a complete code example of an HTML file that creates a canvas and draws a linear gradient using HTML Canvas:
<!DOCTYPE html>
<html>
<head>
<title>Linear Gradient Example</title>
<style>
canvas {
border: 1px solid black;
}
</style>
</head>
<body>
<canvas id="myCanvas" width="400" height="200"></canvas>
<script>
// Get the canvas element and the 2D rendering context
var canvas = document.getElementById("myCanvas");
var ctx = canvas.getContext("2d");
// Create a linear gradient
var gradient = ctx.createLinearGradient(0, 0, canvas.width, 0);
gradient.addColorStop(0, "red");
gradient.addColorStop(0.5, "yellow");
gradient.addColorStop(1, "green");
// Fill a rectangle with the linear gradient
ctx.fillStyle = gradient;
ctx.fillRect(0, 0, canvas.width, canvas.height);
</script>
</body>
</html>
In this example:
1- we create a canvas with a width of 400 pixels and a height of 200 pixels.
2-We create a linear gradient using the createLinearGradient() method of the 2D context.
3-The createLinearGradient() method takes four parameters:
the starting coordinates (x0, y0) and the ending coordinates (x1, y1) of the gradient.
4-We then use the addColorStop() method of the gradient object to define color stops along the gradient.
5-Each color stop is specified by a position (a value between 0 and 1) and a color.
In this example, we add three color stops:
red at the start (position 0), yellow in the middle (position 0.5), and green at the end (position 1).
6-Finally, we set the fillStyle of the 2D context to the gradient object, and use the fillRect() method to fill a rectangle that covers the entire canvas with the linear gradient.
You can save this code in an HTML file, open it in a web browser, and see a gradient that transitions from red to yellow to green drawn on the canvas.
Try to modify the colors, positions, and dimensions of the gradient to create different effects.

HTML Canvas :How to Draw Circular Gradient?
Drawing a circular gradient in HTML Canvas involves using a radial gradient.
Here’s a complete code example of an HTML file that creates a canvas and draws a circular gradient:
Complete code example:
<!DOCTYPE html>
<html>
<head>
<title>Circular Gradient Example</title>
<style>
canvas {
border: 1px solid black;
}
</style>
</head>
<body>
<canvas id="myCanvas" width="400" height="400"></canvas>
<script>
// Get the canvas element and the 2D rendering context
var canvas = document.getElementById("myCanvas");
var ctx = canvas.getContext("2d");
// Create a radial gradient
var gradient = ctx.createRadialGradient(
canvas.width / 2, canvas.height / 2, 0,
canvas.width / 2, canvas.height / 2, canvas.width / 2
);
gradient.addColorStop(0, "red");
gradient.addColorStop(1, "green");
// Fill a circle with the circular gradient
ctx.fillStyle = gradient;
ctx.beginPath();
ctx.arc(canvas.width / 2, canvas.height / 2, canvas.width / 2, 0, 2 * Math.PI);
ctx.fill();
</script>
</body>
</html>
In this example:
1- we create a canvas with a width and height of 400 pixels.
2-We then create a radial gradient using the createRadialGradient() method of the 2D context.
3-The createRadialGradient() method takes six parameters:
the coordinates (x0, y0) and the radius r0 of the inner circle, and the coordinates (x1, y1) and the radius r1 of the outer circle.
4-In this case, we set the center of the gradient and the center of the canvas as the same point (canvas.width / 2, canvas.height / 2).
5-We set the radius of the inner circle to 0 and the radius of the outer circle to canvas.width / 2 to create a circular gradient that spans the entire canvas.
6-We then use the addColorStop() method to define color stops along the gradient. In this example, we add two color stops: red at the center (position 0) and green at the outer edge (position 1).
7-Finally, we set the fillStyle of the 2D context to the gradient object, and use the arc() method to create a full circle using the center coordinates and the radius equal to canvas.width / 2.
8-We then call fill() to fill the circle with the circular gradient.
You can save this code in an HTML file, open it in a web browser, and see a circular gradient that transitions from red at the center to green at the outer edge drawn on the canvas.
Try to modify the colors, positions, and dimensions of the gradient to create different effects.

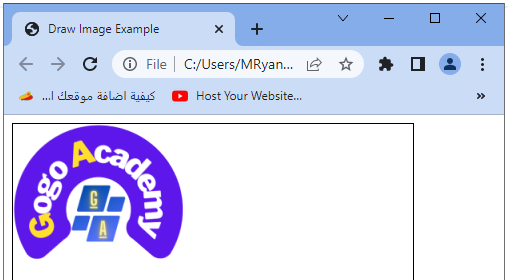
HTML Canvas :How to Draw Image ?
Here’s a complete code example of an HTML file that creates a canvas and draws an image using HTML Canvas:
Complete code example:
<!DOCTYPE html>
<html>
<head>
<title>Draw Image Example</title>
<style>
canvas {
border: 1px solid black;
}
</style>
</head>
<body>
<canvas id="myCanvas" width="400" height="300"></canvas>
<script>
// Get the canvas element and the 2D rendering context
var canvas = document.getElementById("myCanvas");
var ctx = canvas.getContext("2d");
// Create an image object
var image = new Image();
// Set the source of the image
image.src = "image.jpg";
// When the image is loaded, draw it on the canvas
image.onload = function() {
ctx.drawImage(image, 0, 0);
};
</script>
</body>
</html>
In this example:
1-we create a canvas with a width of 400 pixels and a height of 300 pixels.
2-We create an image object using the Image() constructor.
3-Then, we set the source of the image by assigning a valid image URL to the src property of the image object. You need to replace “image.jpg” with the actual path or URL of the image you want to draw.
4-Next, we use the onload event of the image object to ensure that the image is fully loaded before drawing it on the canvas.
5-Inside the onload function, we use the drawImage() method of the 2D context to draw the image on the canvas.
6-The drawImage() method takes the image object, the x and y coordinates of the top-left corner of the image on the canvas (in this case, (0, 0) to draw the image at the top-left corner), and optionally the desired width and height of the image.
When you run this code, the image specified by the URL will be loaded and drawn on the canvas.
Note: The image needs to be accessible from the same domain or have the appropriate CORS headers set to be able to draw it on the canvas.
You can save this code in an HTML file, open it in a web browser, and see the image drawn on the canvas. Make sure to replace “image.jpg” with the actual path or URL of the image you want to draw.
HTML Canvas :How to Draw a Line ?
Here’s a complete code example of an HTML file that creates a canvas and draws a line using HTML Canvas:
Complete code example
<!DOCTYPE html>
<html>
<head>
<title>Draw Line Example</title>
<style>
canvas {
border: 1px solid black;
}
</style>
</head>
<body>
<canvas id="myCanvas" width="400" height="300"></canvas>
<script>
// Get the canvas element and the 2D rendering context
var canvas = document.getElementById("myCanvas");
var ctx = canvas.getContext("2d");
// Set the line properties
var startX = 50;
var startY = 100;
var endX = 350;
var endY = 200;
var color = "blue";
var lineWidth = 2;
// Draw the line
ctx.beginPath();
ctx.moveTo(startX, startY);
ctx.lineTo(endX, endY);
ctx.strokeStyle = color;
ctx.lineWidth = lineWidth;
ctx.stroke();
</script>
</body>
</html>
In this example:
1- we create a canvas with a width of 400 pixels and a height of 300 pixels.
2-We set the properties for the line: the starting coordinates (startX and startY), the ending coordinates (endX and endY), the color (color), and the line width (lineWidth).
3-To draw the line, we use the beginPath() method to start a new path.
4-Then, we use the moveTo() method to set the starting point of the line, and the lineTo() method to set the ending point of the line.
5-The moveTo() and lineTo() methods take the x and y coordinates of the points.
6-After defining the line path, we set the stroke color using strokeStyle, set the line width using lineWidth, and finally call stroke() to draw the line on the canvas.
You can save this code in an HTML file, open it in a web browser, and see a blue line drawn on the canvas. Feel free to modify the properties such as the coordinates, color, and line width to experiment with different line drawings.
