HTML Canvas Methods:beginPath(), moveTo(x, y), lineTo(x, y), closePath()
HTML Canvas Methods: beginPath(), moveTo(x, y), lineTo(x, y), closePath()
In this lesson we will study some of HTML Canvas methods such as:beginPath(), moveTo(x, y), lineTo(x, y), closePath()
Starts a new path or subpath by emptying the list of path segments.
beginPath() method
Ii is used to start a new path or subpath in HTML canvas. It resets the current path so that you can begin defining a new shape or series of drawing commands.
Here’s an example code snippet that demonstrates the usage of beginPath():
<!DOCTYPE html>
<html>
<head>
<title>Canvas beginPath Example</title>
<style>
canvas {
border: 1px solid black;
}
</style>
</head>
<body>
<canvas id="myCanvas" width="400" height="200"></canvas>
<script>
// Get the canvas element
var canvas = document.getElementById("myCanvas");
// Get the 2D rendering context
var ctx = canvas.getContext("2d");
// Start a new path
ctx.beginPath();
// Draw a rectangle
ctx.rect(50, 50, 200, 100);
// Set the stroke style
ctx.strokeStyle = "blue";
// Stroke the path
ctx.stroke();
</script>
</body>
</html>
In this example:
1-we create a canvas with a width of 400 pixels and a height of 200 pixels.
2-We get the canvas element using document.getElementById(“myCanvas”).
3-Next, we get the 2D rendering context of the canvas by calling getContext(“2d”) on the canvas object.
This gives us access to the methods and properties for drawing and manipulating graphics.
4-We call ctx.beginPath() to start a new path. This ensures that any existing path is cleared, allowing us to define a new shape or series of drawing commands.
5-After calling beginPath(), we use ctx.rect(x, y, width, height) to define a rectangle shape. This will create a rectangle with a top-left position at (50, 50) and dimensions of 200 pixels wide and 100 pixels high.
6-We then set the stroke style to “blue” using ctx.strokeStyle and finally call ctx.stroke() to stroke the path and make it visible on the canvas.
When you run this code, you will see a blue rectangle outlined on the canvas. The beginPath() method ensures that only the rectangle defined after calling it is drawn, allowing you to separate different shapes or drawing commands.

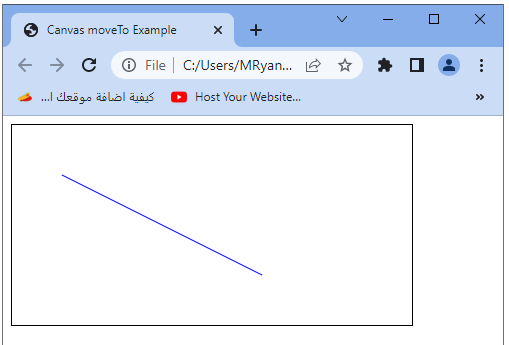
moveTo(x, y) method:
Moves the current drawing position to the specified coordinates without creating a line.
The moveTo(x, y) method is used to move the current drawing position to the specified coordinates (x, y) in the HTML canvas. It does not draw anything; it simply sets the starting point for the next drawing operation.
Here’s an example code snippet that demonstrates the usage of moveTo(x, y):
<!DOCTYPE html>
<html>
<head>
<title>Canvas moveTo Example</title>
<style>
canvas {
border: 1px solid black;
}
</style>
</head>
<body>
<canvas id="myCanvas" width="400" height="200"></canvas>
<script>
// Get the canvas element
var canvas = document.getElementById("myCanvas");
// Get the 2D rendering context
var ctx = canvas.getContext("2d");
// Move the drawing position
ctx.moveTo(50, 50);
// Draw a line
ctx.lineTo(250, 150);
// Set the stroke style
ctx.strokeStyle = "blue";
// Stroke the path
ctx.stroke();
</script>
</body>
</html>
In this example:
1-we create a canvas with a width of 400 pixels and a height of 200 pixels.
2-We get the canvas element using document.getElementById(“myCanvas”).
3-Next, we get the 2D rendering context of the canvas by calling getContext(“2d”) on the canvas object.
This gives us access to the methods and properties for drawing and manipulating graphics.
4-We use ctx.moveTo(x, y) to set the starting point for the drawing operation.
In this example, we move the drawing position to (50, 50).
5-After calling moveTo(x, y), we use ctx.lineTo(x, y) to draw a line from the current drawing position to the specified coordinates (250, 150).
6-We then set the stroke style to “blue” using ctx.strokeStyle and finally call ctx.stroke() to stroke the path and make it visible on the canvas.
When you run this code, you will see a blue line drawn on the canvas, starting from the point (50, 50) and ending at the point (250, 150). The moveTo(x, y) method allows you to set the starting point for drawing lines or other paths in the canvas.
lineTo(x, y) method:
Adds a straight line segment from the current drawing position to the specified coordinates.
The lineTo(x, y) method is used to draw a straight line from the current drawing position to the specified coordinates (x, y) in the HTML canvas. It creates a line segment connecting the current position to the new position.
Here’s an example code snippet that demonstrates the usage of lineTo(x, y):
<!DOCTYPE html>
<html>
<head>
<title>Canvas lineTo Example</title>
<style>
canvas {
border: 1px solid black;
}
</style>
</head>
<body>
<canvas id="myCanvas" width="400" height="200"></canvas>
<script>
// Get the canvas element
var canvas = document.getElementById("myCanvas");
// Get the 2D rendering context
var ctx = canvas.getContext("2d");
// Move the drawing position
ctx.moveTo(50, 50);
// Draw a line
ctx.lineTo(250, 150);
// Set the stroke style
ctx.strokeStyle = "blue";
// Stroke the path
ctx.stroke();
</script>
</body>
</html>
In this example:
1- we create a canvas with a width of 400 pixels and a height of 200 pixels.
2-We get the canvas element using document.getElementById(“myCanvas”).
3-Next, we get the 2D rendering context of the canvas by calling getContext(“2d”) on the canvas object. This gives us access to the methods and properties for drawing and manipulating graphics.
4-We use ctx.moveTo(x, y) to set the starting point for the drawing operation.
In this example, we move the drawing position to (50, 50).
5-After calling moveTo(x, y), we use ctx.lineTo(x, y) to draw a line from the current drawing position to the specified coordinates (250, 150).
6-We then set the stroke style to “blue” using ctx.strokeStyle and finally call ctx.stroke() to stroke the path and make it visible on the canvas.
The lineTo(x, y) method allows you to draw straight lines from one point to another in the canvas.
When you run this code, you will see a blue line drawn on the canvas, starting from the point (50, 50) and ending at the point (250, 150).
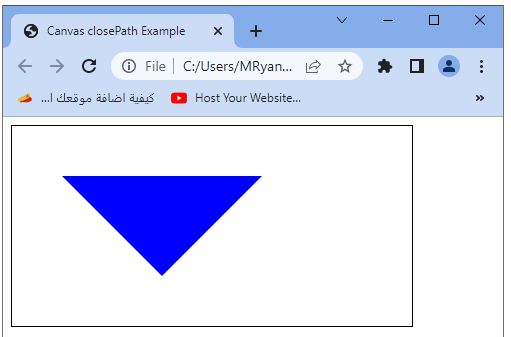
closePath() method:
Closes the current path by drawing a straight line from the current position to the starting position.
The closePath() method is used to close the current subpath in the HTML canvas by connecting the last point of the path to its starting point with a straight line. This creates a closed shape, such as a polygon or a closed curve.
Here’s an example code snippet that demonstrates the usage of closePath():
<!DOCTYPE html>
<html>
<head>
<title>Canvas closePath Example</title>
<style>
canvas {
border: 1px solid black;
}
</style>
</head>
<body>
<canvas id="myCanvas" width="400" height="200"></canvas>
<script>
// Get the canvas element
var canvas = document.getElementById("myCanvas");
// Get the 2D rendering context
var ctx = canvas.getContext("2d");
// Start a new path
ctx.beginPath();
// Draw a triangle
ctx.moveTo(50, 50);
ctx.lineTo(150, 150);
ctx.lineTo(250, 50);
// Close the path
ctx.closePath();
// Set the fill style
ctx.fillStyle = "blue";
// Fill the path
ctx.fill();
</script>
</body>
</html>
In this example:
1- we create a canvas with a width of 400 pixels and a height of 200 pixels.
2-We get the canvas element using document.getElementById(“myCanvas”).
3-Next, we get the 2D rendering context of the canvas by calling getContext(“2d”) on the canvas object.
This gives us access to the methods and properties for drawing and manipulating graphics.
4-We call ctx.beginPath() to start a new path.
This ensures that any existing path is cleared, allowing us to define a new shape or series of drawing commands.
5-We then use ctx.moveTo(x, y) and ctx.lineTo(x, y) to define the points of a triangle shape.
We start at (50, 50), draw a line to (150, 150), and then another line to (250, 50).
6-After defining the triangle, we call ctx.closePath() to close the path by connecting the last point (250, 50) to the starting point (50, 50) with a straight line.
7-Finally, we set the fill style to “blue” using ctx.fillStyle and call ctx.fill() to fill the closed path with the specified color.
When you run this code, you will see a filled blue triangle on the canvas. The closePath() method ensures that the last point of the path is connected to the starting point, creating a closed shape.