
HTML canvas methods:getContext(‘2d’), fillRect(), strokeRect()
HTML canvas methods: getContext(‘2d’), fillRect(), strokeRect()
Here are some of the commonly used methods available for working with the HTML canvas element:
We will study some of html canvas methodes with complete code examples
getContext(‘2d’):
Returns the 2D rendering context of the canvas. This context provides methods and properties for drawing and manipulating graphics.
complete code example
Here’s a complete code example that demonstrates the usage of getContext(‘2d’) to get the 2D rendering context of the canvas:
<!DOCTYPE html>
<html>
<head>
<title>Canvas getContext Example</title>
<style>
canvas {
border: 1px solid black;
}
</style>
</head>
<body>
<canvas id="myCanvas" width="400" height="200"></canvas>
<script>
// Get the canvas element
var canvas = document.getElementById("myCanvas");
// Get the 2D rendering context
var ctx = canvas.getContext("2d");
// Set the fill style and draw a rectangle
ctx.fillStyle = "red";
ctx.fillRect(50, 50, 200, 100);
// Draw a line
ctx.strokeStyle = "blue";
ctx.lineWidth = 2;
ctx.beginPath();
ctx.moveTo(50, 50);
ctx.lineTo(250, 150);
ctx.stroke();
</script>
</body>
</html>
In this example:
1- we create a canvas with a width of 400 pixels and a height of 200 pixels.
2-We get the canvas element using document.getElementById(“myCanvas”).
3-We then get the 2D rendering context of the canvas by calling getContext(“2d”) on the canvas object.
This gives us access to the methods and properties for drawing and manipulating graphics.
4-We set the fill style to “red” using ctx.fillStyle and draw a filled rectangle using ctx.fillRect(x, y, width, height). This will create a red rectangle with a top-left position at (50, 50) and dimensions of 200 pixels wide and 100 pixels high.
5-Next, we set the stroke style to “blue” using ctx.strokeStyle and define the line width to 2 pixels using ctx.lineWidth. We begin a new path using ctx.beginPath(), move the drawing position to (50, 50) using ctx.moveTo(x, y), and draw a line to (250, 150) using ctx.lineTo(x, y).
6-Finally, we call ctx.stroke() to stroke the line and make it visible on the canvas.
When you run this code, you will see a red filled rectangle and a blue line drawn on the canvas. These elements are created using the 2D rendering context obtained through getContext(‘2d’).

fillRect(x, y, width, height):complete code example
Draws a filled rectangle on the canvas with the specified position, width, and height.
Here’s a complete code example that demonstrates the usage of the fillRect(x, y, width, height) method in HTML canvas:
<!DOCTYPE html>
<html>
<head>
<title>Canvas fillRect Example</title>
<style>
canvas {
border: 1px solid black;
}
</style>
</head>
<body>
<canvas id="myCanvas" width="400" height="200"></canvas>
<script>
// Get the canvas element
var canvas = document.getElementById("myCanvas");
// Get the 2D rendering context
var ctx = canvas.getContext("2d");
// Set the fill style and draw a rectangle
ctx.fillStyle = "blue";
ctx.fillRect(50, 50, 200, 100);
</script>
</body>
</html>
In this example:
1-we create a canvas with a width of 400 pixels and a height of 200 pixels.
2-We get the canvas element using document.getElementById(“myCanvas”).
3-Next, we get the 2D rendering context of the canvas by calling getContext(“2d”) on the canvas object.
This gives us access to the methods and properties for drawing and manipulating graphics.
4-We set the fill style to “blue” using ctx.fillStyle and draw a filled rectangle using ctx.fillRect(x, y, width, height). This will create a blue rectangle with a top-left position at (50, 50) and dimensions of 200 pixels wide and 100 pixels high.
When you run this code, you will see a blue filled rectangle drawn on the canvas. The rectangle is created using the fillRect(x, y, width, height) method, which allows you to specify the position and dimensions of the rectangle.

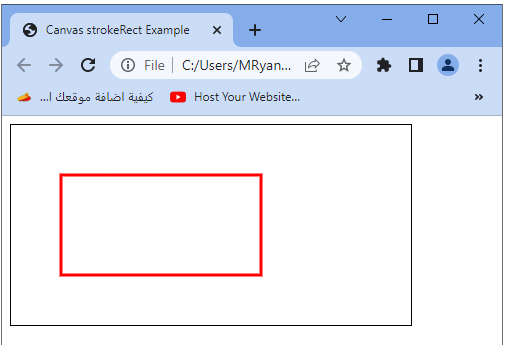
strokeRect(x, y, width, height):
Draws the outline of a rectangle on the canvas with the specified position, width, and height.
complete code example
Here’s a complete code example that demonstrates the usage of the strokeRect(x, y, width, height) method in HTML canvas:
<!DOCTYPE html>
<html>
<head>
<title>Canvas strokeRect Example</title>
<style>
canvas {
border: 1px solid black;
}
</style>
</head>
<body>
<canvas id="myCanvas" width="400" height="200"></canvas>
<script>
// Get the canvas element
var canvas = document.getElementById("myCanvas");
// Get the 2D rendering context
var ctx = canvas.getContext("2d");
// Set the stroke style and draw a rectangle outline
ctx.strokeStyle = "red";
ctx.lineWidth = 3;
ctx.strokeRect(50, 50, 200, 100);
</script>
</body>
</html>
In this example:
1-we create a canvas with a width of 400 pixels and a height of 200 pixels.
2-We get the canvas element using document.getElementById(“myCanvas”).
3-Next, we get the 2D rendering context of the canvas by calling getContext(“2d”) on the canvas object.
This gives us access to the methods and properties for drawing and manipulating graphics.
4-We set the stroke style to “red” using ctx.strokeStyle and set the line width to 3 pixels using ctx.lineWidth. Then, we draw a rectangle outline using ctx.strokeRect(x, y, width, height). This will create a red rectangle outline with a top-left position at (50, 50) and dimensions of 200 pixels wide and 100 pixels high.
When you run this code, you will see a red rectangle outline drawn on the canvas. The rectangle outline is created using the strokeRect(x, y, width, height) method, which allows you to specify the position and dimensions of the rectangle to be outlined.
clearRect(x, y, width, height):
Clears the specified rectangular area on the canvas, making it fully transparent.
Here’s a complete code example that demonstrates the usage of the clearRect(x, y, width, height) method in HTML canvas:
<!DOCTYPE html>
<html>
<head>
<title>Canvas clearRect Example</title>
<style>
canvas {
border: 1px solid black;
}
</style>
</head>
<body>
<canvas id="myCanvas" width="400" height="200"></canvas>
<script>
// Get the canvas element
var canvas = document.getElementById("myCanvas");
// Get the 2D rendering context
var ctx = canvas.getContext("2d");
// Draw a rectangle
ctx.fillStyle = "blue";
ctx.fillRect(50, 50, 200, 100);
// Clear a portion of the rectangle
ctx.clearRect(100, 75, 50, 25);
</script>
</body>
</html>
In this example:
1-we create a canvas with a width of 400 pixels and a height of 200 pixels.
2-We get the canvas element using document.getElementById(“myCanvas”).
3-Next, we get the 2D rendering context of the canvas by calling getContext(“2d”) on the canvas object.
This gives us access to the methods and properties for drawing and manipulating graphics.
4-We draw a filled rectangle using ctx.fillRect(x, y, width, height).
This will create a blue rectangle with a top-left position at (50, 50) and dimensions of 200 pixels wide and 100 pixels high.
5-Then, we use ctx.clearRect(x, y, width, height) to clear a portion of the rectangle. In this example, we clear a portion of the rectangle starting from (100, 75) with a width of 50 pixels and a height of 25 pixels. This clears the specified rectangular area on the canvas, making it fully transparent.
When you run this code, you will see a blue rectangle drawn on the canvas. After a short delay, a portion of the rectangle will be cleared, creating a transparent area within the rectangle. The cleared portion is achieved using the clearRect(x, y, width, height) method, which allows you to specify the rectangular area to be cleared on the canvas.
