
JavaScript While , do-while Loop
JavaScript While , do-while Loop
Learn about JavaScript loops, including while, do-while, and for loops, with practical examples. Explore HTML basics and find code examples for input validation, repetitive processing, and more.
A while loop in JavaScript is a control flow statement that allows you to repeatedly execute a block of code as long as a specified condition is true. The basic syntax of a while loop in JavaScript looks like this:
while (condition) {
// Code to be executed while the condition is true
}
Here’s a breakdown of how a while loop works:
- The condition is an expression that is evaluated before each iteration of the loop. If the condition is true, the loop continues; if it’s false, the loop terminates.
- The code block enclosed in curly braces {} contains the statements that are executed as long as the condition is true.
- After each iteration of the loop, the condition is re-evaluated. If it remains true, the loop continues; if it becomes false, the loop ends, and program execution continues with the code following the loop.
Here’s an example of a while loop that counts from 1 to 5:
let count = 1;
while (count <= 5) {
console.log(count);
count++;
}
In this example:
- The count variable starts at 1, and the loop continues as long as count is less than or equal to 5.
- Inside the loop, the current value of count is printed to the console, and then count is incremented by 1.
- The loop continues until count reaches 6, at which point the condition becomes false, and the loop terminates.
It’s important to be cautious when using while loops to avoid creating infinite loops (loops that never terminate). You must ensure that the condition inside the loop eventually becomes false to prevent your program from running indefinitely.
complete code example in html
Here’s a complete HTML example that includes a JavaScript while loop to count from 1 to 5 and display the numbers in a web page:
<!DOCTYPE html>
<html lang="en">
<head>
<meta charset="UTF-8">
<meta name="viewport" content="width=device-width, initial-scale=1.0">
<title>JavaScript While Loop Example</title>
</head>
<body>
<h1>Counting from 1 to 5 with a While Loop</h1>
<div id="output"></div>
<script>
// JavaScript code
let count = 1;
const outputElement = document.getElementById("output");
while (count <= 5) {
// Create a new paragraph element to display the count
const paragraph = document.createElement("p");
paragraph.textContent = `Count: ${count}`;
// Append the paragraph to the output element
outputElement.appendChild(paragraph);
count++;
}
</script>
</body>
</html>
In this HTML example:
- We have an HTML structure with a title, a heading, and a div element with the id “output” where we’ll display the output of the while loop.
- Inside the <script> tags, we have the JavaScript code. We declare a variable count initialized to 1, and we also get a reference to the “output” div element using document.getElementById.
- The while loop runs as long as count is less than or equal to 5. Inside the loop, we create a new paragraph element for each count and set its text content to display the current count.
- We append each paragraph element to the “output” div to display the counts on the web page.
When you open this HTML file in a web browser, it will display “Count: 1” through “Count: 5” on the web page, demonstrating the use of a while loop in JavaScript to count and display numbers

Another example
Here’s another HTML example that uses a while loop to prompt the for input until they enter a specific value:
<!DOCTYPE html>
<html lang="en">
<head>
<meta charset="UTF-8">
<meta name="viewport" content="width=device-width, initial-scale=1.0">
<title>Input with While Loop Example</title>
</head>
<body>
<h1>Input with While Loop</h1>
<div id="output"></div>
<script>
// JavaScript code
const outputElement = document.getElementById("output");
let Input = "";
while (Input !== "exit") {
Input = prompt("Enter a value (type 'exit' to quit):");
if (Input === null) {
// Handle cancel button press
outputElement.textContent = " canceled input.";
break; // Exit the loop if the cancels
}
outputElement.textContent += `You entered: ${Input}\n`;
}
outputElement.textContent += "Loop ended.";
</script>
</body>
</html>
In this example:
- We have an HTML structure similar to the previous example with a title, a heading, and a div element with the id “output” where we’ll display the output.
- Inside the <script> tags, we declare a variable Input to store input, and we get a reference to the “output” div element using document.getElementById.
- The while loop continues to prompt the for input until they enter “exit.” If the cancels the prompt dialog, the loop handles it gracefully and displays a message. When the enters “exit,” the loop terminates, and we display “Loop ended.”
- We use the prompt function to get input from the , and we update the content of the “output” div to display the entered values.
This example demonstrates how to use a while loop to interact with the and respond to their input.

The Do While Loop
The do-while loop is a control flow statement in JavaScript that is similar to the while loop, but with one key difference: the do-while loop will always execute its code block at least once, even if the condition is initially false. After the code block is executed, the loop checks the condition, and if it’s true, it continues to execute the loop. Here’s the basic syntax:
do {
// Code to be executed
} while (condition);
Here’s how a do-while loop works:
- The code block enclosed in curly braces {} is executed first, without any condition check.
- After the code block is executed, the loop checks the condition. If the condition is true, the loop continues to execute; if it’s false, the loop terminates.
- The loop will keep executing the code block and checking the condition until the condition becomes false.
The difference between a do-while loop and a while loop
The key difference between a do-while loop and a while loop is that a do-while loop guarantees at least one execution of the code block.
Here’s an example of a do-while loop that counts from 1 to 5:
let count = 1;
do {
console.log(count);
count++;
} while (count <= 5);
In this example:
- The code block inside the do-while loop is executed first, printing the current value of count to the console.
- Then, count is incremented. The loop continues until count is greater than 5, at which point it terminates.
- Even if count were initially greater than 5, the code block would still execute at least once before checking the condition. This behavior is what distinguishes the do-while loop from the while loop.
complete code example in html
Here’s a complete HTML example that uses a do-while loop to ask the for input until they enter a specific value:
<!DOCTYPE html>
<html lang="en">
<head>
<meta charset="UTF-8">
<meta name="viewport" content="width=device-width, initial-scale=1.0">
<title>Do-While Loop Example</title>
</head>
<body>
<h1>Input with Do-While Loop</h1>
<div id="output"></div>
<script>
// JavaScript code
const outputElement = document.getElementById("output");
let Input;
do {
Input = prompt("Enter a value (type 'exit' to quit):");
if (Input === null) {
// Handle cancel button press
outputElement.textContent = " canceled input.";
break; // Exit the loop if the cancels
}
outputElement.textContent += `You entered: ${Input}\n`;
} while (Input !== "exit");
outputElement.textContent += "Loop ended.";
</script>
</body>
</html>
In this HTML example:
- We have an HTML structure similar to previous examples with a title, a heading, and a div element with the id “output” where we’ll display the output.
- Inside the <script> tags, we declare a variable Input to store input, and we get a reference to the “output” div element using document.getElementById.
- The do-while loop always starts by executing the code block, which includes prompting the for input and handling the input accordingly.
- If the cancels the prompt dialog, the loop handles it gracefully and displays a message. If the enters “exit,” the loop terminates, and we display “Loop ended.”
- We use the prompt function to get input from the , and we update the content of the “output” div to display the entered values.
This example demonstrates how to use a do-while loop to interact with the and respond to their input, ensuring that the code block runs at least once.
Another example
Here’s another example of a do-while loop in an HTML document. This example generates random numbers until a specified condition is met and displays the generated numbers in a list:
<!DOCTYPE html>
<html lang="en">
<head>
<meta charset="UTF-8">
<meta name="viewport" content="width=device-width, initial-scale=1.0">
<title>Random Numbers with Do-While Loop Example</title>
</head>
<body>
<h1>Generate Random Numbers with Do-While Loop</h1>
<ul id="numberList"></ul>
<script>
// JavaScript code
const numberListElement = document.getElementById("numberList");
let randomNumber;
do {
randomNumber = Math.floor(Math.random() * 100) + 1; // Generate a random number between 1 and 100
// Create a new list item element to display the random number
const listItem = document.createElement("li");
listItem.textContent = `Random Number: ${randomNumber}`;
// Append the list item to the number list
numberListElement.appendChild(listItem);
} while (randomNumber !== 42); // Continue until a random number equals 42
// Display a message when the loop ends
const message = document.createElement("p");
message.textContent = "Loop ended because a random number equals 42.";
numberListElement.appendChild(message);
</script>
</body>
</html>
In this example:
- We have an HTML structure with a title, a heading, and an empty unordered list (<ul>) with the id “numberList” where we’ll display the generated random numbers.
- Inside the <script> tags, we declare a variable randomNumber to store the generated random numbers, and we get a reference to the “numberList” element using document.getElementById.
- The do-while loop generates random numbers between 1 and 100 using Math.random() and displays each number in a list item (<li>) element within the “numberList.”
- The loop continues until a random number equals 42. Once that condition is met, the loop terminates.
- After the loop ends, we display a message indicating that the loop terminated because a random number equals 42.
When you open this HTML file in a web browser, it will generate and display random numbers in a list until a random number equals 42, and then it will show the termination message.

Comparing For and While
In JavaScript, both for and while loops are used for repetitive tasks, but they have slightly different use cases and syntax. Here’s a comparison between for and while loops:
for Loop:
Syntax:
for (initialization; condition; increment) {
// Code to be executed
}
Initialization: You can declare and initialize loop variables here.
Condition: The loop continues executing as long as this condition is true.
Increment: You can specify how the loop variable is updated after each iteration.
Use Cases:
for loops are often used when you know the exact number of iterations in advance or when you need to iterate over arrays or other iterable objects.
They are particularly useful for iterating over a range of numbers or elements.
Example:
for (let i = 0; i < 5; i++) {
console.log(i);
}
while Loop:
Syntax:
while (condition) {
// Code to be executed
}
Condition: The loop continues executing as long as this condition is true. It is checked before the loop body is executed.
Use Cases:
while loops are used when you want to execute a block of code as long as a certain condition is true. The condition is checked before the loop body is executed.
They are useful for situations where the number of iterations is not known in advance or when you need to repeatedly execute code until a certain condition is met.
Example:
let count = 0;
while (count < 5) {
console.log(count);
count++;
}
Key Differences:
Initialization: for loops allow you to declare and initialize loop variables in the loop header, making it convenient for simple counting scenarios. while loops require you to initialize loop variables before the loop.
Condition Checking: In a for loop, the condition is checked at the beginning of each iteration. In a while loop, the condition is checked before the loop body is executed. This means that in a while loop, the code inside the loop may never execute if the condition is initially false.
Use Cases: Use for loops when you know the number of iterations in advance or when iterating over known sequences (e.g., arrays). Use while loops when you need to repeat code until a specific condition is met or when the number of iterations is unknown.
Both for and while loops have their own strengths and are suitable for different situations. The choice between them depends on the specific requirements of your code.
complete code example in html
Here’s a complete HTML example that demonstrates the use of both for and while loops to achieve the same task, which is to display numbers from 1 to 5:
<!DOCTYPE html>
<html lang="en">
<head>
<meta charset="UTF-8">
<meta name="viewport" content="width=device-width, initial-scale=1.0">
<title>For and While Loop Example</title>
</head>
<body>
<h1>Using For and While Loops to Display Numbers</h1>
<h2>Using a For Loop:</h2>
<div id="forLoopOutput"></div>
<h2>Using a While Loop:</h2>
<div id="whileLoopOutput"></div>
<script>
// JavaScript code for the For Loop
const forLoopOutput = document.getElementById("forLoopOutput");
forLoopOutput.textContent = "Numbers using a For Loop: ";
for (let i = 1; i <= 5; i++) {
forLoopOutput.textContent += `${i} `;
}
// JavaScript code for the While Loop
const whileLoopOutput = document.getElementById("whileLoopOutput");
whileLoopOutput.textContent = "Numbers using a While Loop: ";
let count = 1;
while (count <= 5) {
whileLoopOutput.textContent += `${count} `;
count++;
}
</script>
</body>
</html>
In this HTML example:
- We have an HTML structure with a title, a heading explaining the purpose, and two sections: one for displaying numbers using a for loop and another for displaying numbers using a while loop.
- Inside the <script> tags, we have JavaScript code for both loops.
- The for loop iterates from 1 to 5 and appends the numbers to the “For Loop” section.
- The while loop also iterates from 1 to 5 and appends the numbers to the “While Loop” section.
When you open this HTML file in a web browser, it will display the numbers 1 through 5 twice, once using a for loop and once using a while loop, demonstrating the difference in loop structures and how they achieve the same task.

Importance and uses of While Loop and Do while loop
While loops and do-while loops are essential programming constructs in many programming languages, including JavaScript. They serve specific purposes and have distinct use cases, making them valuable tools for different scenarios.
Here’s a closer look at the importance and uses of while loops and do-
while loops:
While Loop: Importance:
While loops are fundamental to programming because they provide a way to repeat a block of code as long as a particular condition is true.
They help in controlling the flow of your program, allowing you to perform tasks iteratively until a certain condition is met or becomes false.
Common Uses:
Condition-Based Iteration:
While loops are typically used when you want to execute a block of code repeatedly based on a condition. For example, processing items in a list, reading data from a file until the end is reached, or responding to input.
Input Validation:
While loops are useful for prompting s for input until they provide valid data. This ensures that the program does not proceed until valid input is received.
Infinite Loops:
While loops can be used to create infinite loops when necessary. For example, in game development, a game loop often uses a while loop to continually update the game state.
Do-While Loop:
Importance:
Do-while loops are similar to while loops but have the important characteristic that they guarantee the execution of the loop body at least once, regardless of the initial condition.
They are crucial for situations where you want to ensure that a block of code runs before checking a condition for further execution.
Common Uses:
Menu Systems:
When creating menu systems or interactive programs, you may want to display a menu and ask the for a choice at least once. A do-while loop is perfect for this scenario.
Input Validation:
Like while loops, do-while loops can be used for input validation, ensuring that the provides at least one piece of input before proceeding.
Repetitive Processing:
If you need to perform an operation on a data set at least once and then check whether additional iterations are required, a do-while loop is suitable.
In summary, while loops and do-while loops are important because they provide control flow structures for repetitive tasks, enabling your code to perform actions until a specific condition is met or until you’ve processed all relevant data. While loops are ideal for situations where the condition is checked before the loop body, whereas do-while loops are useful when you want to guarantee at least one execution of the loop body before checking the condition. Choosing between them depends on the specific requirements of your program and the desired flow of execution.
Examples
Condition-Based Iteration: complete code example in html
Here’s a complete HTML example that demonstrates condition-based iteration using a while loop. In this example, we will repeatedly prompt the for a number until they enter a negative number, and then we will display the sum of the entered positive numbers:
<!DOCTYPE html>
<html lang="en">
<head>
<meta charset="UTF-8">
<meta name="viewport" content="width=device-width, initial-scale=1.0">
<title>Condition-Based Iteration with While Loop</title>
</head>
<body>
<h1>Calculate Sum of Positive Numbers</h1>
<p>Enter a series of positive numbers. Enter a negative number to calculate the sum.</p>
<div id="output"></div>
<script>
// JavaScript code
const outputElement = document.getElementById("output");
let sum = 0;
let Input;
while (true) {
Input = prompt("Enter a number (negative number to calculate sum):");
// Check if the pressed cancel or entered an empty string
if (Input === null || Input.trim() === "") {
outputElement.textContent = "Invalid input. Please enter a number.";
continue; // Skip the rest of the loop and prompt again
}
const number = parseFloat(Input);
// Check if the entered number is positive or negative
if (number < 0) {
break; // Exit the loop when a negative number is entered
} else {
sum += number; // Add the positive number to the sum
}
}
// Display the sum of positive numbers
outputElement.textContent = `Sum of positive numbers: ${sum}`;
</script>
</body>
</html>
In this HTML example:
- We have an HTML structure with a title, a description, and a div element with the id “output” where we’ll display the output.
- Inside the <script> tags, we declare variables for the sum, input,
- We use a while (true) loop to repeatedly prompt the for a number. The loop continues indefinitely until a negative number is entered, at which point we use break to exit the loop.
- We validate input to ensure it’s a valid number, handling cases where the presses cancel or enters an empty string.
- Positive numbers entered by the are added to the sum variable.
- After the loop, we display the sum of the positive numbers.
When you open this HTML file in a web browser, you can enter a series of positive numbers, and the program will keep a running sum until you enter a negative number, at which point it will display the sum of the positive numbers entered.

Input Validation: complete code example
Here’s a complete HTML example that demonstrates input validation using a while loop. In this example, we’ll repeatedly ask the to enter a positive number, and we’ll validate the input to ensure it meets the criteria of being a positive number:
<!DOCTYPE html>
<html lang="en">
<head>
<meta charset="UTF-8">
<meta name="viewport" content="width=device-width, initial-scale=1.0">
<title> Input Validation with While Loop</title>
</head>
<body>
<h1>Enter a Positive Number</h1>
<p>We'll keep asking until you enter a valid positive number.</p>
<div id="output"></div>
<script>
// JavaScript code
const outputElement = document.getElementById("output");
let Input;
let number;
while (true) {
Input = prompt("Enter a positive number:");
// Check if the pressed cancel or entered an empty string
if (Input === null || Input.trim() === "") {
outputElement.textContent = "Invalid input. Please enter a valid positive number.";
continue; // Skip the rest of the loop and prompt again
}
number = parseFloat(Input);
// Check if the entered number is a valid positive number
if (isNaN(number) || number <= 0) {
outputElement.textContent = "Invalid input. Please enter a valid positive number.";
} else {
break; // Exit the loop when a valid positive number is entered
}
}
// Display the valid positive number
outputElement.textContent = `You entered a valid positive number: ${number}`;
</script>
</body>
</html>
In this HTML example:
- We have an HTML structure with a title, a description, and a div element with the id “output” where we’ll display the output.
- Inside the <script> tags, we declare variables for input and the parsed number, and we create a reference to the “output” element.
- We use a while (true) loop to repeatedly prompt the for input.
- Inside the loop, we check if the pressed cancel or entered an empty string, and we handle these cases with an appropriate error message.
- We also validate if the entered input is a valid positive number using parseFloat and conditional statements.
- If the input meets the validation criteria (a valid positive number), we use break to exit the loop.
- Finally, we display the valid positive number.
When you open this HTML file in a web browser, it will keep prompting you to enter a positive number until you provide a valid input, and then it will display the valid positive number you entered.
Infinite Loops: complete code example
Creating an infinite loop intentionally is usually not recommended in most programming scenarios, as it can lead to programs becoming unresponsive and consuming excessive resources. However, there are specific use cases where infinite loops are necessary, such as in game development or when implementing server applications. Below is a complete HTML example that demonstrates an intentional infinite loop:
<!DOCTYPE html>
<html lang="en">
<head>
<meta charset="UTF-8">
<meta name="viewport" content="width=device-width, initial-scale=1.0">
<title>Infinite Loop Example</title>
</head>
<body>
<h1>Infinite Loop Example</h1>
<p>This page demonstrates an intentional infinite loop. Please close this page if needed.</p>
<div id="output"></div>
<script>
// JavaScript code for an intentional infinite loop
const outputElement = document.getElementById("output");
let count = 0;
function updateOutput() {
count++;
outputElement.textContent = `Loop count: ${count}`;
}
// Intentional infinite loop
function infiniteLoop() {
while (true) {
updateOutput();
}
}
// Start the infinite loop
infiniteLoop();
</script>
</body>
</html>
In this HTML example:
- We have an HTML structure with a title, a description, and a div element with the id “output” where we’ll display the output.
- Inside the <script> tags, we declare variables and create a reference to the “output” element.
- We define a function updateOutput() to update the content of the “output” element with the current loop count.
- We create an intentional infinite loop using a while (true) construct. Inside this loop, we repeatedly call the updateOutput() function, which increments the count and displays it.
- The infiniteLoop() function starts the infinite loop.
Important Note: Be cautious when creating infinite loops. Running infinite loops in a web browser can make the page unresponsive, and you may need to forcibly close the tab or browser window. In practical programming, infinite loops should be used sparingly and with careful consideration of the consequences.
Menu Systems: complete code example
Here’s a complete HTML example that demonstrates the use of a simple menu system implemented with a do-while loop. In this example, we’ll create a menu that allows the to choose from different options, and we’ll execute corresponding actions based on their selection:
<!DOCTYPE html>
<html lang="en">
<head>
<meta charset="UTF-8">
<meta name="viewport" content="width=device-width, initial-scale=1.0">
<title>Menu System Example</title>
</head>
<body>
<h1>Menu System Example</h1>
<div id="output"></div>
<script>
// JavaScript code for the menu system
const outputElement = document.getElementById("output");
let choice;
do {
// Display the menu options
outputElement.innerHTML = `
<p>Menu:</p>
<ul>
<li><a href="#" id="option1">Option 1</a></li>
<li><a href="#" id="option2">Option 2</a></li>
<li><a href="#" id="option3">Option 3</a></li>
<li><a href="#" id="exit">Exit</a></li>
</ul> `;
// Prompt the for their choice
choice = prompt("Enter your choice (1, 2, 3, or exit):");
switch (choice) {
case "1":
outputElement.innerHTML += "<p>Option 1 selected.</p>";
// Add action for Option 1 here
break;
case "2":
outputElement.innerHTML += "<p>Option 2 selected.</p>";
// Add action for Option 2 here
break;
case "3":
outputElement.innerHTML += "<p>Option 3 selected.</p>";
// Add action for Option 3 here
break;
case "exit":
outputElement.innerHTML += "<p>Exiting the menu.</p>";
break;
default:
outputElement.innerHTML += "<p>Invalid choice. Please try again.</p>";
break;
}
} while (choice !== "exit");
</script>
</body>
</html>
In this HTML example:
- We have an HTML structure with a title and a div element with the id “output” where we’ll display the menu and the ‘s selections.
- Inside the <script> tags, we declare variables for choice and create a reference to the “output” element.
- We use a do-while loop to repeatedly display a menu with options and prompt the for their choice.
- We implement a simple menu with three options (Option 1, Option 2, Option 3) and an “Exit” option.
- The enters their choice, and a switch statement is used to execute different actions based on their selection. You can customize these actions as needed.
- If the enters “exit,” the loop exits, and the menu system terminates.
When you open this HTML file in a web browser, it will display a menu to the , allowing them to select options by entering the corresponding numbers or “exit” to quit the menu system. The chosen option’s action is displayed in the output area.

Input Validation: complete code example
Here’s a complete HTML example that demonstrates input validation using a while loop. In this example, we’ll repeatedly ask the to enter a number between a specified range (1 to 10), and we’ll validate the input to ensure it falls within that range:
<!DOCTYPE html>
<html lang="en">
<head>
<meta charset="UTF-8">
<meta name="viewport" content="width=device-width, initial-scale=1.0">
<title>Input Validation Example</title>
</head>
<body>
<h1>Enter a Number Between 1 and 10</h1>
<div id="output"></div>
<script>
// JavaScript code for input validation
const outputElement = document.getElementById("output");
let Input;
let number;
while (true) {
Input = prompt("Enter a number between 1 and 10:");
// Check if the pressed cancel or entered an empty string
if (Input === null || Input.trim() === "") {
outputElement.textContent = "Invalid input. Please enter a valid number.";
continue; // Skip the rest of the loop and prompt again
}
number = parseInt(Input);
// Check if the entered number is a valid integer and within the specified range
if (isNaN(number) || number < 1 || number > 10) {
outputElement.textContent = "Invalid input. Please enter a number between 1 and 10.";
} else {
break; // Exit the loop when a valid number is entered
}
}
// Display the valid number
outputElement.textContent = `You entered a valid number: ${number}`;
</script>
</body>
</html>
In this HTML example:
- We have an HTML structure with a title and a div element with the id “output” where we’ll display the output.
- Inside the <script> tags, we declare variables for input and the parsed number, and we create a reference to the “output” element.
- We use a while (true) loop to repeatedly prompt the for input.
- Inside the loop, we check if the pressed cancel or entered an empty string and handle these cases with an appropriate error message.
- We validate if the entered input is a valid integer and falls within the specified range (between 1 and 10) using parseInt and conditional statements.
- If the input meets the validation criteria (a valid number between 1 and 10), we use break to exit the loop.
- Finally, we display the valid number.
When you open this HTML file in a web browser, it will keep prompting you to enter a number until you provide a valid input within the specified range, and then it will display the valid number you entered.

Repetitive Processing: complete code example
Here’s a complete HTML example that demonstrates repetitive processing using a while loop. In this example, we’ll repeatedly perform a simple repetitive task, which is to print a message, until a specified condition is met (in this case, we’ll print the message 5 times):
<!DOCTYPE html>
<html lang="en">
<head>
<meta charset="UTF-8">
<meta name="viewport" content="width=device-width, initial-scale=1.0">
<title>Repetitive Processing Example</title>
</head>
<body>
<h1>Repetitive Processing Example</h1>
<div id="output"></div>
<script>
// JavaScript code for repetitive processing
const outputElement = document.getElementById("output");
let count = 0;
while (count < 5) {
outputElement.innerHTML += `<p>Message ${count + 1}</p>`;
count++;
}
</script>
</body>
</html>
In this HTML example:
- We have an HTML structure with a title, a heading, and a div element with the id “output” where we’ll display the repetitive output.
- Inside the <script> tags, we declare variables for the count and create a reference to the “output” element.
- We use a while (count < 5) loop to repeatedly print a message. The loop continues until the count reaches 5.
- Inside the loop, we append a paragraph (<p>) element to the “output” element, displaying the message with the current count.
- We increment the count in each iteration to ensure that the loop will eventually exit after printing the message 5 times.
When you open this HTML file in a web browser, it will display the message “Message 1” through “Message 5” in the “output” area, demonstrating repetitive processing using a while loop. You can adjust the loop condition and the content of the message to suit your specific requirements.

Quiz with answers about this lesson
Creating a multiple-choice quiz with answers in HTML requires more code than can be provided in a single response, as it involves designing the quiz interface, questions, options, and answer validation. However, I can provide you with a simplified example to get you started. You can then expand upon this template to create a full quiz.
Here’s a basic example of a multiple-choice quiz with two questions:
<!DOCTYPE html>
<html lang="en">
<head>
<meta charset="UTF-8">
<meta name="viewport" content="width=device-width, initial-scale=1.0">
<title>Multiple-Choice Quiz</title>
</head>
<body>
<h1>JavaScript Basics Quiz</h1>
<div id="quiz">
<div id="question1">
<p>1. What does HTML stand for?</p>
<label>
<input type="radio" name="q1" value="a"> a) Hyper Text Markup Language
</label>
<label>
<input type="radio" name="q1" value="b"> b) High Tech Modern Language
</label>
</div>
<div id="question2">
<p>2. Which of the following is a JavaScript loop?</p>
<label>
<input type="radio" name="q2" value="a"> a) if-else
</label>
<label>
<input type="radio" name="q2" value="b"> b) for
</label>
<label>
<input type="radio" name="q2" value="c"> c) div
</label>
</div>
<button onclick="checkAnswers()">Submit</button>
</div>
<div id="results"></div>
<script>
function checkAnswers() {
const q1Answer = document.querySelector('input[name="q1"]:checked');
const q2Answer = document.querySelector('input[name="q2"]:checked');
const resultsElement = document.getElementById("results");
if (q1Answer && q2Answer) {
const score = (q1Answer.value === "a" ? 1 : 0) + (q2Answer.value === "b" ? 1 : 0);
resultsElement.textContent = `You scored ${score} out of 2.`;
} else {
resultsElement.textContent = "Please answer all questions.";
}
}
</script>
</body>
</html>
In this example:
- We have a simple HTML structure with two questions, each with multiple-choice options, and a “Submit” button.
- JavaScript is used to check the answers when the clicks the “Submit” button.
- The checkAnswers() function retrieves the selected answers, calculates the score, and displays the results.
- You can expand this template by adding more questions and answers as needed. Additionally, you can style the quiz to make it more visually appealing and interactive.
Applications by this lesson
The concepts covered in this lesson, which include JavaScript loops and HTML basics, provide a foundation for building a wide range of web applications and interactive websites.
Here are some practical applications and scenarios where the knowledge gained from this lesson can be used:
Form Validation: You can use JavaScript to validate input in web forms, ensuring that the data submitted by s meets specific criteria, such as required fields, valid email addresses, or numeric values.
Interactive Web Pages: Implement interactive elements on web pages, such as image sliders, quizzes, and games, using JavaScript. Loops can help manage animations and interactions.
Dynamic Content: Load and display dynamic content on web pages without requiring a full page reload. JavaScript and loops can be used to fetch data from servers and update the page content accordingly.
Authentication: Implement login and authentication systems, where JavaScript can handle input validation and interactions, while HTML provides the structure for login forms.
E-commerce Features: Create shopping carts, product galleries, and order processing functionality for e-commerce websites. JavaScript can handle the shopping cart logic, and HTML forms can collect order information.
Data Visualization: Display data in charts and graphs on web pages. JavaScript libraries like D3.js can be used to create interactive data visualizations.
Content Sliders: Design content sliders, image carousels, or slideshow presentations that automatically cycle through content or allow s to navigate through slides using HTML and JavaScript.
Chat Applications: Develop real-time chat applications or messaging features on websites using JavaScript to handle message sending and display.
Survey Forms: Create interactive survey forms where JavaScript can manage the survey flow and HTML forms capture responses.
Online Quizzes and Polls: Build online quizzes and polls with JavaScript for interaction and HTML to structure the questions and options.
Web-based Games: Develop simple web-based games, puzzles, or simulations that rely on JavaScript for game logic and HTML for rendering game elements.
Educational Platforms: Create e-learning platforms with interactive lessons and quizzes to engage and assess learners. JavaScript and HTML are essential for building such platforms.
Personal Portfolio Sites: Build personal websites or portfolios that showcase your skills and projects. Use HTML for structuring content and JavaScript for interactive elements.
News Tickers and Updates: Display real-time news tickers or updates on websites using JavaScript to manage the scrolling effect and HTML for displaying the content.
These applications are just a few examples of how the concepts from this lesson can be applied to create dynamic, interactive, and -friendly web experiences. JavaScript and HTML are core technologies for web development, and understanding how to use them effectively opens up a wide range of possibilities for creating web applications and websites.
Form Validation: complete code example
Here’s a complete HTML example that demonstrates form validation using JavaScript. In this example, we’ll create a simple form with input fields, and we’ll use JavaScript to validate the ‘s input when they submit the form. The form will check if the name and email fields are filled out and if the email address is in a valid format:
<!DOCTYPE html>
<html lang="en">
<head>
<meta charset="UTF-8">
<meta name="viewport" content="width=device-width, initial-scale=1.0">
<title>Form Validation Example</title>
</head>
<body>
<h1>Form Validation Example</h1>
<form id="myForm">
<label for="name">Name:</label>
<input type="text" id="name" name="name" required><br><br>
<label for="email">Email:</label>
<input type="email" id="email" name="email" required><br><br>
<input type="submit" value="Submit">
</form>
<div id="result"></div>
<script>
const form = document.getElementById("myForm");
const resultElement = document.getElementById("result");
form.addEventListener("submit", function (event) {
event.preventDefault(); // Prevent the form from submitting by default
const nameInput = document.getElementById("name");
const emailInput = document.getElementById("email");
// Validate name and email
if (nameInput.value.trim() === "") {
resultElement.textContent = "Name is required.";
return;
}
if (!isValidEmail(emailInput.value)) {
resultElement.textContent = "Invalid email address.";
return;
}
// If validation passes, display success message
resultElement.textContent = "Form submitted successfully!";
});
// Function to validate email format
function isValidEmail(email) {
const emailRegex = /^[^\s@]+@[^\s@]+\.[^\s@]+$/;
return emailRegex.test(email);
}
</script>
</body>
</html>
In this HTML example:
- We have a simple HTML form with two input fields (name and email) and a submit button.
- JavaScript is used to add an event listener to the form’s submission. When the form is submitted, the event listener prevents the default form submission (to allow for custom validation).
- The JavaScript code within the event listener validates the name and email fields. It checks if the name is not empty and if the email is in a valid format using a regular expression.
- If any validation fails, an error message is displayed in the “result” element. If both fields pass validation, a success message is displayed.
- The isValidEmail function is used to validate the email address format using a regular expression.
When you open this HTML file in a web browser, you can test the form by entering different values into the name and email fields. The form will validate the input and display appropriate messages based on the validation results.

Interactive Web Pages: complete code example
Creating interactive web pages typically involves a combination of HTML, JavaScript, and often CSS for styling. Here’s a complete HTML example that demonstrates an interactive web page with a simple button that changes the background color when clicked:
<!DOCTYPE html>
<html lang="en">
<head>
<meta charset="UTF-8">
<meta name="viewport" content="width=device-width, initial-scale=1.0">
<title>Interactive Web Page Example</title>
<style>
/* CSS for styling */
body {
font-family: Arial, sans-serif;
text-align: center;
}
button {
padding: 10px 20px;
font-size: 16px;
cursor: pointer;
}
</style>
</head>
<body>
<h1>Interactive Web Page Example</h1>
<p>Click the button to change the background color!</p>
<button id="colorButton">Change Color</button>
<script>
// JavaScript code for interactivity
const colorButton = document.getElementById("colorButton");
const colors = ["#FF5733", "#33FF57", "#5733FF", "#33AFFF"];
let currentColorIndex = 0;
colorButton.addEventListener("click", function () {
document.body.style.backgroundColor = colors[currentColorIndex];
currentColorIndex = (currentColorIndex + 1) % colors.length;
});
</script>
</body>
</html>
In this HTML example:
- We have a basic HTML structure with a title, a heading, and a paragraph.
- We include some simple CSS styles to center-align text and style the button.
- JavaScript is used to make the web page interactive. It listens for a click event on the button with the id “colorButton.”
- When the button is clicked, the background color of the body element changes to one of the predefined colors in the colors array.
- The currentColorIndex variable keeps track of the current color index, cycling through the array of colors when the button is clicked.
When you open this HTML file in a web browser, you will see a button labeled “Change Color.” Clicking the button will change the background color of the entire page, creating a simple interactive effect. You can customize the colors and add more interactive elements to create more complex web pages.

Dynamic Content: complete code example
Creating dynamic content on a web page typically involves using JavaScript to fetch data from an external source and then updating the HTML content based on that data. In this example, we’ll use JavaScript to fetch and display dynamic content from an array of quotes.
Here’s a complete HTML example:
<!DOCTYPE html>
<html lang="en">
<head>
<meta charset="UTF-8">
<meta name="viewport" content="width=device-width, initial-scale=1.0">
<title>Dynamic Content Example</title>
<style>
/* CSS for styling */
body {
font-family: Arial, sans-serif;
text-align: center;
}
button {
padding: 10px 20px;
font-size: 16px;
cursor: pointer;
}
</style>
</head>
<body>
<h1>Dynamic Content Example</h1>
<div id="quoteContainer">
<p id="quote"></p>
<button id="nextButton">Next Quote</button>
</div>
<script>
// JavaScript code for dynamic content
const quoteContainer = document.getElementById("quoteContainer");
const quoteElement = document.getElementById("quote");
const nextButton = document.getElementById("nextButton");
const quotes = [
"The only limit to our realization of tomorrow will be our doubts of today. - Franklin D. Roosevelt",
"Life is what happens when you're busy making other plans. - John Lennon",
"In the end, we will remember not the words of our enemies, but the silence of our friends. - Martin Luther King Jr.",
"Success is not final, failure is not fatal: it is the courage to continue that counts. - Winston Churchill"
];
let currentQuoteIndex = 0;
// Function to display the current quote
function displayCurrentQuote() {
quoteElement.textContent = quotes[currentQuoteIndex];
}
// Initial display
displayCurrentQuote();
// Event listener for the "Next Quote" button
nextButton.addEventListener("click", function () {
currentQuoteIndex = (currentQuoteIndex + 1) % quotes.length;
displayCurrentQuote();
});
</script>
</body>
</html>
In this HTML example:
- We have a basic HTML structure with a title, a heading, and a container for dynamic content.
- We include some simple CSS styles for text alignment and button styling.
- JavaScript is used to create dynamic content. We have an array of quotes stored in the quotes variable.
- The displayCurrentQuote function displays the current quote from the array in the HTML.
- Initially, we display the first quote from the array.
- We add an event listener to the “Next Quote” button. When clicked, it cycles through the quotes and displays the next one.
When you open this HTML file in a web browser, you’ll see an initial quote displayed. Clicking the “Next Quote” button will dynamically change the displayed quote, creating a simple example of dynamic content on a web page. You can customize the array of quotes and the content to suit your needs.

Authentication: complete code example
Authentication typically involves backend server-side logic to securely manage accounts and credentials. However, I can provide a simplified HTML and JavaScript example for authentication where s “log in” with a predefined name and password. Keep in mind that this is not suitable for real-world security and is for educational purposes only.
Here’s a complete HTML example demonstrating a basic authentication form:
<!DOCTYPE html>
<html lang="en">
<head>
<meta charset="UTF-8">
<meta name="viewport" content="width=device-width, initial-scale=1.0">
<title> Authentication Example</title>
<style>
/* CSS for styling */
body {
font-family: Arial, sans-serif;
text-align: center;
}
input {
padding: 10px;
font-size: 16px;
}
button {
padding: 10px 20px;
font-size: 16px;
cursor: pointer;
}
</style>
</head>
<body>
<h1> Authentication Example</h1>
<div id="loginForm">
<label for="name">name:</label>
<input type="text" id="name" required><br><br>
<label for="password">Password:</label>
<input type="password" id="password" required><br><br>
<button id="loginButton">Log In</button>
</div>
<div id="loggedInMessage" style="display: none;">
<p>Welcome, <span id="loggedInname"></span>!</p>
<button id="logoutButton">Log Out</button>
</div>
<script>
// JavaScript code for authentication
const loginForm = document.getElementById("loginForm");
const loggedInMessage = document.getElementById("loggedInMessage");
const loggedInname = document.getElementById("loggedInname");
const logoutButton = document.getElementById("logoutButton");
const loginButton = document.getElementById("loginButton");
// Simulated credentials (for demo purposes)
const correctname = "";
const correctPassword = "password";
// Event listener for the "Log In" button
loginButton.addEventListener("click", function () {
const name = document.getElementById("name").value;
const password = document.getElementById("password").value;
if (name === correctname && password === correctPassword) {
// Successful login
loginForm.style.display = "none";
loggedInMessage.style.display = "block";
loggedInname.textContent = name;
} else {
// Invalid credentials
alert("Invalid name or password. Please try again.");
}
});
// Event listener for the "Log Out" button
logoutButton.addEventListener("click", function () {
loginForm.style.display = "block";
loggedInMessage.style.display = "none";
document.getElementById("name").value = "";
document.getElementById("password").value = "";
});
</script>
</body>
</html>
In this HTML example:
- We have a basic HTML structure with a title, a heading, and a form for
- We include some simple CSS styles for text alignment and input/button styling.
- JavaScript is used to handle We have predefined the correct name and password (for demonstration purposes).
- When the clicks the “Log In” button, JavaScript checks if the entered name and password match the predefined values. If they match, a welcome message is displayed, and the login form is hidden. Otherwise, an alert is shown for invalid credentials.
- There is also a “Log Out” button that allows the to log out, which displays the login form again.

Please note that this example is not secure for real-world applications and is meant for educational purposes. In practice, authentication should be implemented on the server-side with proper security measures.
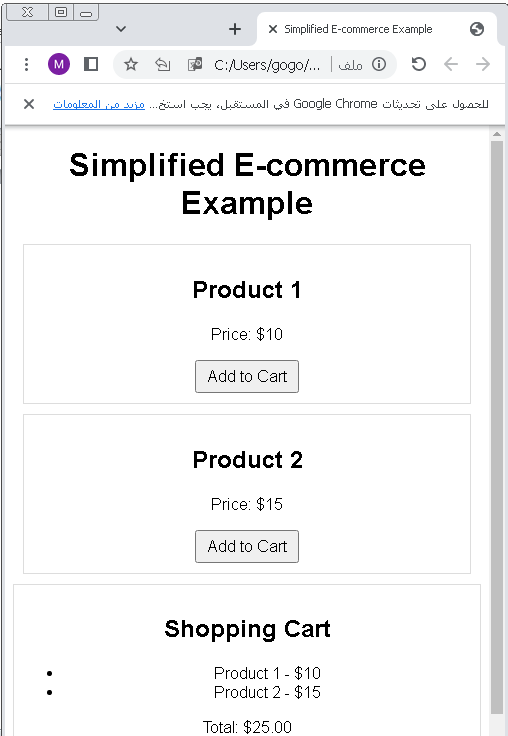
E-commerce Features: complete code example
Building a full e-commerce website with all its features is a complex task that typically requires server-side programming, databases, and payment gateways. However, I can provide you with a simplified HTML and JavaScript example that demonstrates some basic e-commerce features such as adding products to a cart and calculating the total cost. This example is for educational purposes and does not include real payment processing.
Here’s a complete HTML example for a simplified e-commerce page:
<!DOCTYPE html>
<html lang="en">
<head>
<meta charset="UTF-8">
<meta name="viewport" content="width=device-width, initial-scale=1.0">
<title>Simplified E-commerce Example</title>
<style>
/* CSS for styling */
body {
font-family: Arial, sans-serif;
text-align: center;
}
.product {
border: 1px solid #ddd;
padding: 10px;
margin: 10px;
}
button {
padding: 5px 10px;
font-size: 16px;
cursor: pointer;
}
#cart {
border: 1px solid #ddd;
padding: 10px;
}
</style>
</head>
<body>
<h1>Simplified E-commerce Example</h1>
<div class="product">
<h2>Product 1</h2>
<p>Price: $10</p>
<button onclick="addToCart('Product 1', 10)">Add to Cart</button>
</div>
<div class="product">
<h2>Product 2</h2>
<p>Price: $15</p>
<button onclick="addToCart('Product 2', 15)">Add to Cart</button>
</div>
<div id="cart">
<h2>Shopping Cart</h2>
<ul id="cartItems"></ul>
<p>Total: $<span id="cartTotal">0</span></p>
</div>
<script>
// JavaScript code for e-commerce features
const cartItemsElement = document.getElementById("cartItems");
const cartTotalElement = document.getElementById("cartTotal");
let cart = [];
function addToCart(productName, price) {
cart.push({ name: productName, price: price });
updateCart();
}
function updateCart() {
cartItemsElement.innerHTML = "";
let total = 0;
cart.forEach(item => {
const listItem = document.createElement("li");
listItem.textContent = `${item.name} - $${item.price}`;
cartItemsElement.appendChild(listItem);
total += item.price;
});
cartTotalElement.textContent = total.toFixed(2);
}
</script>
</body>
</html>
In this HTML example:
- We have a basic HTML structure with a title, a heading, and two product listings.
- Each product listing includes a name, price, and an “Add to Cart” button. Clicking the button adds the product to the shopping cart.
- The shopping cart is displayed below the product listings, showing the added items, their prices, and the total cost.
- JavaScript is used to handle adding products to the cart and updating the cart’s contents and total cost.
- The addToCart function adds a product to the cart array, and the updateCart function updates the cart’s display and total cost.
This example demonstrates a simplified e-commerce scenario where s can add products to their cart and see the total cost. In a real e-commerce website, you would also need features for registration, product databases, secure payment processing, and more.
Data Visualization: complete code example
Data visualization on the web is often done using libraries like D3.js or Chart.js. These libraries provide powerful tools for creating interactive and visually appealing charts and graphs. Here’s a simplified example using Chart.js to create a basic bar chart:
First, include the Chart.js library in your HTML file. You can either download it or include it from a content delivery network (CDN). In this example, we’ll use the CDN:
<!DOCTYPE html>
<html lang="en">
<head>
<meta charset="UTF-8">
<meta name="viewport" content="width=device-width, initial-scale=1.0">
<title>Data Visualization Example</title>
<!-- Include Chart.js from CDN -->
<script src="https://cdn.jsdelivr.net/npm/chart.js"></script>
</head>
<body>
<h1>Data Visualization Example</h1>
<!-- Create a canvas element to render the chart -->
<canvas id="myChart" width="400" height="200"></canvas>
<script>
// JavaScript code for data visualization
const ctx = document.getElementById("myChart").getContext("2d");
const data = {
labels: ["January", "February", "March", "April", "May"],
datasets: [{
label: "Sales",
data: [12, 19, 3, 5, 2],
backgroundColor: [
'rgba(255, 99, 132, 0.2)',
'rgba(54, 162, 235, 0.2)',
'rgba(255, 206, 86, 0.2)',
'rgba(75, 192, 192, 0.2)',
'rgba(153, 102, 255, 0.2)'
],
borderColor: [
'rgba(255, 99, 132, 1)',
'rgba(54, 162, 235, 1)',
'rgba(255, 206, 86, 1)',
'rgba(75, 192, 192, 1)',
'rgba(153, 102, 255, 1)'
],
borderWidth: 1
}]
};
const config = {
type: 'bar',
data: data,
};
const myChart = new Chart(ctx, config);
</script>
</body>
</html>
In this example:
- We include the Chart.js library from a CDN in the <head> section of the HTML document.
- We create a <canvas> element with the id “myChart” where the chart will be rendered.
- JavaScript is used to configure and create the bar chart. We define the data for the chart, including labels and dataset values, and specify the chart’s appearance.
- The ctx variable represents the 2D rendering context of the canvas element.
- We create a new Chart object by passing the canvas context and the chart configuration.
When you open this HTML file in a web browser, you will see a basic bar chart displaying sales data for different months. You can customize the chart’s appearance and data to create various types of data visualizations using the Chart.js library.

Content Sliders: complete code example
Creating a content slider often involves HTML, CSS, and JavaScript/jQuery to handle the sliding effect and interactions.
Here’s a simplified example of a content slider using HTML, CSS
<!DOCTYPE html>
<html lang="en">
<head>
<meta charset="UTF-8">
<meta name="viewport" content="width=device-width, initial-scale=1.0">
<title>Content Slider Example</title>
<style>
/* CSS for styling */
body {
font-family: Arial, sans-serif;
text-align: center;
}
.slider-container {
width: 300px;
overflow: hidden;
position: relative;
margin: 0 auto;
}
.slider {
display: flex;
transition: transform 0.5s ease;
}
.slide {
flex: 0 0 300px;
height: 200px;
display: flex;
align-items: center;
justify-content: center;
background-color: #f2f2f2;
border: 1px solid #ccc;
box-shadow: 0px 0px 5px #888;
}
button {
padding: 5px 10px;
font-size: 16px;
cursor: pointer;
}
</style>
</head>
<body>
<h1>Content Slider Example</h1>
<div class="slider-container">
<div class="slider">
<div class="slide">Slide 1</div>
<div class="slide">Slide 2</div>
<div class="slide">Slide 3</div>
</div>
</div>
<button id="prevBtn">Previous</button>
<button id="nextBtn">Next</button>
<script>
// JavaScript code for content slider
const slider = document.querySelector(".slider");
const prevBtn = document.getElementById("prevBtn");
const nextBtn = document.getElementById("nextBtn");
let currentIndex = 0;
function updateSlider() {
slider.style.transform = `translateX(${-currentIndex * 300}px)`;
}
prevBtn.addEventListener("click", function () {
if (currentIndex > 0) {
currentIndex--;
updateSlider();
}
});
nextBtn.addEventListener("click", function () {
if (currentIndex < 2) {
currentIndex++;
updateSlider();
}
});
</script>
</body>
</html>
In this HTML example:
- We have a basic HTML structure with a title, a heading, and a container for the content slider.
- CSS is used to style the slider container, slides, and buttons.
- JavaScript is used to handle the sliding effect. We have defined an array of three slides, and the updateSlider function adjusts the position of the slider to show the current slide.
- The “Previous” and “Next” buttons allow s to navigate between the slides. The currentIndex variable keeps track of the current slide.
When you open this HTML file in a web browser, you will see a simple content slider with three slides. You can customize the content, styles, and number of slides to suit your needs. For more complex sliders, consider using libraries like Swiper.js or Slick Carousel, which offer more features and flexibility.

Chat Applications: complete code example
Creating a complete chat application is a complex task that typically involves both frontend and backend development, as well as real-time communication protocols. A simplified example using HTML, JavaScript, and WebSockets for real-time communication is provided below. Keep in mind that this is a basic example for educational purposes and does not cover all the complexities of a production-level chat application.
Here’s a simplified HTML example for a basic chat application:
<!DOCTYPE html>
<html lang="en">
<head>
<meta charset="UTF-8">
<meta name="viewport" content="width=device-width, initial-scale=1.0">
<title>Basic Chat Application</title>
<style>
/* CSS for styling */
body {
font-family: Arial, sans-serif;
text-align: center;
}
#chat-container {
width: 300px;
margin: 0 auto;
border: 1px solid #ccc;
padding: 10px;
box-shadow: 0px 0px 5px #888;
}
#message-list {
list-style-type: none;
padding: 0;
}
#message-list li {
margin-bottom: 5px;
}
input[type="text"] {
width: 100%;
padding: 5px;
font-size: 16px;
}
button {
padding: 5px 10px;
font-size: 16px;
cursor: pointer;
}
</style>
</head>
<body>
<h1>Basic Chat Application</h1>
<div id="chat-container">
<ul id="message-list"></ul>
<input type="text" id="message" placeholder="Type your message">
<button id="send">Send</button>
</div>
<script>
// JavaScript code for chat application
const messageList = document.getElementById("message-list");
const messageInput = document.getElementById("message");
const sendButton = document.getElementById("send");
// Simulated chat data (for demonstration purposes)
const chatData = [
{ : "Alice", message: "Hello, how are you?" },
{ : "Bob", message: "Hi Alice, I'm good. How about you?" },
];
function displayChatMessages() {
messageList.innerHTML = "";
chatData.forEach((chat) => {
const listItem = document.createElement("li");
listItem.textContent = `${chat.}: ${chat.message}`;
messageList.appendChild(listItem);
});
}
displayChatMessages();
sendButton.addEventListener("click", function () {
const message = messageInput.value;
if (message.trim() !== "") {
chatData.push({ : "You", message: message });
messageInput.value = "";
displayChatMessages();
}
});
</script>
</body>
</html>
In this HTML example:
- We have a basic HTML structure with a title, a heading, and a container for the chat application.
- CSS is used for styling the chat container, messages, input field, and buttons.
- JavaScript is used to display chat messages and simulate sending messages. We use the chatData array to store messages for demonstration purposes.
- The displayChatMessages function updates the chat display based on the content of the chatData array.
- we can type messages in the input field and click the “Send” button to simulate sending a message.
This example provides a basic starting point for creating a chat application. In a production-level chat application, you would need to implement real-time communication using technologies like WebSockets or a chat API, handle authentication, and manage messages on a server.

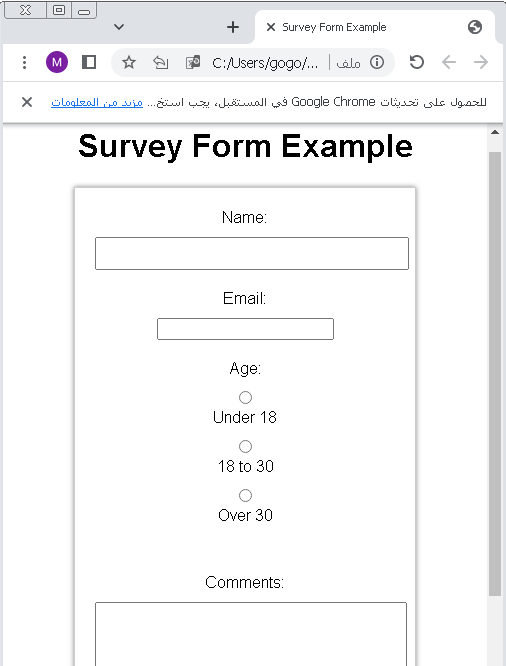
Survey Forms: complete code example
Creating a survey form involves HTML for the structure of the form and JavaScript to handle interactions. Here’s a complete HTML example of a simple survey form:
<!DOCTYPE html>
<html lang="en">
<head>
<meta charset="UTF-8">
<meta name="viewport" content="width=device-width, initial-scale=1.0">
<title>Survey Form Example</title>
<style>
/* CSS for styling */
body {
font-family: Arial, sans-serif;
text-align: center;
}
.survey-container {
width: 300px;
margin: 0 auto;
border: 1px solid #ccc;
padding: 20px;
box-shadow: 0px 0px 5px #888;
}
label {
display: block;
margin-bottom: 10px;
}
input[type="radio"] {
margin-right: 5px;
}
input[type="text"] {
width: 100%;
padding: 5px;
font-size: 16px;
}
textarea {
width: 100%;
padding: 5px;
font-size: 16px;
}
button {
padding: 10px 20px;
font-size: 16px;
cursor: pointer;
}
</style>
</head>
<body>
<h1>Survey Form Example</h1>
<div class="survey-container">
<form id="survey-form">
<label for="name">Name:</label>
<input type="text" id="name" name="name" required><br><br>
<label for="email">Email:</label>
<input type="email" id="email" name="email" required><br><br>
<label>Age:</label>
<input type="radio" id="ageUnder18" name="age" value="Under 18">
<label for="ageUnder18">Under 18</label>
<input type="radio" id="age18to30" name="age" value="18 to 30">
<label for="age18to30">18 to 30</label>
<input type="radio" id="ageOver30" name="age" value="Over 30">
<label for="ageOver30">Over 30</label><br><br>
<label for="comments">Comments:</label>
<textarea id="comments" name="comments" rows="4"></textarea><br><br>
<button type="submit">Submit</button>
</form>
</div>
<script>
// JavaScript code for survey form
const form = document.getElementById("survey-form");
form.addEventListener("submit", function (event) {
event.preventDefault(); // Prevent the form from submitting by default
const name = document.getElementById("name").value;
const email = document.getElementById("email").value;
const age = document.querySelector('input[name="age"]:checked');
const comments = document.getElementById("comments").value;
// Display survey results
alert(`Survey Results:\nName: ${name}\nEmail: ${email}\nAge: ${age.value}\nComments: ${comments}`);
});
</script>
</body>
</html>
In this HTML example:
- We have a basic HTML structure with a title, a heading, and a container for the survey form.
- CSS is used for styling the form, labels, input fields, radio buttons, and buttons.
- JavaScript is used to handle the form submission. When the submits the form, the JavaScript code prevents the default form submission behavior and displays an alert with the survey results, including the ‘s name, email, selected age group, and comments.
- The form includes fields for name, email, age (radio buttons), and comments (textarea).
When you open this HTML file in a web browser, you will see a simple survey form. s can fill out the form, submit it, and receive an alert with their survey results. You can customize the form fields and validation as needed for your specific survey.
Online Quizzes and Polls: complete code example
Creating a complete online quiz or poll involves HTML for the structure of the quiz, JavaScript for interactivity, and potentially server-side scripting for storing and processing results. Here’s a simplified example of an online quiz using HTML and JavaScript:
<!DOCTYPE html>
<html lang="en">
<head>
<meta charset="UTF-8">
<meta name="viewport" content="width=device-width, initial-scale=1.0">
<title>Online Quiz Example</title>
<style>
/* CSS for styling */
body {
font-family: Arial, sans-serif;
text-align: center;
}
.quiz-container {
width: 400px;
margin: 0 auto;
border: 1px solid #ccc;
padding: 20px;
box-shadow: 0px 0px 5px #888;
}
.question {
font-size: 18px;
margin-bottom: 10px;
}
label {
display: block;
margin-bottom: 10px;
}
input[type="radio"] {
margin-right: 5px;
}
button {
padding: 10px 20px;
font-size: 16px;
cursor: pointer;
}
</style>
</head>
<body>
<h1>Online Quiz Example</h1>
<div class="quiz-container">
<form id="quiz-form">
<div class="question">Question 1: What is the capital of France?</div>
<label><input type="radio" name="q1" value="paris"> Paris</label>
<label><input type="radio" name="q1" value="london"> London</label>
<label><input type="radio" name="q1" value="berlin"> Berlin</label><br>
<div class="question">Question 2: Which planet is known as the Red Planet?</div>
<label><input type="radio" name="q2" value="venus"> Venus</label>
<label><input type="radio" name="q2" value="mars"> Mars</label>
<label><input type="radio" name="q2" value="jupiter"> Jupiter</label><br>
<div class="question">Question 3: What is 2 + 2?</div>
<label><input type="radio" name="q3" value="3"> 3</label>
<label><input type="radio" name="q3" value="4"> 4</label>
<label><input type="radio" name="q3" value="5"> 5</label><br>
<button type="submit">Submit</button>
</form>
<div id="results" style="display: none;"></div>
</div>
<script>
// JavaScript code for the quiz
const quizForm = document.getElementById("quiz-form");
const resultsDiv = document.getElementById("results");
quizForm.addEventListener("submit", function (event) {
event.preventDefault(); // Prevent the form from submitting by default
const answers = {
q1: document.querySelector('input[name="q1"]:checked').value,
q2: document.querySelector('input[name="q2"]:checked').value,
q3: document.querySelector('input[name="q3"]:checked').value,
};
const correctAnswers = {
q1: "paris",
q2: "mars",
q3: "4",
};
let score = 0;
for (const question in answers) {
if (answers[question] === correctAnswers[question]) {
score++;
}
}
const percentage = ((score / Object.keys(answers).length) * 100).toFixed(2);
resultsDiv.innerHTML = `<p>Your score: ${score} out of ${Object.keys(answers).length}</p>`;
resultsDiv.innerHTML += `<p>Percentage: ${percentage}%</p>`;
resultsDiv.style.display = "block";
});
</script>
</body>
</html>
In this HTML example:
- We have a basic HTML structure with a title, a heading, and a container for the quiz.
- CSS is used for styling the quiz container, questions, labels, radio buttons, and the submit button.
- JavaScript is used to handle the quiz. We define the questions and their correct answers, and when the submits the form, we check their answers and calculate the score and percentage.
- The results are displayed below the quiz questions when the submits the form.
This example demonstrates a simple online quiz. You can customize the questions, answers, and styling to create your own quizzes or polls. For more complex quiz applications, consider using databases to store questions and results and implementing authentication.

Web-based Games: complete code example
Creating a web-based game involves a wide range of complexities, and the code can become extensive. However, I can provide a simplified example of a basic web-based game using HTML, CSS, and JavaScript. In this example, we’ll create a simple guessing game where the needs to guess a random number.
Here’s a complete HTML example for a simple guessing game:
<!DOCTYPE html>
<html lang="en">
<head>
<meta charset="UTF-8">
<meta name="viewport" content="width=device-width, initial-scale=1.0">
<title>Guess the Number Game</title>
<style>
/* CSS for styling */
body {
font-family: Arial, sans-serif;
text-align: center;
}
#game-container {
width: 300px;
margin: 0 auto;
border: 1px solid #ccc;
padding: 20px;
box-shadow: 0px 0px 5px #888;
}
button {
padding: 10px 20px;
font-size: 16px;
cursor: pointer;
}
</style>
</head>
<body>
<h1>Guess the Number Game</h1>
<div id="game-container">
<p>Guess a number between 1 and 100:</p>
<input type="number" id="guess" min="1" max="100" required>
<button id="submit">Submit Guess</button>
<div id="message"></div>
<button id="reset">Reset Game</button>
</div>
<script>
// JavaScript code for the guessing game
const randomNumber = Math.floor(Math.random() * 100) + 1;
let attempts = 0;
const guessInput = document.getElementById("guess");
const submitButton = document.getElementById("submit");
const messageDiv = document.getElementById("message");
const resetButton = document.getElementById("reset");
submitButton.addEventListener("click", function () {
const Guess = parseInt(guessInput.value);
if (isNaN(Guess) || Guess < 1 || Guess > 100) {
messageDiv.textContent = "Please enter a valid number between 1 and 100.";
} else {
attempts++;
if (Guess === randomNumber) {
messageDiv.textContent = `Congratulations! You guessed the number ${randomNumber} in ${attempts} attempts.`;
submitButton.disabled = true;
} else if (Guess < randomNumber) {
messageDiv.textContent = "Try a higher number.";
} else {
messageDiv.textContent = "Try a lower number.";
}
}
});
resetButton.addEventListener("click", function () {
randomNumber = Math.floor(Math.random() * 100) + 1;
attempts = 0;
messageDiv.textContent = "";
guessInput.value = "";
submitButton.disabled = false;
});
</script>
</body>
</html>
In this HTML example:
- We have a basic HTML structure with a title, a heading, and a container for the guessing game.
- CSS is used for styling the game container, input field, and buttons.
- JavaScript is used to implement the game logic. A random number between 1 and 100 is generated, and the is asked to guess it.
- The ‘s guess is checked for validity, and feedback is provided based on whether the guess is correct, too low, or too high.
- A reset button allows the to start a new game.

This example demonstrates a simple web-based guessing game. You can customize the range of numbers and the game rules to create different types of web-based games. For more complex games, consider using game development frameworks like Phaser or Three.js.
Educational Platforms: complete code example
Creating a complete educational platform is a complex endeavor that typically involves frontend and backend development, authentication, database integration, and various educational features. Here’s a simplified example of an educational platform using HTML, CSS, and JavaScript that allows s to view and take quizzes. Please note that this example is basic and does not include authentication or data storage.
Here’s a complete HTML example for a simplified educational platform:
<!DOCTYPE html>
<html lang="en">
<head>
<meta charset="UTF-8">
<meta name="viewport" content="width=device-width, initial-scale=1.0">
<title>Educational Platform</title>
<style>
/* CSS for styling */
body {
font-family: Arial, sans-serif;
text-align: center;
}
.container {
width: 600px;
margin: 0 auto;
}
.quiz {
border: 1px solid #ccc;
padding: 20px;
margin-bottom: 20px;
box-shadow: 0px 0px 5px #888;
}
h2 {
margin-bottom: 10px;
}
ul {
list-style-type: none;
padding: 0;
}
li {
margin-bottom: 10px;
}
button {
padding: 10px 20px;
font-size: 16px;
cursor: pointer;
}
</style>
</head>
<body>
<h1>Educational Platform</h1>
<div class="container">
<div class="quiz">
<h2>Quiz 1: Geography</h2>
<ul>
<li>What is the capital of France?</li>
<li>What is the largest ocean in the world?</li>
<li>How many continents are there?</li>
</ul>
<button onclick="startQuiz('geography')">Start Quiz</button>
</div>
<div class="quiz">
<h2>Quiz 2: Math</h2>
<ul>
<li>What is 5 + 7?</li>
<li>What is 12 multiplied by 3?</li>
<li>What is the square root of 25?</li>
</ul>
<button onclick="startQuiz('math')">Start Quiz</button>
</div>
<div id="quiz-results"></div>
</div>
<script>
// JavaScript code for educational platform
const quizResults = document.getElementById("quiz-results");
function startQuiz(subject) {
if (subject === "geography") {
const questions = [
"What is the capital of France?",
"What is the largest ocean in the world?",
"How many continents are there?",
];
const answers = ["Paris", "Pacific Ocean", "7"];
displayQuiz(subject, questions, answers);
} else if (subject === "math") {
const questions = [
"What is 5 + 7?",
"What is 12 multiplied by 3?",
"What is the square root of 25?",
];
const answers = ["12", "36", "5"];
displayQuiz(subject, questions, answers);
}
}
function displayQuiz(subject, questions, answers) {
let score = 0;
const quizHtml = `
<h2>${subject} Quiz</h2>
<ul>
${questions
.map((question, index) => {
return `
<li>${question}</li>
<input type="text" id="q${index}" placeholder="Your answer">
`;
})
.join("")}
</ul>
<button onclick="checkAnswers('${subject}', ${JSON.stringify(
answers
)})">Submit</button>
`;
document.querySelector(".quiz").style.display = "none";
quizResults.innerHTML = quizHtml;
}
function checkAnswers(subject, correctAnswers) {
const Answers = [];
let score = 0;
for (let i = 0; i < correctAnswers.length; i++) {
const Answer = document.getElementById(`q${i}`).value;
Answers.push(Answer);
if (Answer.toLowerCase() === correctAnswers[i].toLowerCase()) {
score++;
}
}
const resultHtml = `
<h2>${subject} Quiz Results</h2>
<p>Your Score: ${score} out of ${correctAnswers.length}</p>
<button onclick="window.location.reload()">Take Another Quiz</button>
`;
quizResults.innerHTML = resultHtml;
}
</script>
</body>
</html>
In this HTML example:
- We have a basic HTML structure with a title, a heading, and a container for quizzes.
- CSS is used for styling the quizzes, questions, and buttons.
- JavaScript is used to implement the educational platform’s logic. s can start quizzes in geography and math. After answering the questions, they receive feedback on their scores.
- The startQuiz function initializes the quiz with questions and answers based on the selected subject.
- The displayQuiz function generates the quiz HTML dynamically based on the
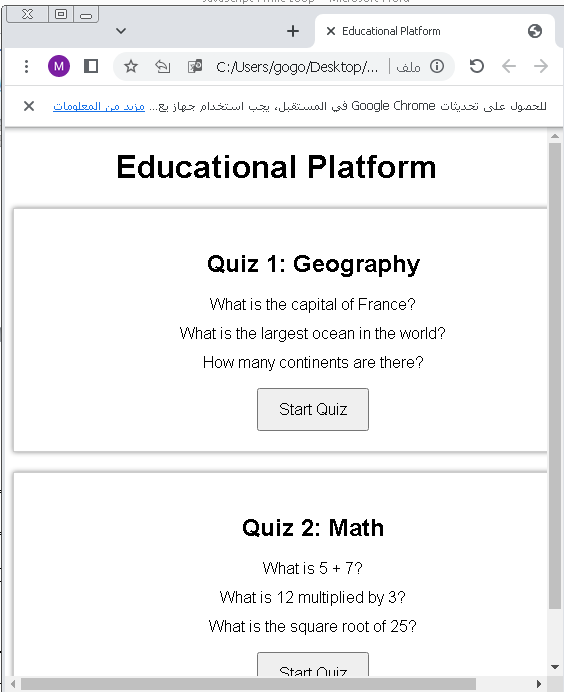
Personal Portfolio Sites: complete cod examples
Creating a personal portfolio website is a common use case for web development. Below is a simplified HTML and CSS code example for a personal portfolio site. This example includes three sections: a header, a projects section, and a contact section. You can expand and customize it according to your needs.
<!DOCTYPE html>
<html lang="en">
<head>
<meta charset="UTF-8">
<meta name="viewport" content="width=device-width, initial-scale=1.0">
<title>My Portfolio</title>
<style>
/* Reset some default browser styles */
body, h1, h2, p {
margin: 0;
padding: 0;
}
/* Global styles */
body {
font-family: Arial, sans-serif;
background-color: #f5f5f5;
color: #333;
line-height: 1.6;
}
/* Header styles */
header {
background-color: #333;
color: #fff;
padding: 20px;
text-align: center;
}
header h1 {
font-size: 2rem;
margin-bottom: 10px;
}
header p {
font-size: 1.2rem;
}
/* Main content styles */
.container {
max-width: 800px;
margin: 0 auto;
padding: 20px;
background-color: #fff;
box-shadow: 0 0 10px rgba(0, 0, 0, 0.1);
}
/* Project section styles */
.projects {
margin-top: 20px;
}
.project {
border: 1px solid #ddd;
padding: 20px;
margin-bottom: 20px;
background-color: #fff;
}
.project h2 {
font-size: 1.5rem;
margin-bottom: 10px;
}
.project p {
font-size: 1.1rem;
}
/* Contact section styles */
.contact {
margin-top: 20px;
text-align: center;
}
.contact p {
font-size: 1.2rem;
margin-bottom: 20px;
}
/* Footer styles */
footer {
background-color: #333;
color: #fff;
padding: 10px;
text-align: center;
}
</style>
</head>
<body>
<header>
<h1>John Doe</h1>
<p>Web Developer</p>
</header>
<div class="container">
<h2>About Me</h2>
<p>Hello, I'm John Doe, a web developer passionate about creating modern and interactive websites. I specialize in front-end development and have experience with HTML, CSS, and JavaScript.</p>
<h2>My Projects</h2>
<div class="projects">
<div class="project">
<h2>Project 1</h2>
<p>Lorem ipsum dolor sit amet, consectetur adipiscing elit. Nullam eu nisl id libero tincidunt dignissim.</p>
</div>
<div class="project">
<h2>Project 2</h2>
<p>Phasellus a tellus nec est sollicitudin sollicitudin. Aliquam nec libero nec lectus efficitur fringilla.</p>
</div>
</div>
<div class="contact">
<h2>Contact Me</h2>
<p>If you'd like to get in touch, feel free to email me at <a href="mailto:john@example.com">john@example.com</a>.</p>
</div>
</div>
<footer>
© 2023 John Doe
</footer>
</body>
</html>
In this code example:
- The HTML structure includes a header section with your name and profession, a main content container with an “About Me” section, a “Projects” section, and a “Contact Me” section.
- The CSS styles define the appearance of the header, projects, contact section, and footer. It also provides a simple responsive design by setting the maximum width of the content container.

You can customize this template further by adding your own projects, modifying the content, and enhancing the design to create a personal portfolio website that showcases your skills and work. Additionally, you can incorporate JavaScript to add interactivity or use a front-end framework like React or Vue.js for more advanced features.
News Tickers and Updates: complete code examples
Creating a news ticker or updates section on a website often involves HTML, CSS, and JavaScript to display and animate news or updates in a scrolling manner.
Here’s a simplified example of a news ticker using HTML, CSS, and JavaScript:
<!DOCTYPE html>
<html lang="en">
<head>
<meta charset="UTF-8">
<meta name="viewport" content="width=device-width, initial-scale=1.0">
<title>News Ticker</title>
<style>
/* CSS for styling */
body {
font-family: Arial, sans-serif;
background-color: #f5f5f5;
margin: 0;
padding: 0;
}
.ticker-container {
overflow: hidden;
background-color: #333;
color: #fff;
}
.ticker-content {
display: inline-block;
white-space: nowrap;
animation: ticker 15s linear infinite;
}
@keyframes ticker {
0% {
transform: translateX(100%);
}
100% {
transform: translateX(-100%);
}
}
</style>
</head>
<body>
<div class="ticker-container">
<div class="ticker-content">
<!-- News or update items -->
<span>Breaking News 1: Lorem ipsum dolor sit amet.</span>
<span>Latest Update: Consectetur adipiscing elit.</span>
<span>Important Announcement: Nullam eu nisl id libero tincidunt.</span>
</div>
</div>
</body>
</html>
In this HTML example:
- We have a basic HTML structure with a title and a container for the news ticker.
- CSS is used to style the news ticker. The ticker-container div has overflow set to “hidden” to hide content that exceeds its boundaries. The ticker-content div contains the news or update items and uses CSS animations to create the scrolling effect.
- The @keyframes animation named “ticker” is defined to translate the content horizontally from right to left infinitely.

You can customize the content within the ticker-content div by adding your own news items or updates. To make the ticker more dynamic and pull news from a source, you would typically use JavaScript and make AJAX requests to retrieve and update the content periodically.
For a more feature-rich news ticker, you might consider using a JavaScript library or plugin specifically designed for this purpose, which can offer additional customization and flexibility.
References of this lesson
JavaScript Loops:
MDN Web Docs – JavaScript Loops and Iteration:
JavaScript Loops – MDN Web Docs
W3Schools JavaScript Loops Tutorial:
JavaScript Loops – W3Schools
JavaScript.info – Loops:
JavaScript.info – Loops
HTML Basics:
MDN Web Docs – HTML Basics:
HTML Basics – MDN Web Docs
W3Schools HTML Tutorial:
HTML Tutorial – W3Schools
Interactive Coding Practice:
Codecademy – JavaScript Course: