
Writing JavaScript Code: Introduction and Best Practices
Writing JavaScript Code: Introduction and Best Practices
JavaScript is a popular programming language used for web development. It is primarily used for adding interactivity and behavior to web pages. You can write JavaScript code in various places, depending on your requirements.
where to write code JavaScript codes ?
Here are some common locations where you can write JavaScript code:
1)Inline within HTML:
You can write JavaScript directly within the HTML file using the <script> tag. You can place the <script> tag in the <head> section or at the end of the <body> section of your HTML file.
For example:
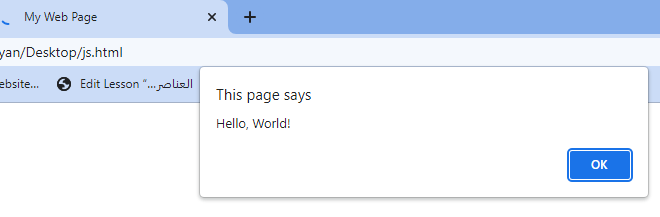
<html>
<head>
<title>My Web Page</title>
<script>
// JavaScript code goes here
alert("Hello, World!");
</script>
</head>
<body>
<!-- HTML content -->
</body>
</html>
2)External JavaScript file:
To keep your code organized and reusable, you can create an external JavaScript file with a .js extension and link it to your HTML file using the <script> tag.
This approach is useful for larger projects or when you want to reuse the same JavaScript code across multiple web pages.
1-create JavaScript file
From File >> save as >> then do the foolowing:

2-crate html file :
For example:
<html> <head> <title>My Web Page</title> <script src="script.js"></script> </head> <body> <!-- HTML content --> </body> </html>
From File >> save >> test.html

On desktop click test.html file to see the following:

In the above example, the JavaScript code is stored in a separate file named script.js in the same directory as the HTML file.
3)In the browser console:
Most modern web browsers provide a built-in developer console that allows you to execute JavaScript code directly. You can open the console by right-clicking on a web page, selecting “Inspect” or “Inspect Element,” and then navigating to the “Console” tab. The console is a useful tool for testing and debugging JavaScript code.

Integrated Development Environment (IDE):
If you’re working on a larger JavaScript project, it’s recommended to use an IDE or code editor like Visual Studio Code, Atom, or Sublime Text. These tools provide features like syntax highlighting, code suggestions, and debugging capabilities to help you write and manage your JavaScript code more efficiently.
Remember to enclose your JavaScript code within <script> tags when writing it within an HTML file. If you’re working in an external JavaScript file or an IDE, you don’t need to include the <script> tags.
Choose the appropriate location to write your JavaScript code based on your specific needs and project structure.
steps to write a code of js in notepad
To write JavaScript code using Notepad, you can follow these steps:
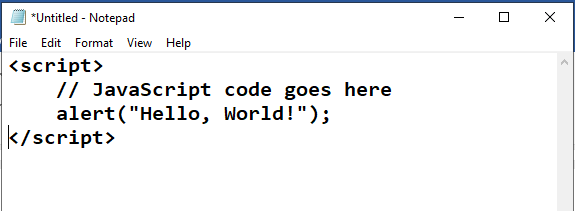
1-Open Notepad: Launch the Notepad application on your computer.
You can typically find it by searching for “Notepad” in the Start menu or by pressing the Windows key and typing “Notepad.”
2-Create a new file: Click on “File” in the top-left corner of the Notepad window and select “New” to create a new blank document.
3-Write your JavaScript code: Start writing your JavaScript code in the Notepad document.
For example, you can begin with a simple “Hello, World!” program:
alert(“Hello, World!”);
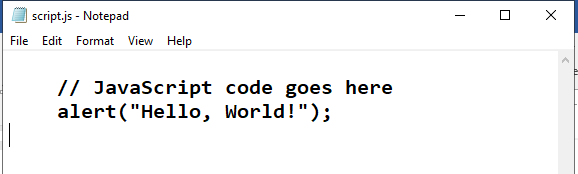
4- Save the file: Click on “File” and select “Save” or press Ctrl + S to save your JavaScript code.
Choose a suitable location on your computer and provide a name for the file, followed by the .js extension.
For example, you can save it as myscript.js.

5- Choose the “All Files” option: When saving the file, make sure to select the “All Files” option from the “Save as type” dropdown menu, instead of the default “Text Documents (*.txt)” option. This ensures that Notepad saves the file with the correct file extension.
6-Run your JavaScript code: To execute the JavaScript code, you’ll need to embed it within an HTML file or use a web browser’s developer console.
You can create an HTML file using Notepad as well and link your JavaScript file to it using the <script> tag, as mentioned in my previous response.
For example, create a new Notepad file, save it as index.html, and include the following code:
<!DOCTYPE html> <html> <head> <title>My Web Page</title> <script src="myscript.js"></script> </head> <body> <!-- HTML content --> </body> </html>
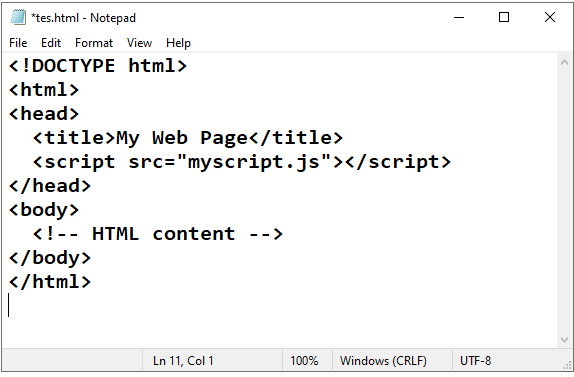
In this example, myscript.js is the name of the JavaScript file you created earlier. When you open the index.html file in a web browser, it will load the JavaScript file and execute the code.
That’s it! You’ve successfully written and saved JavaScript code using Notepad. Remember to open the HTML file in a web browser to see the JavaScript code in action.

How to write javaScript code in <head> tag ?
To write JavaScript code within the <head> section of an HTML file, you can follow this code example:
<!DOCTYPE html>
<html>
<head>
<title>My Web Page</title>
<script>
// JavaScript code
function sayHello() {
alert("welcome ");
}
// Call the function
sayHello();
</script>
</head>
<body>
<!-- HTML content -->
</body>
</html>

In this example, the JavaScript code is enclosed within the <script> tags in the <head> section of the HTML file.
Here’s a breakdown of the code:
1-The sayHello() function is defined. It displays an alert dialog with the message “Hello, World!”.
2-The function is then called within the <script> section.
3-The HTML file also includes a <title> tag within the <head> section for setting the page title.
4-The <body> section is included for adding HTML content to the web page.
When you open this HTML file in a web browser, it will execute the JavaScript code within the <head> section. In this case, an alert dialog will appear, displaying the message “Hello, World!”.
You can add more JavaScript code within the <script> tags in the <head> section to enhance the functionality of your web page. Remember to enclose your JavaScript code within the opening and closing <script> tags to indicate that it’s JavaScript code

How to write javaScript in JavaScript in <body> Tag ?
To write JavaScript code within the <body> section of an HTML file, you can follow this code example:
<!DOCTYPE html>
<html>
<head>
<title>My Web Page</title>
</head>
<body>
<!-- HTML content -->
<script>
// JavaScript code
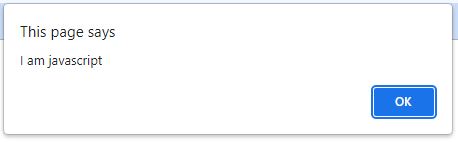
function sayHello() {
alert("I am javascript");
}
// Call the function
sayHello();
</script>
</body>
</html>

The output:
In this example, the JavaScript code is enclosed within the <script> tags in the <body> section of the HTML file, after the HTML content.
Here’s a breakdown of the code:
1-The HTML file includes a <title> tag within the <head> section for setting the page title.
2-The <body> section contains HTML content that you want to display on the web page.
3-After the HTML content, the <script> tags are used to enclose the JavaScript code.
4-Inside the <script> section, the sayHello() function is defined. It displays an alert dialog with the message “Hello, World!”.
5-The function is then called within the <script> section.
The JavaScript code executes after the HTML content is rendered, allowing you to manipulate or interact with the content dynamically.
When you open this HTML file in a web browser, it will execute the JavaScript code within the <body> section. In this case, an alert dialog will appear, displaying the message “Hello, World!”.
You can add more JavaScript code within the <script> tags in the <body> section to enhance the functionality of your web page. Remember to enclose your JavaScript code within the opening and closing <script> tags to indicate that it’s JavaScript code.
How to write javaScript code in external file ?
steps to write javaScript in External JavaScript
To write JavaScript code in an external JavaScript file and link it to your HTML file, you can follow these steps:
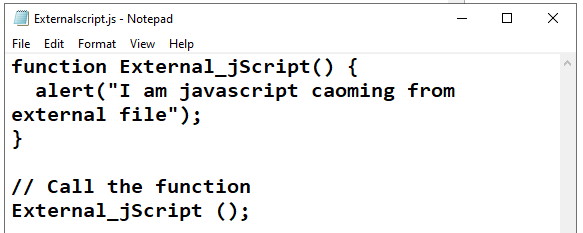
1)Create a new JavaScript file: Open a text editor, such as Notepad or any code editor of your choice, and create a new file. Save it with a .js file extension.
Write the following code insit it:
For example:
function External_jScript() {
alert("I am javascript caoming from external file");
}
// Call the function
External_jScript ();
2) you can save it as script.js.
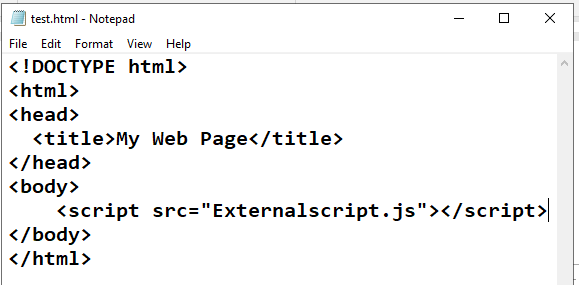
3) Create an HTML file: Open a new file in your text editor and save it with a .html file extension.
For example, you can save it as test.html.
<!DOCTYPE html> <html> <head> <title>My Web Page</title> <script src="Externalscript.js"></script> </head> <body> <!-- HTML content --> </body> </html>
4) click on test.html file to see the following output
The output:

How to link the JavaScript file to the HTML file ?
Link the JavaScript file to the HTML file:
1)In the HTML file, add the <script> tag inside the <head> or <body> section, depending on when you want the JavaScript code to be executed.
2)Use the src attribute to specify the path to your JavaScript file.
For example:
1-In the above example, the <script> tag with the src attribute is used to link the script.js file to the HTML file. Make sure the src attribute points to the correct file path relative to the HTML file.
2-Save and open the HTML file: Save the HTML file after adding the <script> tag.
3-Then, open the HTML file in a web browser.
When you open the HTML file in a web browser, it will load the JavaScript file and execute the code.
4-In this case, an alert dialog will appear, displaying the message ” I am javascript caoming from external file “.
By writing JavaScript in an external file, you can keep your code organized, separate your JavaScript logic from the HTML content, and reuse the JavaScript file across multiple HTML pages if needed.
Advantages of External JavaScript file
Using external JavaScript files in web development offers several advantages:
Code organization and reusability:
External JavaScript files allow you to separate your JavaScript code from your HTML content. This separation promotes better code organization, making it easier to read, maintain, and collaborate on your project. It also enables code reusability, as you can include the same JavaScript file in multiple HTML pages, reducing redundancy and improving efficiency.
Caching and performance:
When a web browser loads an HTML page, it caches external JavaScript files separately. Subsequent visits to other pages that reference the same JavaScript file can leverage the cached version, reducing the amount of data that needs to be downloaded and improving page loading times. Caching improves overall performance and provides a smoother user experience.
Modularity and scalability:
By breaking your JavaScript code into smaller, focused modules within separate files, you can create a modular and scalable architecture. This allows you to manage and update specific functionalities independently without affecting other parts of your application. It also simplifies code maintenance and makes it easier to add new features or make changes in the future.
Code sharing and collaboration:
External JavaScript files can be easily shared with other developers, allowing for collaboration on projects. You can share the JavaScript file separately, enabling others to work on the codebase without directly modifying the HTML files. This facilitates teamwork and fosters efficient development processes.
Improved browser compatibility:
Separating JavaScript code into external files allows you to include browser-specific code or polyfills only when needed. This approach helps ensure better cross-browser compatibility, as you can write specific code for different browsers and include it selectively based on browser detection or feature support.
Easier debugging:
Debugging becomes more straightforward when using external JavaScript files. With separate files, you can easily isolate and identify any issues within your JavaScript code. Debugging tools provided by code editors or web browsers can be used to trace and fix errors, enhancing the development and troubleshooting process.
Integration with build tools and version control:
External JavaScript files can be integrated into build systems, task runners, or bundlers to optimize and automate the build process. These tools allow you to minify, concatenate, or transpile your JavaScript files for improved performance. Additionally, using external files makes it easier to track changes, collaborate, and manage versions of your JavaScript code with version control systems like Git.
By leveraging external JavaScript files, you can enhance your development workflow, improve performance, and maintain a more modular and scalable codebase. It offers flexibility, code reusability, and efficient collaboration possibilities, making it a recommended approach for JavaScript development in web projects.
Ways of External References of javaScript file
There are a few different ways to reference an external JavaScript file in your HTML document.
Here are the most common methods:
Using the <script> tag:
The <script> tag is used to include an external JavaScript file in your HTML document. You can place this tag either in the <head> section or at the end of the <body> section. The src attribute specifies the path to the JavaScript file.
For example:
<!DOCTYPE html> <html> <head> <title>My Web Page</title> <script src="path/to/script.js"></script> </head> <body> <!-- HTML content --> </body> </html>
In the above example, the JavaScript file located at “path/to/script.js” will be loaded and executed.
Using the async or defer attributes:
You can further control how the external JavaScript file is loaded and executed by using the async or defer attributes.
These attributes are optional and can be added to the <script> tag.
The async attribute tells the browser to continue parsing the HTML document while fetching and executing the external script in the background.
It doesn’t guarantee the execution order of scripts.
For example:
<script src="path/to/script.js" async></script>
The defer attribute tells the browser to defer the execution of the script until after the HTML document has been completely parsed. Multiple scripts with the defer attribute will execute in the order they appear in the HTML.
For example:
<script src="path/to/script.js" defer></script>
Using async or defer can help improve the performance and load times of your web page, especially when the JavaScript file is large or not critical to the initial rendering of the page.
Using an external JavaScript module:
If you’re using JavaScript modules (ES modules) to organize your code, you can use the type=”module” attribute in the <script> tag to indicate that the JavaScript file is a module.
For example:
<script type="module" src="path/to/script.js"></script>
This enables you to use module syntax, such as import and export, in your JavaScript file.
Ensure that the file path specified in the src attribute is correct and relative to the location of your HTML file. You can use relative paths or absolute paths, depending on your project structure and requirements.
step by step complete code example by using :Using the <script> tag:
Here’s a step-by-step complete code example using the <script> tag to reference an external JavaScript file:
1-Create a new HTML file:
Open a text editor and create a new file.
Save it with a .html file extension.
For example, you can save it as test.html.
2-Create a new JavaScript file:
In the same directory, create a new JavaScript file. Save it with a .js file extension.
For example, you can save it as script.js.
3-Write your JavaScript code:
Open the script.js file in your text editor and write your JavaScript code.
For this example, let’s create a simple function that displays an alert with a message.
function sayHello() {
alert("Hello, World!");
}
4-Link the JavaScript file in the HTML file:
Open the index.html file in your text editor and add the following code inside the <head> or <body> section, depending on when you want the JavaScript code to be executed:
<!DOCTYPE html> <html> <head> <title>My Web Page</title> <script src="script.js"></script> </head> <body> <!-- HTML content --> </body> </html>
In this example, the <script> tag with the src attribute links the script.js file to the HTML file. Make sure the src attribute points to the correct file path relative to the HTML file.
Call the JavaScript function:
Add an HTML element, such as a button or a link, and call the JavaScript function when the element is clicked.
For example, add the following code inside the <body> section:
<button onclick="sayHello()">Click me</button>
In this example, the onclick attribute triggers the sayHello() function when the button is clicked.
Save and open the HTML file: Save the index.html file and open it in a web browser. You should see the HTML content and a button. When you click the button, an alert dialog should appear with the message “Hello, World!”.
That’s it! You have successfully created an HTML file that references an external JavaScript file using the <script> tag. When the HTML file is loaded in a web browser, the JavaScript code will be executed, allowing you to interact with the page and trigger actions based on user interactions.
complete code example by using Using the async or defer attributes:
Here’s a complete code example using the async or defer attributes to reference an external JavaScript file:
1-Create a new HTML file: Open a text editor and create a new file. Save it with a .html file extension.
For example, you can save it as index.html.
2-Create a new JavaScript file: In the same directory, create a new JavaScript file. Save it with a .js file extension.
For example, you can save it as script.js.
3-Write your JavaScript code: Open the script.js file in your text editor and write your JavaScript code.
For this example, let’s create a simple function that displays an alert with a message.
function sayHello() {
alert("Hello, World!");
}
4-Link the JavaScript file in the HTML file using async or defer: Open the index.html file in your text editor and add the following code inside the <head> or <body> section, depending on when you want the JavaScript code to be executed:
How To use the async attribute ?
<!DOCTYPE html> <html> <head> <title>My Web Page</title> <script async src="script.js"></script> </head> <body> <!-- HTML content --> </body> </html>
The output:

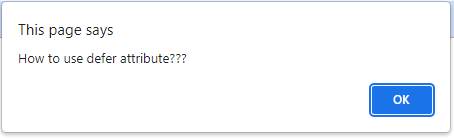
To use the defer attribute:
1-Create js file as the following:

2-create html file as the following :
<!DOCTYPE html> <html> <head> <title>My Web Page</title> <script defer src="script.js"></script> </head> <body> <!-- HTML content --> </body> </html>

In both examples, the <script> tag with the src attribute links the script.js file to the HTML file. The async or defer attribute is included to control the loading and execution behavior of the JavaScript file.
The output:
Quiz with answers about this lesson
Here’s a multiple-choice quiz with answers based on the lesson:
1-How can you include JavaScript code in an HTML file?
- a) By using the <style> tag
- b) By using the <javascript> tag
- c) By using the <script> tag (Answer)
- d) By using the <code> tag
2-What is the purpose of an external JavaScript file?
- a) To style HTML elements
- b) To include CSS code
- c) To separate and organize JavaScript code from HTML content (Answer)
- d) To define the structure of an HTML document
3-How do you reference an external JavaScript file using the <script> tag?
- a) Using the src attribute (Answer)
- b) Using the href attribute
- c) Using the file attribute
- d) Using the path attribute
4-Which attribute can be used to specify that the JavaScript file should be loaded and executed asynchronously?
- a) sync
- b) async (Answer)
- c) defer
- d) asynchronous
5-What is the advantage of using external JavaScript files?
- a) It makes the HTML file smaller
- b) It reduces the number of HTML tags
- c) It promotes code organization and reusability (Answer)
- d) It improves the performance of HTML rendering
6-How can you call a JavaScript function from an HTML element?
- a) Using the run attribute
- b) Using the execute attribute
- c) Using the click attribute
- d) Using the onclick attribute (Answer)
7-Which method allows you to load and execute an external JavaScript file after the HTML document has been completely parsed?
- a) Using the async attribute
- b) Using the defer attribute (Answer)
- c) Using the load attribute
- d) Using the postpone attribute
8-What is the purpose of the sayHello() function in the code examples?
- a) To display an alert with the message “Hello, World!” (Answer)
- b) To change the background color of the web page
- c) To insert a new HTML element into the document
- d) To load another JavaScript file
Answers:
- c) By using the <script> tag
- c) To separate and organize JavaScript code from HTML content
- a) Using the src attribute
- b) async
- c) It promotes code organization and reusability
- d) Using the onclick attribute
- b) Using the defer attribute
- a) To display an alert with the message “Hello, World!”
9-Which of the following is an advantage of using external JavaScript files?
- a) It increases the size of the HTML file.
- b) It slows down the loading of the web page.
- c) It allows for better code maintenance and collaboration. (Answer)
- d) It restricts the functionality of the JavaScript code.
10-How can you include an external JavaScript file in multiple HTML pages without duplicating code?
- a) Use the <style> tag to import the JavaScript file.
- b) Use the <include> tag to import the JavaScript file.
- c) Use the <script> tag with the src attribute. (Answer)
- d) Use the <template> tag to define the JavaScript file.
11-Which attribute can be used to specify a fallback script if the external JavaScript file fails to load?
- a) fallback
- b) load
- c) onerror (Answer)
- d) retry
12-Which of the following is the correct syntax for adding an external JavaScript file using the <script> tag with the async attribute?
- a) <script src=”script.js” async>
- b) <script async src=”script.js”>
- c) <script async=”true” src=”script.js”> (Answer)
- d) <script async=”async” src=”script.js”>
13-How does using an external JavaScript file improve browser compatibility?
- a) It automatically converts JavaScript code to match browser requirements.
- b) It allows for the inclusion of multiple JavaScript libraries in a single file.
- c) It enables the use of browser-specific code or polyfills only when needed. (Answer)
- d) It eliminates the need for testing on different web browsers.
Answers:
- c) It allows for better code maintenance and collaboration.
- c) Use the <script> tag with the src attribute.
- c) onerror
- c) <script async=”true” src=”script.js”>
- c) It enables the use of browser-specific code or polyfills only when needed.
14-Which attribute can be used to specify that the JavaScript code should be executed after the HTML document has been completely parsed?
- a) parse
- b) execute
- c) load
- d) defer (Answer)
15-How can you include an external JavaScript file from a different domain?
- a) It is not possible due to security restrictions.
- b) Use the <script> tag with the crossorigin attribute. (Answer)
- c) Use the <external> tag to specify the domain.
- d) Use the include() function in JavaScript to import the file.
16-Which of the following is an advantage of using external JavaScript files over inline JavaScript code?
- a) Inline code offers better performance.
- b) External files can be cached by the browser for faster subsequent page loads. (Answer)
- c) Inline code provides better security.
- d) External files require less bandwidth.
17-How can you include multiple external JavaScript files in an HTML document?
- a) Separate each <script> tag with a comma.
- b) Include all files within a single <script> tag.
- c) Use multiple <script> tags, each with its own src attribute. (Answer)
- d) Use the <include> tag to reference the files.
18-Which attribute can be used to load an external JavaScript file asynchronously without blocking the rendering of the HTML document?
- a) async (Answer)
- b) defer
- c) load
- d) non-blocking
Answers:
- d) defer
- b) Use the <script> tag with the crossorigin attribute.
- b) External files can be cached by the browser for faster subsequent page loads.
- c) Use multiple <script> tags, each with its own src attribute.
- a) async
19-Which of the following is the correct way to comment a line of JavaScript code?
- a) // Comment
- b) <!– Comment –>
- c) /* Comment */ (Answer)
- d) # Comment
20-How can you check if an external JavaScript file has finished loading?
- a) Use the isLoaded property of the <script> tag.
- b) Check the readyState property of the <script> tag. (Answer)
- c) Use the isLoaded method of the window object.
- d) Check the loadStatus property of the <script> tag.
21-Which of the following methods can be used to dynamically create a <script> tag in JavaScript?
- a) document.createElement(‘script’) (Answer)
- b) document.createTag(‘script’)
- c) document.newElement(‘script’)
- d) document.addScriptTag(‘script’)
22-How can you include an external JavaScript file in an HTML document without blocking the rendering of the page?
- a) Use the <include> tag with the async attribute.
- b) Use the <script> tag with the async attribute.
- c) Use the <script> tag with the defer attribute. (Answer)
- d) Use the <include> tag with the defer attribute.
23-Which of the following is an advantage of using the defer attribute over the async attribute for loading external JavaScript files?
- a) The defer attribute offers better performance.
- b) The defer attribute allows scripts to be executed in the order they appear in the HTML document. (Answer)
- c) The defer attribute ensures scripts are loaded in parallel with other resources.
- d) The defer attribute guarantees that the script will be executed immediately after loading.
Answers:
- c) /* Comment */
- b) Check the readyState property of the <script> tag.
- a) document.createElement(‘script’)
- c) Use the <script> tag with the defer attribute.
- b) The defer attribute allows scripts to be executed in the order they appear in the HTML document.