
How Display the data using HTML and PHP from XAMPP MySQL?
Learn Web Development: Creating a Contact Management Application with HTML, PHP MySQL in XAMPP
Introduction:
Explore the fundamentals of web development by creating a robust contact management application. This step-by-step guide will walk you through setting up XAMPP, creating a MySQL database, establishing connections with PHP, and building HTML forms. Enhance your skills in managing dynamic data and gain hands-on experience with the technologies commonly used in web development.
To display data using HTML and PHP from a MySQL database in XAMPP, you’ll need to follow these steps:
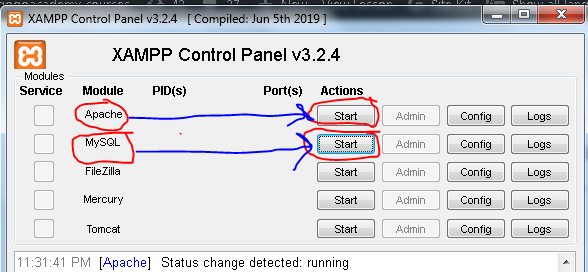
Step 1: Set up XAMPP:
Make sure you have XAMPP installed on your system and that the Apache and MySQL services are running.
Step 2:Create a MySQL Database:
Use phpMyAdmin or the MySQL command line to create a database and a table to store your data.
Step 3:Create a Connection Script:
Create a PHP script to connect to the MySQL database. Save this script with a “.php” extension, for example,
db_connect.php
<?php
$servername = "localhost";
$username = "root";
$password = "";
$dbname = "your_database_name";
// Create connection
$conn = new mysqli($servername, $username, $password, $dbname);
// Check connection
if ($conn->connect_error) {
die("Connection failed: " . $conn->connect_error);
}
?>
Make sure to replace “your_database_name” with the name of your database.
Step 5:Create a PHP Script to Fetch and Display Data:
- Create another PHP script to fetch data from the database and display it.
- Save this script with a “.php” extension.
for example, display_data.php.
<?php
include 'db_connect.php';
// Fetch data from the database
$sql = "SELECT * FROM your_table_name";
$result = $conn->query($sql);
if ($result->num_rows > 0) {
// Output data in a table
echo "<table border='1'>
<tr>
<th>ID</th>
<th>Name</th>
<th>Email</th>
</tr>";
while($row = $result->fetch_assoc()) {
echo "<tr>
<td>".$row["id"]."</td>
<td>".$row["name"]."</td>
<td>".$row["email"]."</td>
</tr>";
}
echo "</table>";
} else {
echo "0 results";
}
$conn->close();
?>
- Replace “your_table_name” with the name of your table.
- Place the HTML and PHP Files in the XAMPP “htdocs” Directory:
Move both db_connect.php and display_data.php files into the “htdocs” directory of your XAMPP installation.
Step 6:Access the Script in a Web Browser:
Open your web browser and navigate to:
http://localhost/display_data.php.
This will execute the PHP script and display the data from your MySQL database.
Complete example of displaying data from a MySQL database
let’s go through a complete example of displaying data from a MySQL database using HTML and PHP in XAMPP.
Step 1: Set up XAMPP
Ensure that XAMPP is installed and both Apache and MySQL services are running.
Step 2: Create a MySQL Database
- Open phpMyAdmin (usually accessible at:
(http://localhost/phpmyadmin) and create a new database.
Let’s name it test10_db.

Inside this database, create a table named users with columns:
id (INT, auto-increment, primary key), name (VARCHAR), and email (VARCHAR).
Step 3: Create a Connection Script
- create a folder named project10 inside “htdocs“
- Create a new file named db_connect.php in project10 folder inside the XAMPP “htdocs” directory.
Add the following code to establish a connection to the MySQL database:
<?php
$servername = "localhost";
$username = "root";
$password = "";
$dbname = "test10";
// Create connection
$conn = new mysqli($servername, $username, $password, $dbname);
// Check connection
if ($conn->connect_error) {
die("Connection failed: " . $conn->connect_error);
}
?>
Step 4: Create a PHP Script to Fetch and Display Data
- Create a new file named display_data.php in project10 folder inside “htdocs“
- Add the following code to fetch and display data from the users table:
<?php
include 'db_connect.php';
// Fetch data from the database
$sql = "SELECT * FROM users";
$result = $conn->query($sql);
// Display data in an HTML table
if ($result->num_rows > 0) {
echo "<html>
<head>
<title>User Data</title>
</head>
<body>
<h2>User Data</h2>
<table border='1'>
<tr>
<th>ID</th>
<th>Name</th>
<th>Email</th>
</tr>";
while($row = $result->fetch_assoc()) {
echo "<tr>
<td>".$row["id"]."</td>
<td>".$row["name"]."</td>
<td>".$row["email"]."</td>
</tr>";
}
echo "</table></body></html>";
} else {
echo "0 results";
}
$conn->close();
?>
Step 5: Access the Script in a Web Browser
Open your web browser and go to:
http://localhost/display_data.php.
This will execute the PHP script and display the data from the MySQL database in an HTML table.
An application: A list of contacts step by step explanation
Let’s create a simple web application that allows users to view and manage a list of contacts stored in a MySQL database using HTML and PHP in XAMPP.
Step 1: Set up XAMPP
Ensure that XAMPP is installed on your computer, and start the Apache and MySQL services.
Step 2: Create a MySQL Database
- Open phpMyAdmin and create a new database named contacts.
- Inside this database, create a table named contact_list with columns:
id (INT, auto-increment, primary key), name (VARCHAR), email (VARCHAR), and phone (VARCHAR).
Step 3: Create a Connection Script
- Create a new file named db_connect.php in the XAMPP “htdocs” directory.
- Add the following code to establish a connection to the MySQL database:
<?php
$servername = "localhost";
$username = "root";
$password = "";
$dbname = "contacts";
// Create connection
$conn = new mysqli($servername, $username, $password, $dbname);
// Check connection
if ($conn->connect_error) {
die("Connection failed: " . $conn->connect_error);
}
?>
Step 4: Create an HTML Form to Add Contacts
- create a folder named “project11” in the “htdocs” directory.
- Create a new file named add_contact.php in “project11” inside “htdocs” directory.
- Add the following code to create a simple HTML form for adding contacts:
<!DOCTYPE html> <html lang="en"> <head> <meta charset="UTF-8"> <meta name="viewport" content="width=device-width, initial-scale=1.0"> <title>Add Contact</title> </head> <body> <h2>Add Contact</h2> <form action="process_contact.php" method="post"> <label for="name">Name:</label> <input type="text" name="name" required><br> <label for="email">Email:</label> <input type="email" name="email" required><br> <label for="phone">Phone:</label> <input type="tel" name="phone" required><br> <input type="submit" value="Add Contact"> </form> </body> </html>
Step 5: Create a PHP Script to Process and Insert Contacts
- Create a new file named process_contact.php in “project11” folder
- in the “htdocs” directory.
- Add the following code to process the form submission and insert the contact into the database:
<?php
include 'db_connect.php';
if ($_SERVER["REQUEST_METHOD"] == "POST") {
$name = $_POST["name"];
$email = $_POST["email"];
$phone = $_POST["phone"];
$sql = "INSERT INTO contact_list (name, email, phone) VALUES ('$name', '$email', '$phone')";
if ($conn->query($sql) === TRUE) {
echo "Contact added successfully.";
} else {
echo "Error: " . $sql . "<br>" . $conn->error;
}
}
$conn->close();
?>
Step 6: Create a PHP Script to Display Contacts
- Create a new file named display_contacts.php in “project11” folder inside the “htdocs” directory.
- Add the following code to display the list of contacts from the database:
<?php
include 'db_connect.php';
// Fetch data from the database
$sql = "SELECT * FROM contact_list";
$result = $conn->query($sql);
// Display data in an HTML table
if ($result->num_rows > 0) {
echo "<html>
<head>
<title>Contact List</title>
</head>
<body>
<h2>Contact List</h2>
<table border='1'>
<tr>
<th>ID</th>
<th>Name</th>
<th>Email</th>
<th>Phone</th>
</tr>";
while($row = $result->fetch_assoc()) {
echo "<tr>
<td>".$row["id"]."</td>
<td>".$row["name"]."</td>
<td>".$row["email"]."</td>
<td>".$row["phone"]."</td>
</tr>";
}
echo "</table></body></html>";
} else {
echo "No contacts found.";
}
$conn->close();
?>
Step 7: Access the Application in a Web Browser
- Open your web browser and go to:
http://localhost/project10/add_contact.php to add contacts.
- After adding contacts, you can view the contact list by navigating to:
{http://localhost/project10/display_contacts.php)
Quiz about this lesson:15 questions with explanation
- Here’s a quiz with 15 questions related to the lesson on creating a web application with HTML, PHP, and MySQL using XAMPP.
- Each question is followed by an explanation to help reinforce the concepts.
Quiz:
1. What is XAMPP used for?
a. Video editing
b. Web development
c. Graphic design
d. Game development
Explanation: XAMPP is a free and open-source cross-platform web server solution stack package developed by Apache Friends. It is used for web development.
2. In the context of MySQL databases, what does PHPMyAdmin allow you to do?
a. Manage files
b. Edit images
c. Manage database operations
d. Write PHP code
Explanation: PHPMyAdmin is a web-based tool for managing MySQL databases. It allows you to perform various database operations such as creating tables, inserting data, and running SQL queries.
3. What should you check after establishing a connection to a MySQL database in PHP?
a. Check if the HTML is valid
b. Check if the CSS is applied
c. Check if the connection is successful
d. Check if JavaScript is working
Explanation: After establishing a connection to a MySQL database in PHP, you should check if the connection is successful to avoid errors in subsequent database operations.
4. In a MySQL database, what is the purpose of the id column in a table?
a. It represents the contact’s email
b. It is used for storing names
c. It is an auto-incrementing primary key
d. It is optional and not necessary
Explanation: The id column is often used as an auto-incrementing primary key in a MySQL table to uniquely identify each record.
5. Which file should you include in your PHP scripts to establish a connection to the MySQL database?
a. connect.php
b. database.php
c. db_connect.php
d. mysql_connect.php
Explanation: You should include the db_connect.php file in your PHP scripts to establish a connection to the MySQL database.
6. What HTML element is used to create a form in an HTML document?
a. <input>
b. <form>
c. <label>
d. <select>
Explanation: The <form> element is used to create a form in an HTML document.
7. What method attribute in an HTML form is used to send data to the server?
a. GET
b. POST
c. PUT
d. FETCH
Explanation: The POST method in an HTML form is used to send data to the server.
8. What does the method attribute in an HTML form specify?
a. The type of data being sent
b. The action to be performed on the form
c. The script to process the form data
d. The HTTP method used to send form data
Explanation: The method attribute in an HTML form specifies the HTTP method used to send form data. It can be either GET or POST.
9. In the context of HTML forms, what does the action attribute specify?
a. The method used to send form data
b. The type of data being sent
c. The script to process the form data
d. The action to be performed on the form
Explanation: The action attribute in an HTML form specifies the script to process the form data.
10. What does the required attribute do in an HTML input field?
a. It specifies the data type of the input
b. It makes the input field mandatory
c. It sets a default value for the input
d. It specifies the maximum length of the input
Explanation: The required attribute in an HTML input field makes the field mandatory, and the form cannot be submitted without entering a value.
11. What does the fetch_assoc() function do in PHP?
a. Fetches a numeric array of results
b. Fetches an associative array of results
c. Fetches the first result only
d. Fetches all results as a string
Explanation: The fetch_assoc() function in PHP fetches a row as an associative array.
12. How can you prevent SQL injection in PHP?
a. Use prepared statements and parameterized queries
b. Encode all input data with base64
c. Disable user input in the application
d. Use JavaScript to validate user input
Explanation: To prevent SQL injection in PHP, you should use prepared statements and parameterized queries.
13. What is the purpose of the mysqli_close() function in PHP?
a. To open a new MySQL connection
b. To close the PHP script
c. To close a previously opened MySQL connection
d. To execute a MySQL query
Explanation: The mysqli_close() function in PHP is used to close a previously opened MySQL connection.
14. What is the correct way to comment out a block of code in PHP?
a. <!– This is a comment –>
b. // This is a comment
c. /* This is a comment */
d. # This is a comment
Explanation: The correct way to comment out a block of code in PHP is using /* This is a comment */.
15. How can you access your web application in a browser after placing files in the “htdocs” directory?
a. http://localhost
b. http://localhost/index.html
c. http://localhost/myapp
d. http://localhost/htdocs
Explanation: After placing files in the “htdocs” directory, you can access your web application at http://localhost.