
How to create database,insert data, display data in XAMPP
How to Create database, Insert, and Display Data using PHP and HTML in XAMPP
Introduction:
Explore the fundamentals of building dynamic web applications by creating a database, inserting data, and displaying information using PHP and HTML within the XAMPP development environment. This comprehensive guide will walk you through essential steps to Setting up a basic database using PHP and XAMPP involves several steps.
Here’s a step-by-step guide to create a database, insert data, and display data using PHP:
Step 1: Install XAMPP
If you haven’t installed XAMPP, download and install it from the official website: XAMPP.
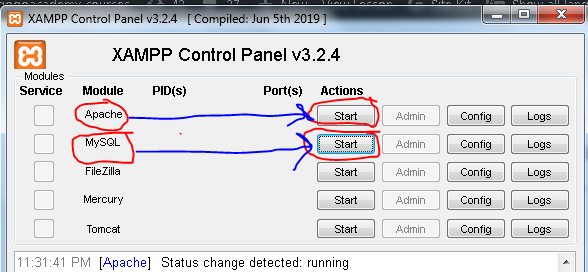
Step 2: Start XAMPP Server
Launch the XAMPP control panel and start the Apache server.
Step 3: Create a Database
Open your web browser and go to:
http://localhost/phpmyadmin/.
Click on the “Databases” tab.
Enter a name for your database (e.g., “gogodatabase“) and click “Create”.
Step 4: Create a Table
Select your newly created database from the left sidebar.
Click on the “SQL” tab.
Execute the following SQL query to create a sample table:
sql
CREATE TABLE users ( id INT PRIMARY KEY AUTO_INCREMENT, username VARCHAR(50) NOT NULL, email VARCHAR(100) NOT NULL );

Step 5: create a folder naming it (myproject)in “htdocs” directory
to save the following file in it.
its path is :http://localhost/myproject
Create PHP Files and save it in (myproject) folder
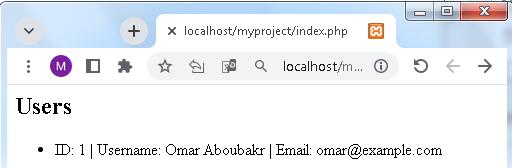
index.php – For displaying data:
<?php
$conn = new mysqli("localhost", "root", "", "gogodatabase");
if ($conn->connect_error) {
die("Connection failed: " . $conn->connect_error);
}
$result = $conn->query("SELECT * FROM users");
echo "<h2>Users</h2>";
echo "<ul>";
while ($row = $result->fetch_assoc()) {
echo "<li>ID: " . $row["id"] . " | Username: " . $row["username"] . " | Email: " . $row["email"] . "</li>";
}
echo "</ul>";
$conn->close();
?>
insert.php – For inserting data:
<?php
$conn = new mysqli("localhost", "root", "", "mydatabase");
if ($conn->connect_error) {
die("Connection failed: " . $conn->connect_error);
}
$username = "Omar Aboubakr";
$email = "omar@example.com";
$sql = "INSERT INTO users (username, email) VALUES ('$username', '$email')";
if ($conn->query($sql) === TRUE) {
echo "New record created successfully";
} else {
echo "Error: " . $sql . "<br>" . $conn->error;
}
$conn->close();
?>
Step 6: Run the Examples
Open your web browser and go to :
http://localhost/myprojectinsert.php to insert data.
Then, go to http://localhost/myproject/index.php to view the displayed data.
That’s it! we’ve created a basic PHP application with XAMPP to manage a database.
How to use HTML Form to create database,insert data, display data in XAMPP
Here’s a step-by-step guide on how to use an HTML form to create a database, insert data, and display data using PHP in XAMPP:
Step 1: Install XAMPP
If you haven’t installed XAMPP, download and install it from the official website: XAMPP.
Step 2: Start XAMPP Server
Launch the XAMPP control panel and start the Apache server.
Step 3: Create a Database
Open your web browser and go to:
http://localhost/phpmyadmin/.
Click on the “Databases” tab.
Enter a name for your database (e.g., “mydatabase2”) and click “Create”.
Step 4: Create a Table
Select your newly created database from the left sidebar.
Click on the “SQL” tab.
Execute the following SQL query to create a sample table:
sql
CREATE TABLE users (
id INT PRIMARY KEY AUTO_INCREMENT,
username VARCHAR(50) NOT NULL,
email VARCHAR(100) NOT NULL
);
Step 5: Create HTML Form
Create an HTML form to take user input.
Create a new file called form.html in your XAMPP’s “htdocs” directory:
<!DOCTYPE html> <html lang="en"> <head> <meta charset="UTF-8"> <meta name="viewport" content="width=device-width, initial-scale=1.0"> <title>User Registration Form</title> </head> <body> <h2>User Registration Form</h2> <form action="process.php" method="post"> <label for="username">Username:</label> <input type="text" name="username" required> <br> <label for="email">Email:</label> <input type="email" name="email" required> <br> <input type="submit" value="Register"> </form> </body> </html>
Step 6: Create PHP File for Data Processing
Create a new file called process.php in your XAMPP’s “htdocs” directory:
<?php
if ($_SERVER["REQUEST_METHOD"] == "POST") {
$conn = new mysqli("localhost", "root", "", "mydatabase");
if ($conn->connect_error) {
die("Connection failed: " . $conn->connect_error);
}
$username = $_POST["username"];
$email = $_POST["email"];
$sql = "INSERT INTO users (username, email) VALUES ('$username', '$email')";
if ($conn->query($sql) === TRUE) {
echo "Registration successful";
} else {
echo "Error: " . $sql . "<br>" . $conn->error;
}
$conn->close();
}
?>
Step 7: Display Data
You can create another PHP file to display data.
Create a new file called display.php in your XAMPP’s “htdocs” directory:
<?php
$conn = new mysqli("localhost", "root", "", "mydatabase");
if ($conn->connect_error) {
die("Connection failed: " . $conn->connect_error);
}
$result = $conn->query("SELECT * FROM users");
echo "<h2>Users</h2>";
echo "<ul>";
while ($row = $result->fetch_assoc()) {
echo "<li>ID: " . $row["id"] . " | Username: " . $row["username"] . " | Email: " . $row["email"] . "</li>";
}
echo "</ul>";
$conn->close();
?>
Step 8: Run the Examples
Open your web browser and go to:
http://localhost/form.html to fill out the registration form and submit the data.
The data will be processed by process.php and inserted into the database.
Go to http://localhost/display.php to view the displayed data.
That’s it! You’ve created a basic HTML form that interacts with a PHP script to insert data into a database and another script to display the data.
How to use HTML from to:create database,insert data, display data in XAMPP:
Creating a database, inserting data, and displaying data using PHP and HTML form in XAMPP involves several steps. Below is a step-by-step guide:
Step 1: Install XAMPP
If you haven’t installed XAMPP, download and install it from the official website: XAMPP.
Step 2: Start XAMPP Server
Launch the XAMPP control panel and start the Apache server.
Step 3: Create HTML Form
Create an HTML form to take user input. Create a new file called index.html in your XAMPP’s “htdocs” directory:
<!DOCTYPE html> <html lang="en"> <head> <meta charset="UTF-8"> <meta name="viewport" content="width=device-width, initial-scale=1.0"> <title>User Registration Form</title> </head> <body> <h2>User Registration Form</h2> <form action="process.php" method="post"> <label for="username">Username:</label> <input type="text" name="username" required> <br> <label for="email">Email:</label> <input type="email" name="email" required> <br> <input type="submit" value="Register"> </form> </body> </html>
Step 4: Create PHP File for Data Processing
Create a new file called process.php in your XAMPP’s “htdocs” directory:
<?php
if ($_SERVER["REQUEST_METHOD"] == "POST") {
$conn = new mysqli("localhost", "root", "", "mydatabase");
if ($conn->connect_error) {
die("Connection failed: " . $conn->connect_error);
}
$username = $_POST["username"];
$email = $_POST["email"];
// Create database and table if not exists
$conn->query("CREATE DATABASE IF NOT EXISTS mydatabase");
$conn->query("USE mydatabase");
$conn->query("CREATE TABLE IF NOT EXISTS users (
id INT PRIMARY KEY AUTO_INCREMENT,
username VARCHAR(50) NOT NULL,
email VARCHAR(100) NOT NULL
)");
// Insert data into the table
$sql = "INSERT INTO users (username, email) VALUES ('$username', '$email')";
if ($conn->query($sql) === TRUE) {
echo "Registration successful";
} else {
echo "Error: " . $sql . "<br>" . $conn->error;
}
$conn->close();
}
?>
Step 5: Display Data
You can create another PHP file to display data.
Create a new file called display.php in your XAMPP’s “htdocs” directory:
<?php
$conn = new mysqli("localhost", "root", "", "mydatabase");
if ($conn->connect_error) {
die("Connection failed: " . $conn->connect_error);
}
$result = $conn->query("SELECT * FROM users");
echo "<h2>Users</h2>";
echo "<ul>";
while ($row = $result->fetch_assoc()) {
echo "<li>ID: " . $row["id"] . " | Username: " . $row["username"] . " | Email: " . $row["email"] . "</li>";
}
echo "</ul>";
$conn->close();
?>
Step 6: Run the Examples
- Open your web browser and go to:
- http://localhost/index.html to fill out the registration form and submit the data.
The data will be processed by process.php and inserted into the database. - Go to http://localhost/display.php to view the displayed data.
That’s it! You’ve created a basic HTML form that interacts with a PHP script to insert data into a database and another script to display the data.
An application: registration and login system
In this example, I’ll guide you through creating a simple user registration system with user authentication, data validation, and an improved database structure using PHP, HTML, and MySQL in XAMPP.
Step 1: Database Structure
Create a new database called advanced_app in phpMyAdmin.
Then, create two tables: users and sessions.
sql
-- Table structure for table `users` CREATE TABLE `users` ( `id` INT PRIMARY KEY AUTO_INCREMENT, `username` VARCHAR(50) NOT NULL, `email` VARCHAR(100) NOT NULL, `password` VARCHAR(255) NOT NULL );
-- Table structure for table `sessions` CREATE TABLE `sessions` ( `id` INT PRIMARY KEY AUTO_INCREMENT, `user_id` INT NOT NULL, `session_token` VARCHAR(255) NOT NULL, `expiry_time` DATETIME NOT NULL );
Step 2: User Registration Form
Create an HTML file called register.html:
<!DOCTYPE html> <html lang="en"> <head> <meta charset="UTF-8"> <meta name="viewport" content="width=device-width, initial-scale=1.0"> <title>User Registration</title> </head> <body> <h2>User Registration</h2> <form action="register.php" method="post"> <label for="username">Username:</label> <input type="text" name="username" required> <br> <label for="email">Email:</label> <input type="email" name="email" required> <br> <label for="password">Password:</label> <input type="password" name="password" required> <br> <input type="submit" value="Register"> </form> </body> </html>
Step 3: User Registration PHP
Create a PHP file called register.php:
<?php
if ($_SERVER["REQUEST_METHOD"] == "POST") {
$conn = new mysqli("localhost", "root", "", "advanced_app");
if ($conn->connect_error) {
die("Connection failed: " . $conn->connect_error);
}
$username = $_POST["username"];
$email = $_POST["email"];
$password = password_hash($_POST["password"], PASSWORD_BCRYPT);
$stmt = $conn->prepare("INSERT INTO users (username, email, password) VALUES (?, ?, ?)");
$stmt->bind_param("sss", $username, $email, $password);
if ($stmt->execute()) {
echo "Registration successful";
} else {
echo "Error: " . $stmt->error;
}
$stmt->close();
$conn->close();
}
?>
Step 4: User Login Form
Create an HTML file called login.html:
<!DOCTYPE html> <html lang="en"> <head> <meta charset="UTF-8"> <meta name="viewport" content="width=device-width, initial-scale=1.0"> <title>User Login</title> </head> <body> <h2>User Login</h2> <form action="login.php" method="post"> <label for="email">Email:</label> <input type="email" name="email" required> <br> <label for="password">Password:</label> <input type="password" name="password" required> <br> <input type="submit" value="Login"> </form> </body> </html>
Step 5: User Login PHP
Create a PHP file called login.php:
<?php
if ($_SERVER["REQUEST_METHOD"] == "POST") {
$conn = new mysqli("localhost", "root", "", "advanced_app");
if ($conn->connect_error) {
die("Connection failed: " . $conn->connect_error);
}
$email = $_POST["email"];
$password = $_POST["password"];
$stmt = $conn->prepare("SELECT id, username, email, password FROM users WHERE email = ?");
$stmt->bind_param("s", $email);
$stmt->execute();
$result = $stmt->get_result();
$user = $result->fetch_assoc();
if ($user && password_verify($password, $user["password"])) {
// Successful login, you can set session or cookie here
echo "Login successful. Welcome, " . $user["username"] . "!";
} else {
echo "Invalid email or password.";
}
$stmt->close();
$conn->close();
}
?>
This is a simplified example to demonstrate user registration and login. In a real-world scenario, you would implement additional security measures, session handling, and more. Remember to hash passwords and never store them in plain text.
Quiz about creating a database and inserting data
Here’s a quiz with 15 questions about creating a database, inserting data, and displaying data using PHP and HTML in XAMPP.
Each question is followed by a brief explanation of the correct answer.
Quiz:
1-What is the purpose of XAMPP in this lesson?
a) To create HTML forms
b) To manage databases
c) To display data
d) All of the above
Explanation: b) XAMPP is used to set up a local server environment that includes Apache and MySQL for managing databases.
2-Which file is used to take user input in the form of HTML?
a) index.html
b) process.php
c) display.php
d) form.html
Explanation: a) The HTML form is created in the index.html file.
3-What is the method attribute in the HTML form tag used for?
a) To specify the action page
b) To define the form method
c) To set form enctype
d) To define form validation
Explanation: b) The method attribute is used to define the form submission method, such as POST or GET.
4-In the process.php file, what does $_SERVER[“REQUEST_METHOD”] == “POST” check?
a) Server IP address
b) Request method
c) Database connection status
d) File permissions
Explanation: b) It checks if the form was submitted using the POST method.
5-Which SQL statement is used to create a database in process.php if it doesn’t exist?
a) CREATE DATABASE
b) USE DATABASE
c) SELECT DATABASE
d) SET DATABASE
Explanation: a) CREATE DATABASE IF NOT EXISTS is used to create a database if it doesn’t exist.
6-What is the purpose of the mysqli class in PHP?
a) To create HTML forms
b) To interact with MySQL databases
c) To style web pages
d) To handle form validation
Explanation: b) The mysqli class is used to interact with MySQL databases in PHP.
7-Which file is responsible for inserting data into the database?
a) index.html
b) process.php
c) display.php
d) form.html
Explanation: b) The process.php file is responsible for processing and inserting data into the database.
8-In the SQL query, what does AUTO_INCREMENT do?
a) Sets the column as the primary key
b) Automatically increments the column value
c) Deletes the database records
d) Updates the database records
Explanation: b) AUTO_INCREMENT automatically increments the column value for each new record.
9-Which HTML input type is used for email input in the form?
a) text
b) email
c) number
d) password
Explanation: b) The email input type is used for email input.
10-What does the $conn->close(); line do in PHP?
a) Closes the HTML document
b) Ends the PHP script
c) Closes the database connection
d) Deletes database records
Explanation: c) $conn->close(); closes the database connection.
11-Which file is responsible for displaying data from the database?
a) index.html
b) process.php
c) display.php
d) form.html
Explanation: c) The display.php file is responsible for retrieving and displaying data from the database.
12-Which SQL statement is used to select data from a table in display.php?
a) SELECT FROM
b) SELECT TABLE
c) SELECT * FROM
d) FETCH ALL
Explanation: c) SELECT * FROM is used to select all columns from a table.
13-What does the fetch_assoc() function do in PHP?
a) Deletes database records
b) Fetches all records
c) Fetches a single record as an associative array
d) Sets up a new database connection
Explanation: c) fetch_assoc() fetches a single record as an associative array.
14-Which HTML tag is used to create an unordered list (<ul>) in display.php?
a) <li>
b) <ul>
c) <ol>
d) <dl>
Explanation: b) <ul> is used to create an unordered list in HTML.
15-In the HTML form, what is the purpose of the required attribute?
a) It sets the input as required for validation
b) It specifies the action page
c) It defines the form method
d) It sets the form enctype
Explanation: a) The required attribute is used to make an input field mandatory for form submission.
Scoring:
0-5 correct: Beginner
6-10 correct: Intermediate
11-15 correct: Advanced