
CSS Outline : A Guide to Using the CSS Outline Property for Visual Feedback and Accessibility
CSS Outline
Learn about the CSS outline property and its importance in providing visual feedback and improving accessibility on web pages. Understand how to set the outline style, width, color, and offset, and explore examples and best practices for using outlines in your designs.
CSS outline is a property that allows you to create a visible border around an element without affecting the layout of the page.
It is often used to highlight or emphasize elements, such as links, buttons, or form fields, without changing their size or position.
The values of The CSS outline property ?
The outline property can be applied to any element and accepts several values:
outline-style:
Specifies the style of the outline, such as solid, dashed, dotted, double, or none.
outline-width:
Sets the width of the outline. It can be specified in pixels (px), points (pt), ems (em), or other length units.
outline-color:
Defines the color of the outline.
You can use color names, hexadecimal values, RGB values, or the currentColor keyword.
How to use the CSS outline property ?
Here’s an example of how to use the outline property:
a {
outline: 2px solid blue;
}
Explanation:
1-In this example, all anchor (<a>) elements will have a solid blue outline with a width of 2 pixels.
2-It’s worth noting that the outline property is different from the border property. Unlike borders, outlines do not take up space or affect the layout of the elements.
3-Additionally, outlines are typically not affected by the border-radius property, resulting in sharp corners even if the element has rounded borders.
You can also use pseudo-classes like :
focus to apply an outline to an element when it receives focus, such as when a user clicks on it or navigates to it using the keyboard.
input:focus {
outline: 2px solid red;
}
Explanation:
1-In this example, when an input element is focused, it will have a solid red outline.
2-Remember that the outline property does not support individual side values like the border property does.
3-It applies the same outline style, width, and color to all sides of the element.
complete code example
Step by step How to use the CSS outline property ?
Here’s a complete HTML code example that demonstrates the usage of the outline property:
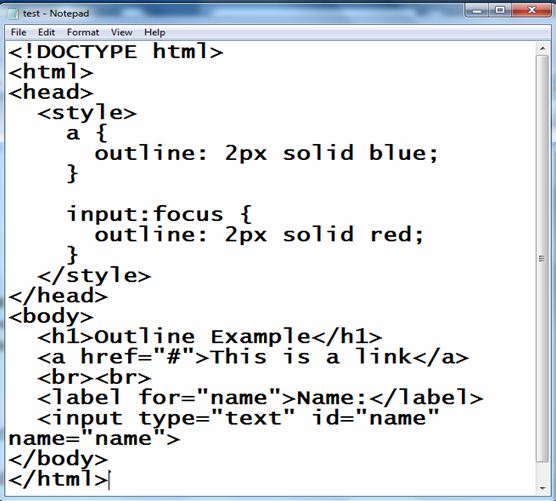
Step one: create HTML file (test.html):
1) open any text Editor like notepad the write the following code:
<!DOCTYPE html>
<html>
<head>
<style>
a {
outline: 2px solid blue;
}
input:focus {
outline: 2px solid red;
}
</style>
</head>
<body>
<h1>Outline Example</h1>
<a href="#">This is a link</a>
<br><br>
<label for="name">Name:</label>
<input type="text" id="name" name="name">
</body>
</html>
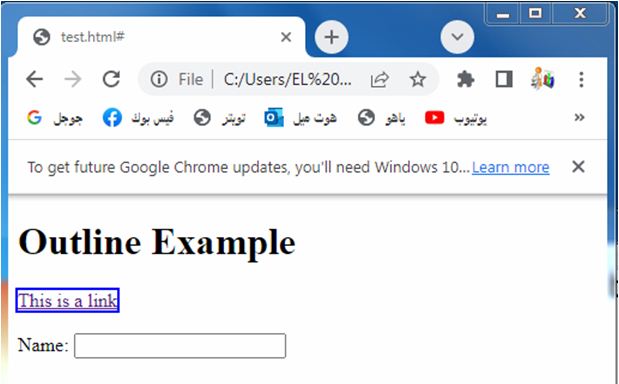
Explanation:
1-In this code, we define a CSS style block within the <style> tags in the <head> section.
2-We set an outline of 2 pixels width with a solid blue color for all anchor (<a>) elements.
3-we apply an outline of 2 pixels width with a solid red color to the input element when it receives focus using the :focus pseudo-class.
4-In the <body> section, we have an example link wrapped in an <a> tag and a form input element (<input>) with a corresponding label.
5-You can interact with the code by clicking on the link to see the blue outline or by focusing on the input field to see the red outline.
Step 2 :save the file :test.html
Step 3: open the test.html file by any web browser to see the following result
The outline properties
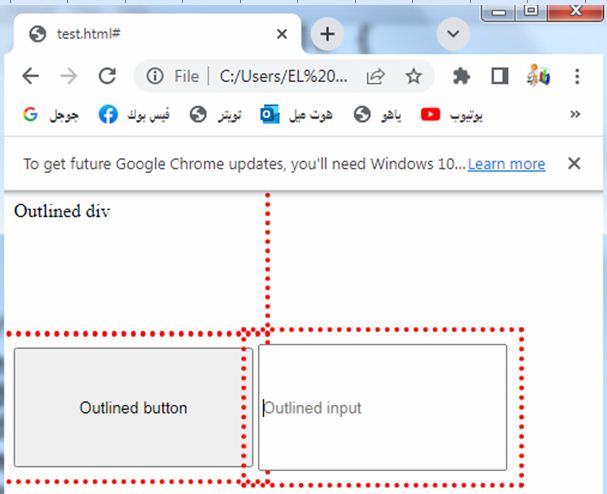
Here’s an example that demonstrates the various outline properties you can use:
<!DOCTYPE html>
<html>
<head>
<style>
.outline-example {
width: 200px;
height: 100px;
margin-bottom: 20px;
outline-style: dotted;
outline-width: 4px;
outline-color: red;
outline-offset: 10px;
}
</style>
</head>
<body>
<div class="outline-example">Outlined div</div>
<button class="outline-example">Outlined button</button>
<input type="text" class="outline-example" placeholder="Outlined input">
</body>
</html>
Explanation:
1-In this example, we define a CSS style block within the <style> tags in the <head> section.
2-We have a class named .outline-example that is applied to a <div>, <button>, and <input> element.
3-Each of these elements has a dotted outline with a width of 4 pixels and a red color.
Here are the outline properties used in the example:
- outline-style: Sets the style of the outline. In this case, we use the dotted style.
- outline-width: Specifies the width of the outline. The value is set to 4px.
- outline-color: Defines the color of the outline. We use the color name red.
- outline-offset: Specifies the space between the outline and the element’s border.
-In this example, the outline is offset by 10px from the element’s border.
-By applying these properties, you’ll see a red dotted outline around the outlined div, button, and input elements on the page.
-You can modify the values of these properties to achieve different outline styles, widths, colors, and offsets according to your requirements.
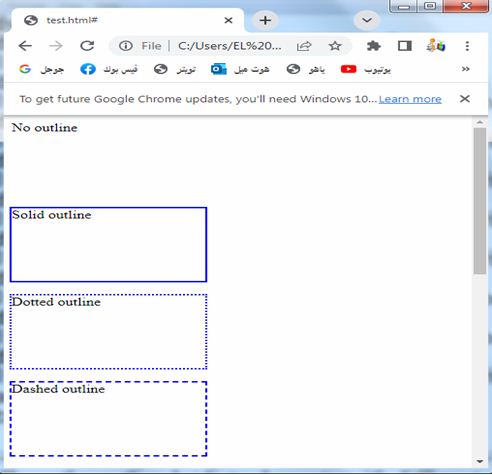
CSS Outline Style values
The CSS outline-style property accepts various values to define the style of the outline.
Here are the commonly used outline-style values:
none: No outline is displayed. This is the default value if the outline-style property is not specified.
- solid: The outline is a solid line.
- dotted: The outline is a series of dots.
- dashed: The outline is a series of short dashes.
- double: The outline consists of two parallel lines.
- groove: The outline appears as a three-dimensional groove.
- ridge: The outline appears as a three-dimensional ridge.
- inset: The outline appears as a three-dimensional inset.
- outset: The outline appears as a three-dimensional outset.
Here’s an example that demonstrates the usage of different outline-style values:
<!DOCTYPE html>
<html>
<head>
<style>
.outline-example {
width: 200px;
height: 100px;
margin-bottom: 20px;
outline-width: 2px;
outline-color: blue;
}
.outline-none {
outline-style: none;
}
.outline-solid {
outline-style: solid;
}
.outline-dotted {
outline-style: dotted;
}
.outline-dashed {
outline-style: dashed;
}
.outline-double {
outline-style: double;
}
.outline-groove {
outline-style: groove;
}
.outline-ridge {
outline-style: ridge;
}
.outline-inset {
outline-style: inset;
}
.outline-outset {
outline-style: outset;
}
</style>
</head>
<body>
<div class="outline-example outline-none">No outline</div>
<div class="outline-example outline-solid">Solid outline</div>
<div class="outline-example outline-dotted">Dotted outline</div>
<div class="outline-example outline-dashed">Dashed outline</div>
<div class="outline-example outline-double">Double outline</div>
<div class="outline-example outline-groove">Groove outline</div>
<div class="outline-example outline-ridge">Ridge outline</div>
<div class="outline-example outline-inset">Inset outline</div>
<div class="outline-example outline-outset">Outset outline</div>
</body>
</html>
Explanation:
1-In this example, we define a CSS style block within the <style> tags in the <head> section.
2-We have a class named .outline-example applied to <div> elements, and different classes such as .outline-none, .outline-solid, .outline-dotted, etc., to set different outline-style values.
3-By applying these styles, you’ll see the outlined <div> elements with different outline styles on the page.
4-You can experiment with these values or create your own custom outline styles by combining outline-style with other outline properties like outline-width and outline-color.
CSS Outline Width property
The CSS outline-width property is used to specify the width of the outline.
It controls the thickness or size of the outline around an element.
Here are the different ways you can define the outline-width value:
Length values:
You can specify the width using various length units, such as pixels (px), points (pt), ems (em), or percentages (%).
For example, outline-width: 2px; sets the outline width to 2 pixels.
thin, medium, thick:
These are predefined keywords that represent specific widths.
They are less commonly used compared to specifying the width using length values.
For example, outline-width:thin;
sets the outline width to the browser’s default thin width.
Global values:
CSS also supports global values like inherit and initial that can be used with outline-width.
inherit makes the element inherit the outline-width value from its parent, while initial resets the outline-width value to its initial default value.
Here’s an example that demonstrates the usage of outline-width with different values:
<!DOCTYPE html>
<html>
<head>
<style>
.outline-example {
width: 200px;
height: 100px;
margin-bottom: 20px;
outline-style: solid;
}
.outline-2px {
outline-width: 2px;
}
.outline-4px {
outline-width: 4px;
}
.outline-thin {
outline-width: thin;
}
.outline-medium {
outline-width: medium;
}
.outline-thick {
outline-width: thick;
}
</style>
</head>
<body>
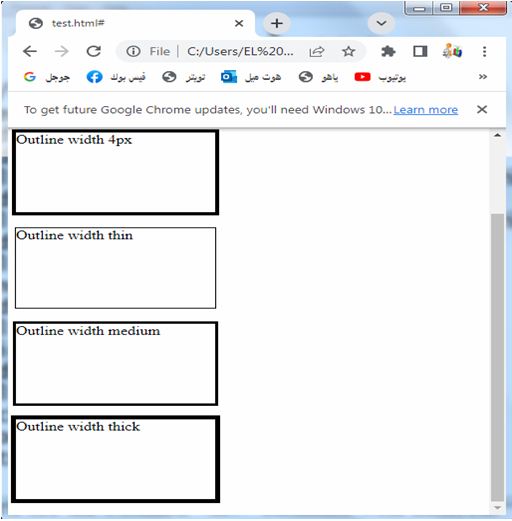
<div class="outline-example outline-2px">Outline width 2px</div>
<div class="outline-example outline-4px">Outline width 4px</div>
<div class="outline-example outline-thin">Outline width thin</div>
<div class="outline-example outline-medium">Outline width medium</div>
<div class="outline-example outline-thick">Outline width thick</div>
</body>
</html>
Explanation:
1-In this example, we define a CSS style block within the <style> tags in the <head> section.
2-We have a class named .outline-example applied to <div> elements, and different classes such as .outline-2px, .outline-4px, .outline-thin, etc., to set different outline-width values.
3-By applying these styles, you’ll see the outlined <div> elements with different outline widths on the page.
4-You can experiment with these values or use your preferred length units to define the outline width according to your design requirements.
The CSS outline-color property
-The CSS outline-color property is used to define the color of the outline around an element.
-It allows you to specify the color using different formats, such as color names, hexadecimal values, RGB values, or HSL values.
Here are the different ways to define the outline-color value:
By using Color names:
You can use predefined color names, such as red, blue, green, etc.
For example:
outline-color: red; sets the outline color to red.
By using Hexadecimal values:
You can specify the color using hexadecimal notation.
It starts with a # followed by a combination of three or six hexadecimal digits.
For example:
outline-color: #FF0000; sets the outline color to red.
By using RGB values:
- You can define the color using RGB values.
- It consists of the rgb() function followed by the red, green, and blue component values.
- Each component value ranges from 0 to 255.
- For example: outline-color: rgb(255, 0, 0); sets the outline color to red.
By using HSL values:
- You can use HSL (Hue, Saturation, Lightness) notation to specify the color.
- It consists of the hsl() function followed by the hue, saturation, and lightness values.
- The hue value ranges from 0 to 360, while the saturation and lightness values range from 0% to 100%.
- For example, outline-color: hsl(0, 100%, 50%); sets the outline color to red.
Here’s an example that demonstrates the usage of outline-color with different values:
<!DOCTYPE html>
<html>
<head>
<style>
.outline-example {
width: 200px;
height: 100px;
margin-bottom: 20px;
outline-style: solid;
outline-width: 2px;
}
.outline-red {
outline-color: red;
}
.outline-blue {
outline-color: blue;
}
.outline-green {
outline-color: green;
}
.outline-hex {
outline-color: #FF0000;
}
.outline-rgb {
outline-color: rgb(0, 0, 255);
}
.outline-hsl {
outline-color: hsl(120, 100%, 50%);
}
</style>
</head>
<body>
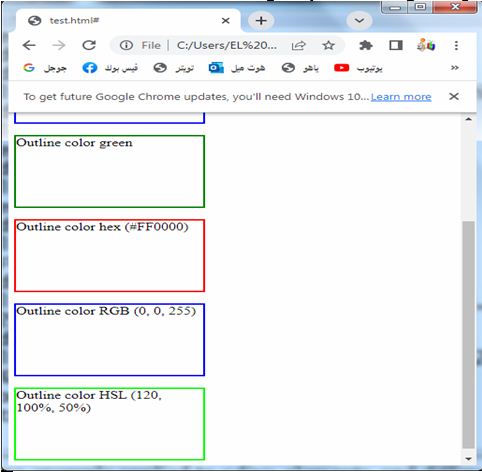
<div class="outline-example outline-red">Outline color red</div>
<div class="outline-example outline-blue">Outline color blue</div>
<div class="outline-example outline-green">Outline color green</div>
<div class="outline-example outline-hex">Outline color hex (#FF0000)</div>
<div class="outline-example outline-rgb">Outline color RGB (0, 0, 255)</div>
<div class="outline-example outline-hsl">Outline color HSL (120, 100%, 50%)</div>
</body>
</html>
Explanation:
1-In this example, we define a CSS style block within the <style> tags in the <head> section.
2-We have a class named .outline-example applied to <div> elements, and different classes such as .outline-red, .outline-blue, .outline-green, etc., to set different outline-color values.
3-By applying these styles, you’ll see the outlined <div> elements with different outline colors on the page.
4-You can experiment with these values or use your preferred color format to define the outline color according to your design requirements.
The CSS outline-offset property
- The CSS outline-offs
- et property is used to set the space between the outline and the edge of the element.
- It defines the distance or offset of the outline from the element’s border or content.
- The outline-offset property accepts length values and can be positive, negative, or zero.
Here are the common ways to define the outline-offset value:
Length values:
- You can specify the offset using various length units, such as pixels (px), points (pt), ems (em), or percentages (%).
- For example, outline-offset: 10px; sets the outline offset to 10 pixels.
Global values:
- CSS also supports global values like inherit and initial that can be used with outline-offset.
- inherit makes the element inherit the outline-offset value from its parent, while initial resets the outline-offset value to its initial default value.
Here’s an example that demonstrates the usage of outline-offset with different values:
<!DOCTYPE html>
<html>
<head>
<style>
.outline-example {
width: 200px;
height: 100px;
margin-bottom: 20px;
outline-style: solid;
outline-width: 2px;
outline-color: blue;
}
.outline-offset-10px {
outline-offset: 10px;
}
.outline-offset-20px {
outline-offset: 20px;
}
.outline-offset-negative {
outline-offset: -5px;
}
</style>
</head>
<body>
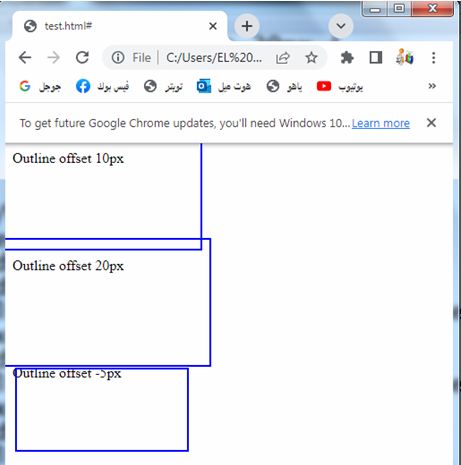
<div class="outline-example outline-offset-10px">Outline offset 10px</div>
<div class="outline-example outline-offset-20px">Outline offset 20px</div>
<div class="outline-example outline-offset-negative">Outline offset -5px</div>
</body>
</html>
Explanation:
1-In this example, we define a CSS style block within the <style> tags in the <head> section.
2-We have a class named .outline-example applied to <div> elements, and different classes such as .outline-offset-10px, .outline-offset-20px, .outline-offset-negative, etc., to set different outline-offset values.
3-By applying these styles, you’ll see the outlined <div> elements with different outline offsets on the page. You can experiment with these values or use your preferred length units to define the outline offset according to your design requirements.
The CSS outline shorthand property
- The CSS outline property is a shorthand property that allows you to set multiple outline properties in a single declaration.
- It provides a convenient way to set the outline-width, outline-style, and outline-color properties simultaneously.
- The values for each property are specified in a specific order.
The syntax for the outline shorthand property is as follows:
Outline:
outline-width outline-style outline-color;
Here’s a breakdown of each component:
outline-width:
Specifies the width of the outline.
It can be set using length values (e.g., 2px, 4px), predefined keywords (thin, medium, thick), or global values (inherit, initial).
outline-style:
Sets the style of the outline.
It can be set to values like none, solid, dotted, dashed, double, groove, ridge, inset, or outset.
outline-color:
Defines the color of the outline.
It can be set using color names, hexadecimal values, RGB values, HSL values, or global values (inherit, initial).
How to use the outline shorthand property ?
Here’s an example that demonstrates the usage of the outline shorthand property:
<!DOCTYPE html>
<html>
<head>
<style>
.outline-example {
width: 200px;
height: 100px;
margin-bottom: 20px;
outline: 2px dashed red;
}
</style>
</head>
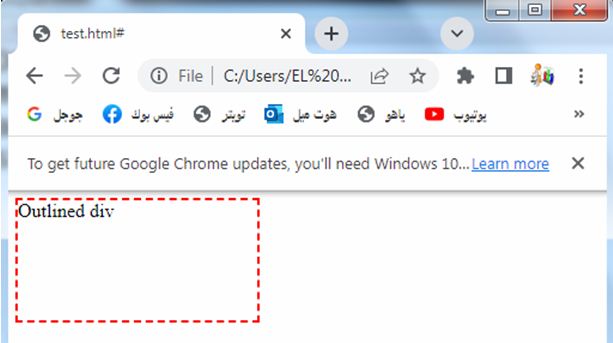
<body>
<div class="outline-example">Outlined div</div>
</body>
</html>
Explanation:
1-In this example, we define a CSS style block within the <style> tags in the <head> section.
2-We have a class named .outline-example applied to a <div> element.
3-The outline shorthand property is used to set the outline width to 2px, the outline style to dashed, and the outline color to red.
4-By using the outline shorthand property, you can achieve the same effect as setting the outline-width, outline-style, and outline-color properties individually.
This can help simplify your CSS code and make it more concise.
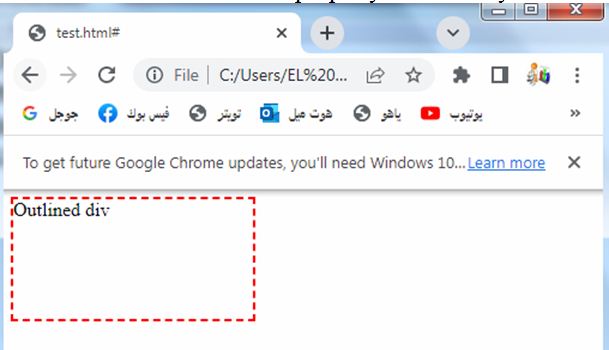
How to use CSS Outline Shorthand: complete code example
Here’s a complete HTML code example demonstrating the usage of the CSS outline shorthand property:
<!DOCTYPE html>
<html>
<head>
<style>
.outline-example {
width: 200px;
height: 100px;
margin-bottom: 20px;
outline: 2px dashed red;
}
</style>
</head>
<body>
<div class="outline-example">Outlined div</div>
</body>
</html>
Explanation:
1-In this example, we have an HTML document with a <style> block in the <head> section.
2-Inside the style block, we define a class named .outline-example.
3-This class is applied to a <div> element in the <body> section.
4-The CSS rules for the .outline-example class set the width of the div to 200px, the height to 100px, and a 20px margin bottom.
5-The outline shorthand property is used to set the outline properties for the div.
6-It specifies a 2px width, a dashed style, and a red color for the outline.
7-When you open this HTML file in a web browser, you’ll see the outlined <div> element with a red dashed outline.
8-You can adjust the values for outline-width, outline-style, and outline-color within the outline shorthand property to achieve your desired outline appearance.
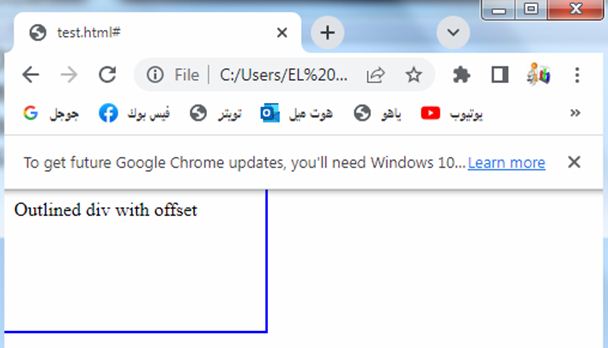
How to use CSS Outline Offset: compelete code in html
Here’s a complete HTML code example demonstrating the usage of the CSS outline-offset property:
<!DOCTYPE html>
<html>
<head>
<style>
.outline-example {
width: 200px;
height: 100px;
margin-bottom: 20px;
outline: 2px solid blue;
outline-offset: 10px;
}
</style>
</head>
<body>
<div class="outline-example">Outlined div with offset</div>
</body>
</html>
Explanation:
1-In this example, we have an HTML document with a <style> block in the <head> section.
2-Inside the style block, we define a class named .outline-example.
3-This class is applied to a <div> element in the <body> section.
4-The CSS rules for the .outline-example class set the width of the <div> to 200px, the height to 100px, and a 20px margin bottom.
5-The outline shorthand property is used to set the outline properties for the <div>, including a 2px width, a solid style, and a blue color.
6-Additionally, the outline-offset property is set to 10px to create a distance between the outline and the element’s border.
7-When you open this HTML file in a web browser, you’ll see the outlined <div> element with a blue solid outline and an offset of 10px. You can adjust the value of outline-offset to achieve your desired offset between the outline and the element
Here’s a complete HTML code example demonstrating the usage of the CSS outline property:
<!DOCTYPE html>
<html>
<head>
<style>
.outline-example {
width: 200px;
height: 100px;
margin-bottom: 20px;
outline: 2px dashed red;
}
</style>
</head>
<body>
<div class="outline-example">Outlined div</div>
</body>
</html>
Explanation:
1-In this example, we have an HTML document with a <style> block in the <head> section.
2-Inside the style block, we define a class named .outline-example.
3-This class is applied to a <div> element in the <body> section.
4-The CSS rules for the .outline-example class set the width of the <div> to 200px, the height to 100px, and a 20px margin bottom.
5-The outline property is used to set the outline properties for the <div>, including a 2px width, a dashed style, and a red color.
6-When you open this HTML file in a web browser, you’ll see the outlined <div> element with a red dashed outline.
7-The outline shorthand property allows you to set multiple outline properties in a single declaration, making your CSS code more concise and easier to manage.
8-You can adjust the values for outline-width, outline-style, and outline-color within the outline shorthand property to achieve your desired outline appearance.
Importance and uses of css outline
The CSS outline property is important and useful in web development for several reasons:
Visual Feedback:
The outline property allows you to provide visual feedback to users by highlighting or emphasizing certain elements on a webpage.
It helps users understand the focus or selection state of interactive elements such as links, buttons, or form inputs.
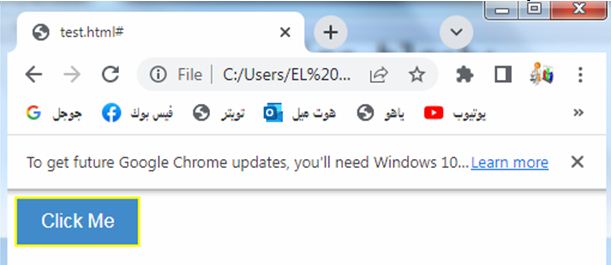
Here’s a complete HTML code example that demonstrates the use of the CSS outline property for visual feedback:
<!DOCTYPE html>
<html>
<head>
<style>
.button {
display: inline-block;
padding: 10px 20px;
background-color: #428bca;
color: #fff;
font-size: 16px;
border: none;
outline: none;
cursor: pointer;
}
.button:hover,
.button:focus {
outline: 2px solid yellow;
}
</style>
</head>
<body>
<button class="button">Click Me</button>
</body>
</html>
Explanation:
1-In this example, we have an HTML document with a <style> block in the <head> section.
2-Inside the style block, we define a class named .button that represents a button element.
3-We set various styles for the button, such as background color, font color, padding, and cursor.
4-The outline property is initially set to none in the .button class to remove the default outline styles.
5-However, when the button is hovered or receives focus, we override the outline property with a yellow solid outline of 2px width using the :hover and :focus pseudo-classes.
6-When you open this HTML file in a web browser and hover over the button or click it, you’ll see a yellow outline appearing around the button, providing visual feedback to indicate the interactive state.
The outline helps users understand which element is currently under focus or being interacted with.
7-You can modify the styles and colors as per your preference to achieve the desired visual feedback for interactive elements on your web page.
Accessibility:
The outline property is essential for improving accessibility on websites.
It ensures that keyboard-only users can easily identify and navigate through interactive elements, enhancing their overall browsing experience.
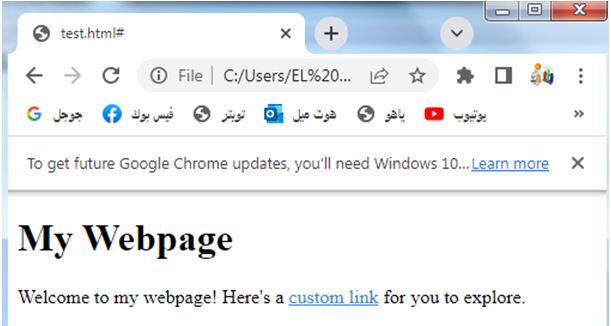
Here’s a complete HTML code example that demonstrates the use of the CSS outline property for accessibility:
<!DOCTYPE html>
<html>
<head>
<style>
.custom-link {
color: #428bca;
text-decoration: underline;
outline: none;
}
.custom-link:hover,
.custom-link:focus {
outline: 2px solid yellow;
}
</style>
</head>
<body>
<h1>My Webpage</h1>
<p>Welcome to my webpage! Here's a <a href="#" class="custom-link">custom link</a> for you to explore.</p>
</body>
</html>
Explanation:
1-In this example, we have an HTML document with a <style> block in the <head> section.
2-Inside the style block, we define a class named .custom-link that represents a custom-styled hyperlink.
3-We set the color of the link to a shade of blue and add an underline for the text decoration.
4-The outline property is initially set to none in the .custom-link class to remove the default outline.
5-However, when the link is hovered or receives focus, we override the outline property with a yellow solid outline of 2px width using the :hover and :focus pseudo-classes.
6-When you open this HTML file in a web browser and hover over the link or navigate to it using the keyboard (by using the Tab key to focus), you’ll see a yellow outline appearing around the link.
This provides visual feedback and helps users understand which element is currently under focus or being interacted with.
This is particularly beneficial for users who rely on keyboard navigation, as it enhances the accessibility of the webpage.
7-By applying the outline property to interactive elements, such as links, buttons, or form inputs, you can significantly improve the accessibility and usability of your web pages.
Design and Styling:
The outline property offers design flexibility by allowing you to customize the appearance of outlines.
You can set the outline width, style, and color to match your design requirements or create visual effects.
This helps in creating consistent and visually appealing UIs.
Here’s a complete HTML code example that demonstrates the use of the CSS outline property for design and styling purposes:
<!DOCTYPE html>
<html>
<head>
<style>
.custom-input {
width: 200px;
padding: 10px;
border: 2px solid #ddd;
outline: none;
transition: border-color 0.3s;
}
.custom-input:focus {
border-color: #428bca;
outline: 2px dashed #428bca;
}
</style>
</head>
<body>
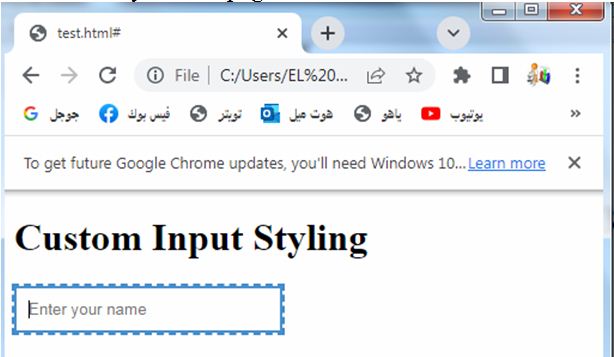
<h1>Custom Input Styling</h1>
<input type="text" class="custom-input" placeholder="Enter your name">
</body>
</html>
Explanation:
1-In this example, we have an HTML document with a <style> block in the <head> section.
2-Inside the style block, we define a class named .custom-input that represents a custom-styled text input field. We set various styles for the input field, such as width, padding, and border.
3-The outline property is initially set to none in the .custom-input class to remove the default outline styles.
4-However, when the input field receives focus, we override the outline property with a dashed outline of 2px width and the color #428bca using the :focus pseudo-class.
5-Additionally, we change the border color to #428bca during the transition.
6-When you open this HTML file in a web browser and click on the input field, you’ll see a dashed outline appearing around the input field, along with a change in border color.
7-This provides a visually appealing effect and enhances the design of the input field.
8-The outline helps users understand which element is currently under focus or being interacted with.
9-You can modify the styles, colors, and transition properties as per your preference to achieve the desired design and styling effects for your input fields or other elements on your webpage.
User Interface (UI) Components:
The outline property is commonly used in the styling of interactive UI components, such as buttons, form fields, and navigation menus. By applying outlines, you can enhance the visual clarity and interactivity of these components.
Here’s a complete HTML code example that demonstrates the use of the CSS outline property for styling user interface (UI) components:
<!DOCTYPE html>
<html>
<head>
<style>
.custom-button {
display: inline-block;
padding: 10px 20px;
background-color: #428bca;
color: #fff;
font-size: 16px;
border: none;
outline: none;
cursor: pointer;
transition: background-color 0.3s;
}
.custom-button:hover,
.custom-button:focus {
background-color: #0056b3;
outline: 2px solid yellow;
}
</style>
</head>
<body>
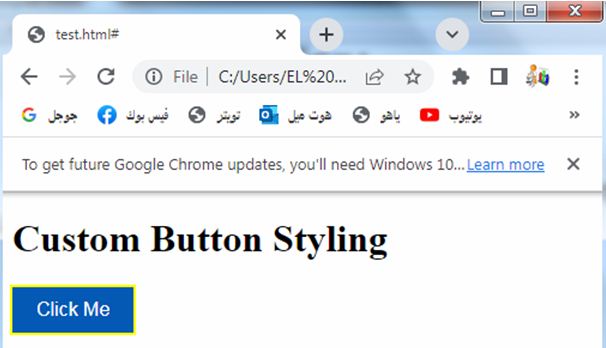
<h1>Custom Button Styling</h1>
<button class="custom-button">Click Me</button>
</body>
</html>
Explanation:
1-In this example, we have an HTML document with a <style> block in the <head> section. Inside the style block, we define a class named .custom-button that represents a custom-styled button.
2-We set various styles for the button, such as padding, background color, font color, and cursor.
3-The outline property is initially set to none in the .custom-button class to remove the default outline styles.
4-However, when the button is hovered or receives focus, we override the outline property with a yellow solid outline of 2px width using the :hover and :focus pseudo-classes.
5-Additionally, we change the background color of the button during the transition.
6-When you open this HTML file in a web browser and hover over the button or click it, you’ll see a yellow outline appearing around the button, along with a change in the background color.
7-This enhances the visual clarity and interactivity of the button, making it more visually appealing and engaging for users.
8-You can modify the styles, colors, padding, and transition properties as per your preference to achieve the desired design and styling effects for your UI components such as buttons, checkboxes, dropdowns, etc.
Focus Management:
When a user interacts with a web page using the keyboard, the outline property helps indicate which element currently has focus.
This is particularly important for users who rely on keyboard navigation, as it assists in understanding their position within a page and improves usability.
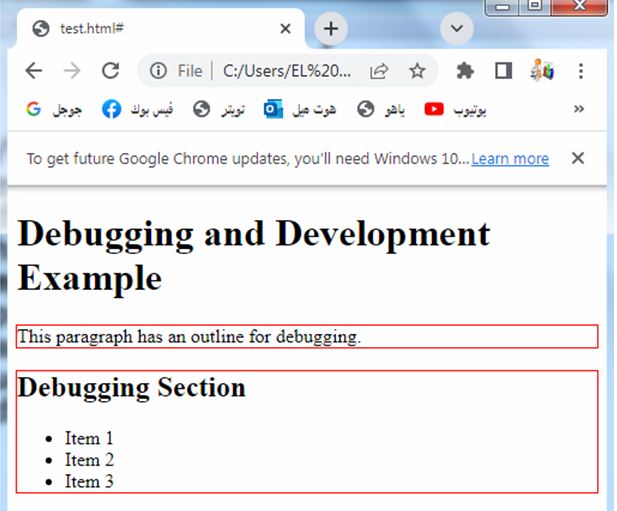
Debugging and Development:
During the development process, the outline property can be useful for debugging and troubleshooting.
It helps identify the dimensions and positioning of elements, ensuring proper alignment and spacing.
Here’s a complete HTML code example that demonstrates the use of the CSS outline property for focus management:
<!DOCTYPE html>
<html>
<head>
<style>
.custom-input {
padding: 10px;
border: 2px solid #ddd;
outline: none;
transition: border-color 0.3s;
}
.custom-input:focus {
border-color: #428bca;
outline: 2px solid yellow;
}
</style>
</head>
<body>
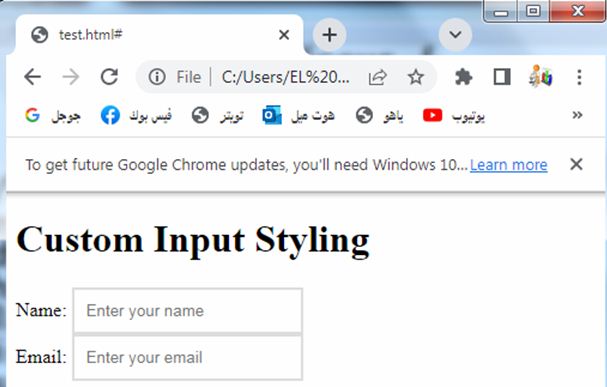
<h1>Custom Input Styling</h1>
<label for="name">Name:</label>
<input type="text" id="name" class="custom-input" placeholder="Enter your name">
<br>
<label for="email">Email:</label>
<input type="email" id="email" class="custom-input" placeholder="Enter your email">
</body>
</html>
Explanation:
1-In this example, we have an HTML document with a <style> block in the <head> section.
2-Inside the style block, we define a class named .custom-input that represents a custom-styled text input field. We set various styles for the input field, such as padding and border.
3-The outline property is initially set to none in the .custom-input class to remove the default outline styles. However, when the input field receives focus, we override the outline property with a solid yellow outline of 2px width using the :focus pseudo-class.
4-Additionally, we change the border color to #428bca during the transition.
5-When you open this HTML file in a web browser and click on the input fields, you’ll see a yellow outline appearing around the focused input field.
6-This helps users understand which element is currently under focus or being interacted with, making it easier for them to navigate through the form or input fields using the keyboard.
7-By applying the outline property to interactive elements such as input fields, buttons, or checkboxes, you can enhance the focus management and improve the accessibility of your web pages.
It’s important to note that the outline property should be used judiciously and in conjunction with other design considerations.
Care should be taken to ensure that the outline styles do not interfere with the overall aesthetics or readability of the webpage.
Overall, the CSS outline property is a valuable tool for improving accessibility, providing visual feedback, and enhancing the design and interactivity of web pages. Its versatility and ability to customize outlines make it an essential part of modern web development.
Quiz with answers about this lesson
Here’s a multiple-choice quiz about the CSS outline property:
1-What is the purpose of the CSS outline property?
a) To set the background color of an element
b) To define the shape of an element
c) To provide visual feedback or highlight elements
d) To control the spacing between elements
Answer: c) To provide visual feedback or highlight elements
2-Which CSS property is used to specify the width of the outline?
a) outline-color
b) outline-style
c) outline-width
d) outline-offset
Answer: c) outline-width
3-Which CSS property is used to set the style of the outline?
a) outline-color
b) outline-style
c) outline-width
d) outline-offset
Answer: b) outline-style
4-How can you remove the default outline styles from an element?
a) By setting outline: none;
b) By setting outline: inherit;
c) By setting outline: hidden;
d) By setting outline: initial;
Answer: a) By setting outline: none;
5-Which CSS property is used to set the color of the outline?
a) outline-color
b) outline-style
c) outline-width
d) outline-offset
Answer: a) outline-color
6-What is the purpose of the CSS outline-offset property?
a) To control the spacing between elements
b) To set the background color of an element
c) To specify the width of the outline
d) To define the distance between the outline and the element
Answer: d) To define the distance between the outline and the element
7-Which shorthand property can be used to set the outline style, width, and color in a single declaration?
a) outline-style
b) outline-width
c) outline-color
d) outline
Answer: d) outline
8-Why is the CSS outline property important for accessibility?
a) It helps improve the performance of web pages
b) It provides visual feedback to users, indicating the focus or selection state of elements
c) It allows you to control the layout and positioning of elements
d) It defines the background color of elements
Answer: b) It provides visual feedback to users, indicating the focus or selection state of elements
9-Which pseudo-class is commonly used with the outline property to specify the styles when an element is being interacted with using the keyboard?
a) :hover
b) :active
c) :focus
d) :visited
Answer: c) :focus
10-When applying the outline property to an element, which value can be used to create a dotted outline?
a) solid
b) dotted
c) dashed
d) double
Answer: b) dotted
11-How can you adjust the position of the outline relative to the element using the outline-offset property?
a) By specifying a length value in pixels
b) By using the auto keyword
c) By setting a negative value
d) By using percentage values
Answer: a) By specifying a length value in pixels
12-Which of the following is NOT a valid CSS outline-style value?
a) solid
b) groove
c) ridge
d) curve
Answer: d) curve
13-The CSS outline property can be applied to which of the following HTML elements?
a) <div>
b) <button>
c) <input>
d) All of the above
Answer: d) All of the above
14-How does the outline property differ from the border property in CSS?
a) The outline property is used for decorative purposes, while the border property is used for structural purposes.
b) The outline property can be used to create rounded corners, while the border property cannot.
c) The outline property does not affect the layout or dimensions of an element, while the border property does.
d) The outline property can only have a solid style, while the border property can have various styles.
Answer: c) The outline property does not affect the layout or dimensions of an element, while the border property does.
15-Which CSS property can be used to change the color of the outline when an element is in a focused or active state?
a) border-color
b) outline-color
c) background-color
d) color
Answer: b) outline-color
16-When using the shorthand outline property, in which order should the values be specified?
a) Style, width, color
b) Width, color, style
c) Color, width, style
d) Color, style, width
Answer: d) Color, style, width
17-What is the default value of the outline-style property?
a) none
b) solid
c) dotted
d) initial
Answer: b) solid
18-How can you remove the outline from all elements on a webpage?
a) Apply the outline: none; style to the body selector
b) Set the outline property to initial for all elements
c) Use the outline: 0; style for all elements
d) Apply the outline: none; style to the html selector
Answer: a) Apply the outline: none; style to the body selector
19-Which CSS property can be used to create a custom outline effect using an image?
a) outline-image
b) outline-texture
c) outline-fill
d) There is no CSS property specifically for outlining with images
Answer: d) There is no CSS property specifically for outlining with images
20-How can you apply different outline styles to different sides of an element?
a) Use the outline-top, outline-right, outline-bottom, and outline-left properties
b) Apply separate classes with different outline styles to each side
c) Use the outline-style property with multiple values separated by a space
d) It is not possible to have different outline styles for different sides
Answer: d) It is not possible to have different outline styles for different sides
Here’s the link to my official site: https://submissiontodirectory.top/
Ever stop to think how much you’re spending on marked-up CPMs for Connected TV ads?
If you’re using “premium” audience segments without verifying who you’re actually reaching, that money is likely feeding someone else’s family.
No pressure. Here’s the site if you’re open to see a revolutionary vision for digital advertising
topshelfaudience.com using real-time Intent data from an Integration in our platform to Lotame.com. You can reach me at marketing@mrmarketingres.com or 843-720-7301. And if this isn’t a fit please feel free to email me and I’ll be sure not to reach out again. Thanks!
Promote your offer with a million guaranteed submissions — just $55 now. Just send a note to ads@form-blast-promo.top
Hey there, I was wondering if you took guest posts on gogoacademy.net? If so, how would I go about getting one on your site? If there is a fee, let me know.
Also, if you have any other sites you can get me a post on please list them.
Thanks
Justin