
Python Tkinter Frame Widget
Python Tkinter Frame Widget
Tkinter is a Python GUI (Graphical User Interface) library used for building desktop applications. A frame is a widget in Tkinter that acts as a container to hold and organize other widgets. It is similar to a container in other programming languages.
A frame can be thought of as a rectangular area on the screen where you can place other widgets. You can also create nested frames, which means you can have a frame inside another frame, and so on.
The uses and importance of Tkinter frame
Tkinter frames are an essential part of building graphical user interfaces (GUI) using Python. They provide a way to organize and group widgets together, which helps to improve the visual layout of an application. Here are some of the main uses and importance of Tkinter frames:
Organization: Frames provide a way to group and organize widgets in a logical and meaningful way. This can make an application easier to navigate and use, and helps to keep related widgets together.
Layout: Frames can be used to create complex layouts, where different widgets are arranged in specific ways. This can be used to create custom user interfaces, which are optimized for specific tasks.
Customization: Frames can be customized in a variety of ways, including changing their background color, border style, and size. This allows developers to create a unique and visually appealing interface for their application.
Modularity: Frames can be used to create modular interfaces, where different frames can be swapped in and out depending on the user’s actions. This can be used to create dynamic interfaces, where the user interface changes based on the user’s inputs.
Overall, tkinter frames are an important tool for building modern, user-friendly graphical interfaces using Python. They provide a way to organize and group widgets together, which can improve the visual layout of an application, as well as provide a way to create custom and dynamic user interfaces.
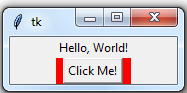
Here is an example of creating a Tkinter Frame:
import tkinter as tk root = tk.Tk() # Create a frame frame = tk.Frame(root, bg="red") # Add widgets to the frame label = tk.Label(frame, text="Hello, World!") button = tk.Button(frame, text="Click Me!") # Pack the widgets into the frame label.pack() button.pack() # Pack the frame into the root window frame.pack() root.mainloop()
In this example, we create a frame by calling the Frame class and passing the root window as the first argument. We also set the background color of the frame to red using the bg parameter.
Then we add two widgets to the frame, a label and a button, and pack them into the frame using the pack method. Finally, we pack the frame into the root window using the pack method.
Frames are useful for grouping related widgets together and organizing the layout of your application. You can also use frames to create a more complex layout by nesting them inside each other.
Syntax to create Tkinter Frame
The syntax to create a Tkinter Frame is as follows:
frame = tk.Frame(parent, options)
Here, parent refers to the parent widget in which the frame will be placed. It can be a Tkinter window, another frame, or any other widget that can act as a parent.
options refers to a set of optional parameters that can be used to customize the appearance and behavior of the frame. Some of the commonly used options are:
list of possible options of Tkinter frame
Here is a list of some of the possible options that can be used with Tkinter Frame:
bg: sets the background color of the frame
borderwidth: sets the width of the frame’s border
cursor: sets the mouse cursor appearance when it is over the frame
height: sets the height of the frame
highlightbackground: sets the color of the frame’s highlight border when it does not have focus
highlightcolor: sets the color of the frame’s highlight border when it has focus
highlightthickness: sets the width of the frame’s highlight border
padx: sets the horizontal padding within the frame
pady: sets the vertical padding within the frame
relief: sets the border style of the frame (such as “raised”, “sunken”, “groove”, “ridge”, “flat”, “solid”, etc.)
takefocus: specifies whether the frame should be included in focus traversal (tabbing) order
width: sets the width of the frame
Note that this is not a comprehensive list of all possible options, as there are many more that can be used. You can refer to the official Tkinter documentation for a complete list of all available options for the Frame widget.
Here are some of the common options that can be used with the Tkinter Frame widget, along with code examples:
bg:
sets the background color of the frame
import tkinter as tk root = tk.Tk() # Create a frame with red background color frame = tk.Frame(root, bg="red", width=200, height=100) frame.pack() root.mainloop()

borderwidth:
sets the width of the frame’s border
import tkinter as tk root = tk.Tk() # Create a frame with a border width of 2 pixels frame = tk.Frame(root, borderwidth=2, width=200, height=100) frame.pack() root.mainloop()

cursor:
sets the mouse cursor appearance when it is over the frame
import tkinter as tk root = tk.Tk() # Create a frame with a different mouse cursor frame = tk.Frame(root, cursor="cross", width=200, height=100) frame.pack() root.mainloop()
Height:
sets the height of the frame
import tkinter as tk root = tk.Tk() # Create a frame with a height of 200 pixels frame = tk.Frame(root, height=200, width=200) frame.pack() root.mainloop()
Highlightbackground:
sets the color of the frame’s highlight border when it does not have focus
import tkinter as tk root = tk.Tk() # Create a frame with a highlight background color frame = tk.Frame(root, highlightbackground="green", highlightthickness=1, width=200, height=100) frame.pack() root.mainloop()

Highlightcolor:
sets the color of the frame’s highlight border when it has focus
import tkinter as tk root = tk.Tk() # Create a frame with a highlight color when it has focus frame = tk.Frame(root, highlightcolor="red", highlightthickness=1, width=200, height=100) frame.pack() root.mainloop()
padx:
sets the horizontal padding within the frame
import tkinter as tk root = tk.Tk() # Create a frame with padding of 10 pixels on the left and right sides frame = tk.Frame(root, padx=10, width=200, height=100) frame.pack() root.mainloop()
pady:
sets the vertical padding within the frame
import tkinter as tk root = tk.Tk() # Create a frame with padding of 10 pixels on the top and bottom sides frame = tk.Frame(root, pady=10, width=200, height=100) frame.pack() root.mainloop()
relief:
sets the border style of the frame
import tkinter as tk root = tk.Tk() # Create a frame with a sunken border style frame = tk.Frame(root, relief="sunken", borderwidth=2, width=200, height=100) frame.pack() root.mainloop()

borderwidth:
sets the width of the frame’s border
import tkinter as tk root = tk.Tk() # Create a frame with a border width of 2 pixels frame = tk.Frame(root, borderwidth=2, width=200, height=100) frame.pack() root.mainloop()
References of tkinter Frame
Here are some references related to the tkinter Frame widget:
Tkinter Frame widget examples:
Tkinter GUI Programming by Example:
Tkinter Course: Create Graphic User Interfaces in Python Tutorial: