
Python tkinter geometry Pack geometry manager
Python tkinter geometry Pack geometry manager
Tkinter is a Python library used for creating graphical user interfaces (GUIs).
The geometry manager in Tkinter is responsible for positioning and sizing widgets in the window.
In addition to the geometry managers, there are also several methods and attributes that can be used to control the size and position of widgets.
For example, the width and height attributes can be used to set the size of a widget, and the padx and pady attributes can be used to add padding around a widget.
Overall, understanding the geometry managers and their associated methods and attributes is crucial for creating well-organized and visually appealing GUIs using Tkinter.
Types of Tkinter geometry
Tkinter provides three geometry managers to position and organize widgets within a GUI window:
1-Pack geometry manager:
This geometry manager packs the widgets in a horizontal or vertical direction. The pack() method is used to add the widgets to the window. The pack() method arranges the widgets in the order they are packed, and they fill the available space in the direction of packing.
2-Grid geometry manager:
This geometry manager organizes widgets in a table-like structure. The grid() method is used to add widgets to the window using this geometry manager. The widgets are placed in rows and columns, and they can span multiple rows and columns.
3-Place geometry manager:
This geometry manager allows widgets to be placed at specific locations in the window. The place() method is used to add widgets to the window using this geometry manager. The widgets are placed based on the x and y coordinates specified.
Each geometry manager has its own set of options and methods for positioning and sizing widgets within a window. It’s important to understand the differences between them to choose the appropriate geometry manager for your GUI layout.
1-Pack geometry manager:
How to create Pack geometry manager?
To use the Pack geometry manager in Tkinter, you can follow these steps:
1-Import the Tkinter library by adding the following code at the beginning of your Python file:
import tkinter as tk
2-Create a new window using the Tk() method:
window = tk.Tk()
3-Create the widgets that you want to add to the window using the appropriate Tkinter classes (e.g., Label, Button, etc.).
Here is an example of creating a Label widget:
label = tk.Label(window, text="Hello, World!")
4-Use the pack() method to add the widgets to the window. You can specify the direction of packing using the side parameter (e.g., “left”, “right”, “top”, or “bottom”):
label.pack(side="top")
5-Repeat steps 3 and 4 for each widget you want to add to the window.
6-Call the mainloop() method to start the Tkinter event loop and display the window:
window.mainloop()
Here is an example code that creates a window with two buttons using the Pack geometry manager:
import tkinter as tk window = tk.Tk() button1 = tk.Button(window, text="Click me!") button2 = tk.Button(window, text="Don't click me!") button1.pack(side="left") button2.pack(side="right") window.mainloop()

In this example, we created two Button widgets, and we used the pack() method with the side parameter to add them to the window.
The “Click me!” button is on the left side of the window, and the “Don’t click me!” button is on the right side of the window. When you run this code, it will display a window with two buttons.
Uses of Pack geometry manager with complete code examples
The Pack geometry manager in Tkinter is useful for organizing widgets in a simple and straightforward manner. Here are some examples of how to use the Pack geometry manager with complete code examples:
Example 1:
How to create Simple window with a label and a button
This example creates a window with a label and a button using the Pack geometry manager.
import tkinter as tk
window = tk.Tk()
window.title("My Window")
label = tk.Label(window, text="Hello, World!")
label.pack()
button = tk.Button(window, text="Click me!")
button.pack()
window.mainloop()

In this example, we first create a window using the Tk() method.
We set the title of the window using the title() method.
Then we create a Label widget with the text “Hello, World!” and a Button widget with the text “Click me!”.
We use the pack() method to add these widgets to the window. The widgets are packed in the order they are added and fill the available space.
Finally, we call the mainloop() method to start the Tkinter event loop and display the window.
Example 2:
How to put Two buttons side by side by Pack geometry manager ?
This example creates a window with two buttons side by side using the Pack geometry manager.
import tkinter as tk
window = tk.Tk()
window.title("My Window")
button1 = tk.Button(window, text="Button 1")
button1.pack(side="left")
button2 = tk.Button(window, text="Button 2")
button2.pack(side="left")
window.mainloop()

Example 3:
How to create Multiple buttons with padding by the Pack geometry manager
This example creates a window with multiple buttons using the Pack geometry manager. We also add padding between the buttons using the padx and pady parameters.
import tkinter as tk
window = tk.Tk()
window.title("My Window")
button1 = tk.Button(window, text="Button 1")
button1.pack(padx=10, pady=10)
button2 = tk.Button(window, text="Button 2")
button2.pack(padx=10, pady=10)
button3 = tk.Button(window, text="Button 3")
button3.pack(padx=10, pady=10)
window.mainloop()

In this example, we create three Button widgets and add them to the window using the pack() method. We use the padx and pady parameters to add padding between the buttons. The padding is specified in pixels.
Example 4:
How to create Button with a fixed size ?
This example creates a button with a fixed size using the Pack geometry manager. We use the width and height parameters to specify the size of the button in pixels.
import tkinter as tk
window = tk.Tk()
window.title("My Window")
button = tk.Button(window, text="Click me!", width=10, height=2)
button.pack()
window.mainloop()

In this example, we create a Button widget with the text “Click me!” and a fixed size of 10 pixels wide and 2 pixels tall.
We use the pack() method to add the button to the window.
Example 5:
How to create Multiple labels with different colors?
This example creates multiple Label widgets with different colors using the Pack geometry manager. We use the fg parameter to specify the text color and the bg parameter to specify the background color of each label.
import tkinter as tk
window = tk.Tk()
window.title("My Window")
label1 = tk.Label(window, text="Red", fg="red", bg="white")
label1.pack()
label2 = tk.Label(window, text="Green", fg="green", bg="white")
label2.pack()
label3 = tk.Label(window, text="Blue", fg="blue", bg="white")
label3.pack()
window.mainloop()
In this example, we create three Label widgets with the text “Red”, “Green”, and “Blue”, respectively. Each label has a different text color and a white background color.
We use the pack() method to add the labels to the window.

Example 7:
How to create Frame with buttons ?
This example creates a frame with multiple buttons using the Pack geometry manager.
We use the side parameter to pack the buttons next to each other in a horizontal layout within the frame.
import tkinter as tk
window = tk.Tk()
window.title("My Window")
frame = tk.Frame(window)
frame.pack()
button1 = tk.Button(frame, text="Button 1")
button1.pack(side="left", padx=10)
button2 = tk.Button(frame, text="Button 2")
button2.pack(side="left", padx=10)
button3 = tk.Button(frame, text="Button 3")
button3.pack(side="left", padx=10)
window.mainloop()
In this example:
we create a Frame widget and pack it into the window.
We create three Button widgets and pack them into the frame using the side parameter set to “left” to arrange them horizontally.
We also add some padding between the buttons using the padx parameter.

Example 8:
How to create Labels with different font sizes ?
This example creates multiple Label widgets with different font sizes using the Pack geometry manager. We use the font parameter to specify the font size of each label.
import tkinter as tk
window = tk.Tk()
window.title("My Window")
label1 = tk.Label(window, text="Small font", font=("Arial", 10))
label1.pack()
label2 = tk.Label(window, text="Medium font", font=("Arial", 20))
label2.pack()
label3 = tk.Label(window, text="Large font", font=("Arial", 30))
label3.pack()
window.mainloop()
In this example, we create three Label widgets with different font sizes using the font parameter.
We use a tuple to specify the font family and font size.
We use the pack() method to add the labels to the window.

Example 9:
How to create Checkboxes with labels ?
This example creates multiple Checkbutton widgets with labels using the Pack geometry manager.
We use the text parameter to specify the label for each checkbox.
import tkinter as tk
window = tk.Tk()
window.title("My Window")
var1 = tk.IntVar()
checkbox1 = tk.Checkbutton(window, text="Option 1", variable=var1)
checkbox1.pack()
var2 = tk.IntVar()
checkbox2 = tk.Checkbutton(window, text="Option 2", variable=var2)
checkbox2.pack()
var3 = tk.IntVar()
checkbox3 = tk.Checkbutton(window, text="Option 3", variable=var3)
checkbox3.pack()
window.mainloop()
In this example, we create three Checkbutton widgets with labels using the text parameter.
We also create three IntVar variables to store the state of each checkbox.
We use the variable parameter to link each checkbox to its corresponding variable, and use the pack() method to add the checkboxes to the window.

Example 10:
How to create Radio buttons with a label?
This example creates multiple Radiobutton widgets with a label using the Pack geometry manager.
We use the text parameter to specify the label for each radio button, and the variable parameter to link them together.
import tkinter as tk
window = tk.Tk()
window.title("My Window")
var = tk.StringVar(value="Option 1")
radio1 = tk.Radiobutton(window, text="Option 1", variable=var, value="Option 1")
radio1.pack()
radio2 = tk.Radiobutton(window, text="Option 2", variable=var, value="Option 2")
radio2.pack()
radio3 = tk.Radiobutton(window, text="Option 3", variable=var, value="Option 3")
radio3.pack()
label = tk.Label(window, textvariable=var)
label.pack()
window.mainloop()
In this example, we create three Radiobutton widgets with labels using the text parameter.
We also create a StringVar variable to store the state of the radio buttons, and link them together using the variable parameter.
Finally, we create a Label widget with its textvariable parameter set to the StringVar variable, which displays the currently selected radio button.

Example 11:
How to create Frames with labels and buttons ?
This example creates multiple frames with labels and buttons using the Pack geometry manager.
We use the side parameter to pack the frames next to each other in a horizontal layout, and the anchor parameter to align the labels and buttons within each frame.
import tkinter as tk
window = tk.Tk()
window.title("My Window")
frame1 = tk.Frame(window, padx=10, pady=10)
frame1.pack(side="left")
label1 = tk.Label(frame1, text="Frame 1")
label1.pack(anchor="w")
button1 = tk.Button(frame1, text="Button 1")
button1.pack(pady=5, anchor="w")
button2 = tk.Button(frame1, text="Button 2")
button2.pack(pady=5, anchor="w")
frame2 = tk.Frame(window, padx=10, pady=10)
frame2.pack(side="left")
label2 = tk.Label(frame2, text="Frame 2")
label2.pack(anchor="w")
button3 = tk.Button(frame2, text="Button 3")
button3.pack(pady=5, anchor="w")
button4 = tk.Button(frame2, text="Button 4")
button4.pack(pady=5, anchor="w")
window.mainloop()
In this example, we create two frames using the Frame widget, and pack them next to each other in a horizontal layout using the side parameter.
We create labels and buttons within each frame using the Label and Button widgets, and use the anchor parameter to align them within each frame.
We also add some padding using the padx and pady parameters.

Example 12:
How to create Grid of buttons?
This example creates a grid of buttons using the Pack geometry manager.
We use nested frames and the fill parameter to create a grid layout, and the expand parameter to fill any empty space.
import tkinter as tk
window = tk.Tk()
window.title("My Window")
frame1 = tk.Frame(window, padx=10, pady=10)
frame1.pack(expand=True, fill="both")
for row in range(3):
for col in range(3):
button = tk.Button(frame1, text=f"Button {row+1},{col+1}")
button.grid(row=row, column=col, padx=5, pady=5)
window.mainloop()
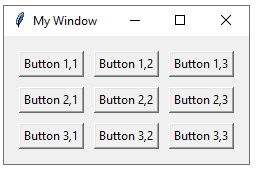
In this example, we create a single frame using the Frame widget, and pack it using the expand and fill parameters to fill any empty space in the window.
We then use a nested loop to create a 3×3 grid of buttons using the Button widget, and use the grid method to position them in the grid layout.
We also add some padding using the padx and pady parameters to create some space between the buttons.
Refrences of this lesson with links
Here are some references for learning more about using the Pack geometry manager in Tkinter:
The official Python documentation on Tkinter:
A tutorial on using Pack in Tkinter:
An article on the differences between Pack, Grid, and Place in Tkinter: