
Python Tkinter Grid geometry manager
Python Tkinter Grid geometry manager
Learn how to use the Grid Geometry Manager in Python GUI applications using Tkinter. This lesson includes code examples and use cases for the Grid geometry manager, as well as tips for optimizing user interface design. Improve your Python GUI skills with this comprehensive guide to the Grid geometry manager.
The Grid geometry manager arranges widgets in a grid-like pattern with rows and columns.
The Grid geometry manager is a layout manager in tkinter, the standard GUI package for Python.
The Grid geometry manager allows you to create a grid of cells in which you can place widgets such as buttons, labels, text boxes, and more. The Grid geometry manager is a powerful tool for creating complex layouts that are responsive to changes in window size or widget content.
In summary, the Grid geometry manager is a powerful tool for creating complex GUI layouts in Python using the Tkinter library. While it can be more challenging to use than the other managers, it provides greater flexibility and control over the placement of widgets.
How to use the Grid geometry manger ?
Here are the basic steps to use the Grid geometry manager:
1-Import the tkinter module.
import tkinter as tk
2-Create a new tkinter window by instantiating the Tk() class.
root = tk.Tk()
3-Create the widgets that you want to place in the grid.
label1 = tk.Label(root, text="Label 1") label2 = tk.Label(root, text="Label 2") button1 = tk.Button(root, text="Button 1") button2 = tk.Button(root, text="Button 2")
4-Create the grid by specifying the number of rows and columns you want.
root.grid_rowconfigure(0, weight=1) root.grid_columnconfigure(0, weight=1)
5-Place the widgets in the grid by specifying their row and column position.
label1.grid(row=0, column=0) label2.grid(row=0, column=1) button1.grid(row=1, column=0) button2.grid(row=1, column=1)
6-Start the main event loop using the mainloop() method of the Tk() class.
root.mainloop()
These steps will create a window with a grid of two rows and two columns, with a label in the first row of the first column, a label in the first row of the second column, a button in the second row of the first column, and a button in the second row of the second column.
The Grid geometry manager also offers several options that you can use to customize the layout of your widgets within the grid, including rowspan, columnspan, sticky, padx, and pady. You can use these options to control the size, position, and alignment of your widgets within the grid.
Options of Grid geometry manager
The Grid geometry manager provides several options that can be used to control the layout of widgets in the grid.
Here are the options that can be used with the grid() method:
row
The row number in which to place the widget. Starts from 0.
column
The column number in which to place the widget. Starts from 0.
rowspan
The number of rows that the widget should span.
columnspan
The number of columns that the widget should span.
sticky
Controls the placement of the widget within its cell. Can be a combination of N, S, E, W, NE, NW, SE, SW, CENTER. For example, sticky=”W” will make the widget left-aligned within its cell.
padx
The amount of padding to add to the left and right of the widget.
pady
The amount of padding to add to the top and bottom of the widget.
ipadx
The amount of internal padding to add to the left and right of the widget.
ipady
The amount of internal padding to add to the top and bottom of the widget.
By using these options, you can fine-tune the placement and appearance of widgets within the grid.
Here are some examples that demonstrate the use of the options available with the Grid geometry manager:
Example 1:
How to Use rowspan and columnspan in grid geometry manager?
import tkinter as tk root = tk.Tk() label1 = tk.Label(root, text="Label 1") label2 = tk.Label(root, text="Label 2") label3 = tk.Label(root, text="Label 3") label1.grid(row=0, column=0) label2.grid(row=0, column=1) label3.grid(row=1, column=0, columnspan=2) root.mainloop()

In this example, we create three labels and place them in the grid. We use rowspan and columnspan to make label3 span two columns.
Example 2:
How to Use sticky and padx ?
import tkinter as tk root = tk.Tk() label1 = tk.Label(root, text="Label 1") label2 = tk.Label(root, text="Label 2") button1 = tk.Button(root, text="Button 1") button2 = tk.Button(root, text="Button 2") label1.grid(row=0, column=0, sticky="E", padx=5) label2.grid(row=0, column=1, sticky="W", padx=5) button1.grid(row=1, column=0, sticky="W", padx=5, pady=5) button2.grid(row=1, column=1, sticky="E", padx=5, pady=5) root.mainloop()

In this example, we create two labels and two buttons and place them in the grid.
We use sticky to control the alignment of the labels and buttons within their cells.
We also use padx and pady to add padding around the buttons.
Example 3:
How to use ipadx and ipady?
import tkinter as tk root = tk.Tk() label1 = tk.Label(root, text="Label 1") label2 = tk.Label(root, text="Label 2") entry1 = tk.Entry(root) entry2 = tk.Entry(root) label1.grid(row=0, column=0, padx=5, pady=5) entry1.grid(row=0, column=1, padx=5, pady=5, ipadx=50) label2.grid(row=1, column=0, padx=5, pady=5) entry2.grid(row=1, column=1, padx=5, pady=5, ipady=10) root.mainloop()

In this example, we create two labels and two entry widgets and place them in the grid.
We use ipadx to add internal padding to the entry widgets. entry1 has a wider internal padding while entry2 has a taller internal padding.
These examples demonstrate how to use the various options available with the Grid geometry manager to control the layout and appearance of widgets within the grid.
Example 4:
How to use sticky and ipady ?
import tkinter as tk root = tk.Tk() label1 = tk.Label(root, text="Label 1") label2 = tk.Label(root, text="Label 2") entry1 = tk.Entry(root) entry2 = tk.Entry(root) label1.grid(row=0, column=0, sticky="E", padx=5, pady=5) entry1.grid(row=0, column=1, sticky="W", padx=5, pady=5, ipady=10) label2.grid(row=1, column=0, sticky="E", padx=5, pady=5) entry2.grid(row=1, column=1, sticky="W", padx=5, pady=5, ipady=10) root.mainloop()

In this example, we create two labels and two entry widgets and place them in the grid. We use sticky to control the alignment of the widgets within their cells. entry1 and entry2 have the same amount of internal padding added to the top and bottom using ipady.
Example 5:
How to use padx and pady ?
import tkinter as tk root = tk.Tk() label1 = tk.Label(root, text="First Name") entry1 = tk.Entry(root) label2 = tk.Label(root, text="Last Name") entry2 = tk.Entry(root) button1 = tk.Button(root, text="Submit") label1.grid(row=0, column=0, padx=5, pady=5) entry1.grid(row=0, column=1, padx=5, pady=5) label2.grid(row=1, column=0, padx=5, pady=5) entry2.grid(row=1, column=1, padx=5, pady=5) button1.grid(row=2, column=1, padx=5, pady=5, sticky="E") root.mainloop()

In this example, we create two labels, two entry widgets, and a button and place them in the grid. We use padx and pady to add padding around the widgets. button1 is aligned to the right within its cell using sticky.
Example 6:
How use rowspan, columnspan, sticky, padx, and pady ?
import tkinter as tk root = tk.Tk() label1 = tk.Label(root, text="Label 1") label2 = tk.Label(root, text="Label 2") label3 = tk.Label(root, text="Label 3") button1 = tk.Button(root, text="Button 1") button2 = tk.Button(root, text="Button 2") button3 = tk.Button(root, text="Button 3") label1.grid(row=0, column=0, padx=5, pady=5) label2.grid(row=0, column=1, padx=5, pady=5) label3.grid(row=0, column=2, rowspan=2, sticky="NS", padx=5, pady=5) button1.grid(row=1, column=0, padx=5, pady=5) button2.grid(row=1, column=1, padx=5, pady=5) button3.grid(row=2, column=0, columnspan=2, sticky="EW", padx=5, pady=5) root.mainloop()

In this example, we create three labels and three buttons and place them in the grid
Some uses of Grid Geometry manager with code examples
The Grid geometry manager is a versatile layout manager in tkinter that allows you to create complex layouts for your GUI applications. Here are some common use cases of the Grid geometry manager with code examples:
How to create a Simple Grid Layout ?
The simplest use case of the Grid geometry manager is to create a grid of rows and columns and place widgets in each cell of the grid.
Here’s an example:
import tkinter as tk root = tk.Tk() # Create labels label1 = tk.Label(root, text="Label 1") label2 = tk.Label(root, text="Label 2") label3 = tk.Label(root, text="Label 3") # Create buttons button1 = tk.Button(root, text="Button 1") button2 = tk.Button(root, text="Button 2") button3 = tk.Button(root, text="Button 3") # Create grid layout label1.grid(row=0, column=0) label2.grid(row=0, column=1) label3.grid(row=1, column=0) button1.grid(row=1, column=1) button2.grid(row=2, column=0) button3.grid(row=2, column=1) root.mainloop()

How to create Grid Layout with Spanning Widgets ?
You can use the rowspan and columnspan options of the Grid geometry manager to create widgets that span multiple rows or columns.
Here’s an example:
import tkinter as tk root = tk.Tk() # Create labels label1 = tk.Label(root, text="Label 1") label2 = tk.Label(root, text="Label 2") label3 = tk.Label(root, text="Label 3") # Create buttons button1 = tk.Button(root, text="Button 1") button2 = tk.Button(root, text="Button 2", padx=10, pady=10) button3 = tk.Button(root, text="Button 3") # Create grid layout label1.grid(row=0, column=0) label2.grid(row=0, column=1) label3.grid(row=1, column=0, columnspan=2) button1.grid(row=2, column=0) button2.grid(row=2, column=1) button3.grid(row=3, column=0, columnspan=2) root.mainloop()

How to create a Responsive Grid Layout?
The Grid geometry manager can be used to create responsive layouts that adjust to changes in window size or widget content.
Here’s an example:
here’s the complete example for the responsive grid layout:
import tkinter as tk root = tk.Tk() # Create labels label1 = tk.Label(root, text="Label 1") label2 = tk.Label(root, text="Label 2") label3 = tk.Label(root, text="Label 3") label4 = tk.Label(root, text="Label 4") label5 = tk.Label(root, text="Label 5") label6 = tk.Label(root, text="Label 6") # Create buttons button1 = tk.Button(root, text="Button 1") button2 = tk.Button(root, text="Button 2", padx=10, pady=10) button3 = tk.Button(root, text="Button 3") button4 = tk.Button(root, text="Button 4") button5 = tk.Button(root, text="Button 5") # Create grid layout root.columnconfigure(0, weight=1) root.columnconfigure(1, weight=1) root.rowconfigure(0, weight=1) root.rowconfigure(1, weight=1) root.rowconfigure(2, weight=1) label1.grid(row=0, column=0, sticky="nsew") label2.grid(row=0, column=1, sticky="nsew") label3.grid(row=1, column=0, sticky="nsew") label4.grid(row=1, column=1, sticky="nsew") label5.grid(row=2, column=0, sticky="nsew") label6.grid(row=2, column=1, sticky="nsew") button1.grid(row=3, column=0, sticky="nsew") button2.grid(row=3, column=1, sticky="nsew") button3.grid(row=4, column=0, sticky="nsew") button4.grid(row=4, column=1, sticky="nsew") button5.grid(row=5, column=0, columnspan=2, sticky="nsew") root.mainloop()
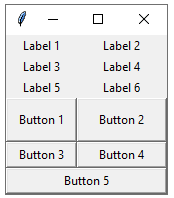
This code creates a grid layout with six rows and two columns.
The first four rows contain labels, and the last two rows contain buttons.
The columnconfigure and rowconfigure methods are used to set the weights of the columns and rows so that they expand when the window is resized.
The sticky option is set to “nsew” to make the widgets fill the cells of the grid.
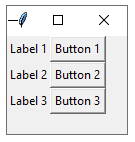
How to create a Simple grid layout with labels and buttons?
import tkinter as tk root = tk.Tk() # Create labels label1 = tk.Label(root, text="Label 1") label2 = tk.Label(root, text="Label 2") label3 = tk.Label(root, text="Label 3") # Create buttons button1 = tk.Button(root, text="Button 1") button2 = tk.Button(root, text="Button 2") button3 = tk.Button(root, text="Button 3") # Create grid layout label1.grid(row=0, column=0) label2.grid(row=1, column=0) label3.grid(row=2, column=0) button1.grid(row=0, column=1) button2.grid(row=1, column=1) button3.grid(row=2, column=1) root.mainloop()
How to create Grid layout with frames?
import tkinter as tk root = tk.Tk() # Create frames frame1 = tk.Frame(root, bd=2, relief="groove") frame2 = tk.Frame(root, bd=2, relief="groove") frame3 = tk.Frame(root, bd=2, relief="groove") # Create labels label1 = tk.Label(frame1, text="Label 1") label2 = tk.Label(frame2, text="Label 2") label3 = tk.Label(frame3, text="Label 3") # Create buttons button1 = tk.Button(frame1, text="Button 1") button2 = tk.Button(frame2, text="Button 2") button3 = tk.Button(frame3, text="Button 3") # Create grid layout frame1.grid(row=0, column=0) frame2.grid(row=0, column=1) frame3.grid(row=0, column=2) label1.grid(row=0, column=0) label2.grid(row=0, column=0) label3.grid(row=0, column=0) button1.grid(row=1, column=0) button2.grid(row=1, column=0) button3.grid(row=1, column=0) root.mainloop()
How to create Grid layout with padding ?
import tkinter as tk root = tk.Tk() # Create labels label1 = tk.Label(root, text="Label 1") label2 = tk.Label(root, text="Label 2") label3 = tk.Label(root, text="Label 3") # Create buttons button1 = tk.Button(root, text="Button 1") button2 = tk.Button(root, text="Button 2") button3 = tk.Button(root, text="Button 3") # Create grid layout label1.grid(row=0, column=0, padx=10, pady=10) label2.grid(row=1, column=0, padx=10, pady=10) label3.grid(row=2, column=0, padx=10, pady=10) button1.grid(row=0, column=1, padx=10, pady=10) button2.grid(row=1, column=1, padx=10, pady=10) button3.grid(row=2, column=1, padx=10, pady=10) root.mainloop()
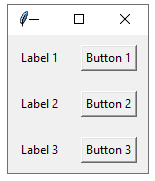
In this example, the padx and pady options are used to add padding to the cells of the grid.
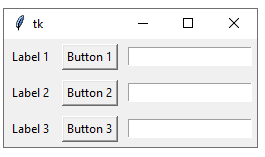
How to create Grid layout with multiple widgets in a cell ?
import tkinter as tk root = tk.Tk() # Create labels label1 = tk.Label(root, text="Label 1") label2 = tk.Label(root, text="Label 2") label3 = tk.Label(root, text="Label 3") # Create buttons button1 = tk.Button(root, text="Button 1") button2 = tk.Button(root, text="Button 2") button3 = tk.Button(root, text="Button 3") # Create entry widgets entry1 = tk.Entry(root) entry2 = tk.Entry(root) entry3 = tk.Entry(root) # Create grid layout label1.grid(row=0, column=0) label2.grid(row=1, column=0) label3.grid(row=2, column=0) button1.grid(row=0, column=1) button2.grid(row=1, column=1) button3.grid(row=2, column=1) entry1.grid(row=0, column=2) entry2.grid(row=1, column=2) entry3.grid(row=2, column=2) root.mainloop()

How to create Grid layout with resizable columns and rows?
import tkinter as tk root = tk.Tk() # Create labels label1 = tk.Label(root, text="Label 1") label2 = tk.Label(root, text="Label 2") label3 = tk.Label(root, text="Label 3") # Create buttons button1 = tk.Button(root, text="Button 1") button2 = tk.Button(root, text="Button 2") button3 = tk.Button(root, text="Button 3") # Create entry widgets entry1 = tk.Entry(root) entry2 = tk.Entry(root) entry3 = tk.Entry(root) # Create grid layout root.columnconfigure(0, weight=1) root.columnconfigure(1, weight=1) root.columnconfigure(2, weight=1) root.rowconfigure(0, weight=1) root.rowconfigure(1, weight=1) root.rowconfigure(2, weight=1) label1.grid(row=0, column=0, padx=5, pady=5) label2.grid(row=1, column=0, padx=5, pady=5) label3.grid(row=2, column=0, padx=5, pady=5) button1.grid(row=0, column=1, padx=5, pady=5) button2.grid(row=1, column=1, padx=5, pady=5) button3.grid(row=2, column=1, padx=5, pady=5) entry1.grid(row=0, column=2, padx=5, pady=5) entry2.grid(row=1, column=2, padx=5, pady=5) entry3.grid(row=2, column=2, padx=5, pady=5) root.mainloop()
In this example, the columnconfigure and rowconfigure methods are used to make the columns and rows resizable.
The weight option is used to specify how much each column or row should expand when the window is resized.
The padx and pady options are used to add padding to the cells of the grid.
How to create Calculator application by grid manager ?
Here is an example of a complete application that uses the Grid geometry manager in Tkinter:
import tkinter as tk
class Calculator(tk.Frame):
def __init__(self, master=None):
super().__init__(master)
self.master = master
self.master.title("Calculator")
self.create_widgets()
def create_widgets(self):
# Create entry widget
self.entry = tk.Entry(self.master, width=20, font=('Arial', 16), justify='right')
self.entry.grid(row=0, column=0, columnspan=4, padx=5, pady=5)
# Create buttons
self.create_button('C', self.clear_entry, 1, 0)
self.create_button('/', lambda: self.insert_symbol('/'), 1, 1)
self.create_button('*', lambda: self.insert_symbol('*'), 1, 2)
self.create_button('-', lambda: self.insert_symbol('-'), 1, 3)
self.create_button('7', lambda: self.insert_number('7'), 2, 0)
self.create_button('8', lambda: self.insert_number('8'), 2, 1)
self.create_button('9', lambda: self.insert_number('9'), 2, 2)
self.create_button('+', lambda: self.insert_symbol('+'), 2, 3)
self.create_button('4', lambda: self.insert_number('4'), 3, 0)
self.create_button('5', lambda: self.insert_number('5'), 3, 1)
self.create_button('6', lambda: self.insert_number('6'), 3, 2)
self.create_button('1', lambda: self.insert_number('1'), 4, 0)
self.create_button('2', lambda: self.insert_number('2'), 4, 1)
self.create_button('3', lambda: self.insert_number('3'), 4, 2)
self.create_button('0', lambda: self.insert_number('0'), 5, 0, columnspan=2)
self.create_button('.', lambda: self.insert_symbol('.'), 5, 2)
self.create_button('=', self.calculate, 5, 3)
def create_button(self, text, command, row, column, columnspan=1):
button = tk.Button(self.master, text=text, width=5, font=('Arial', 16), command=command)
button.grid(row=row, column=column, columnspan=columnspan, padx=5, pady=5)
def insert_number(self, number):
self.entry.insert(tk.END, number)
def insert_symbol(self, symbol):
self.entry.insert(tk.END, symbol)
def clear_entry(self):
self.entry.delete(0, tk.END)
def calculate(self):
try:
result = eval(self.entry.get())
self.clear_entry()
self.insert_number(result)
except:
self.clear_entry()
self.insert_number('Error')
root = tk.Tk()
app = Calculator(root)
app.mainloop()
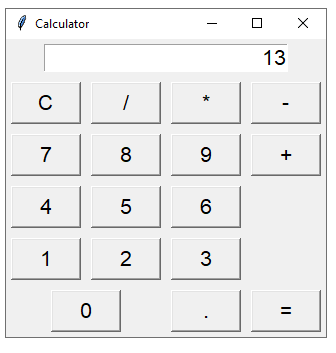
This application creates a simple calculator with the Grid geometry manager.
The create_widgets method creates the entry widget and buttons for the calculator, and uses the create_button method to create each button.
The insert_number, insert_symbol, and clear_entry methods are used to handle button clicks and update the entry widget.
The calculate method is used to evaluate the expression entered in the entry widget and display the result.
Quiz with answers
1-What is the Grid Geometry Manager used for in Python GUI applications?
A) Widget positioning and resizing
B) Creating new widgets
C) Changing widget colors
D) Widget event handling
Answer: A
2-Which library is commonly used for creating Python GUI applications with the Grid Geometry Manager?
A) NumPy
B) Matplotlib
C) Tkinter
D) Pandas
Answer: C
3-What are the advantages of using the Grid Geometry Manager over other layout managers in Tkinter?
A) More flexibility in widget positioning and resizing
B) Simpler syntax for widget placement
C) Better performance with large numbers of widgets
D) Easier to use with other GUI libraries
Answer: A
4-Which method is used to add a widget to the Grid Geometry Manager in Tkinter?
A) pack()
B) place()
C) grid()
D) add()
Answer: C
5-How can you specify the position of a widget in the Grid Geometry Manager?
A) Using the x and y coordinates
B) Using the row and column numbers
C) Using the width and height values
D) Using the pack() method
Answer: B
6-What is the syntax for adding a widget to the Grid Geometry Manager with a specific row and column position?
A) widget.add(row, column)
B) widget.pack(row, column)
C) widget.place(row, column)
D) widget.grid(row=row_num, column=col_num)
Answer: D
7-How can you make a widget span multiple rows or columns in the Grid Geometry Manager?
A) Using the span() method
B) Using the merge() method
C) Using the rowspan and columnspan parameters
D) Using the expand() method
Answer: C
8-What is the benefit of using the Grid Geometry Manager for responsive design in Python GUI applications?
A) Widgets can be automatically resized based on the size of the window
B) Widgets can be automatically repositioned based on the size of the window
C) The layout can be adjusted for different screen resolutions and aspect ratios
D) All of the above
Answer: D
9-Which of the following is NOT a parameter that can be used when adding a widget to the Grid Geometry Manager?
A) row
B) column
C) size
D) rowspan
Answer: C
10-What is the default value for the rowspan and columnspan parameters in the Grid Geometry Manager?
A) 1
B) 0
C) 2
D) None
Answer: A
11-How can you add padding between widgets in the Grid Geometry Manager?
A) Using the padx and pady parameters
B) Using the pack() method
C) Using the place() method
D) Padding is not supported in the Grid Geometry Manager
Answer: A
12-What happens if a widget is added to the Grid Geometry Manager without specifying a row or column?
A) The widget will be positioned randomly on the GUI
B) An error will be raised
C) The widget will be added to the first available row and column
D) The widget will be added to the last row and column
Answer: C
13-How can you resize a widget in the Grid Geometry Manager to fill its cell?
A) Using the fill parameter
B) Using the resize parameter
C) Using the expand parameter
D) Resizing a widget to fill its cell is not supported in the Grid Geometry Manager
Answer: A
14-What is the syntax for specifying a minimum and maximum size for a widget in the Grid Geometry Manager?
A) widget.grid(minsize=(x, y), maxsize=(x, y))
B) widget.grid(minsize=(x, y), maxsize=(x))
C) widget.grid(minsize=x, maxsize=(x, y))
D) widget.grid(minsize=x, maxsize=x)
Answer: A
15-How can you create a responsive grid layout in the Grid Geometry Manager that adjusts to the size of the window?
A) Using the columnconfigure() and rowconfigure() methods
B) Using the expand parameter
C) Using the size parameter
D) Responsive grid layouts are not supported in the Grid Geometry Manager
Answer: A
16-How can you specify the position of a widget in the Grid Geometry Manager?
A) Using the place() method
B) Using the pack() method
C) Using the row and column parameters
D) The position is determined automatically based on other widgets in the grid
Answer: C
17-What is the syntax for specifying the size of a widget in the Grid Geometry Manager?
A) widget.grid(size=(x, y))
B) widget.grid(width=x, height=y)
C) widget.grid(size=x)
D) The size is determined automatically based on the contents of the widget
Answer: B
18-How can you create a widget that spans multiple rows or columns in the Grid Geometry Manager?
A) Using the rowspan and columnspan parameters
B) Using the expand parameter
C) Using the size parameter
D) Spanning multiple rows or columns is not supported in the Grid Geometry Manager
Answer: A
19-What is the purpose of the sticky parameter in the Grid Geometry Manager?
A) To specify the position of a widget in its cell
B) To specify the alignment of a widget within its cell
C) To specify the size of a widget in its cell
D) The sticky parameter is not a valid parameter in the Grid Geometry Manager
Answer: B
20-How can you specify the minimum size of a row or column in the Grid Geometry Manager?
A) Using the columnconfigure() and rowconfigure() methods
B) Using the expand parameter
C) Using the size parameter
D) Minimum row and column sizes cannot be specified in the Grid Geometry Manager
Answer: A
21-How can you remove a widget from the Grid Geometry Manager?
A) Using the forget() method
B) Using the remove() method
C) Removing a widget is not supported in the Grid Geometry Manager
D) The widget is automatically removed when the program exits
Answer: A
22-How can you create a widget with a fixed size in the Grid Geometry Manager that does not adjust to the size of its contents?
A) Using the fill parameter
B) Using the resize parameter
C) Using the size parameter
D) Widgets in the Grid Geometry Manager always adjust to the size of their contents
Answer: C
23-What is the default value of the padx and pady parameters in the Grid Geometry Manager?
A) 0
B) 1
C) 5
D) 10
Answer: A
24-How can you align a widget within its cell in the Grid Geometry Manager?
A) Using the align parameter
B) Using the anchor parameter
C) Using the position parameter
D) Alignment is not supported in the Grid Geometry Manager
Answer: B
25-How can you specify the vertical and horizontal spacing between widgets in the Grid Geometry Manager?
A) Using the spacing parameter
B) Using the margin parameter
C) Using the padx and pady parameters
D) Using the columnconfigure() and rowconfigure() methods
Answer: C
26-How can you set a background color for a widget in the Grid Geometry Manager?
A) Using the set_color() method
B) Using the background parameter
C) Setting the color is not supported in the Grid Geometry Manager
D) Background color is determined automatically based on the widget’s position in the grid
Answer: B
27-How can you make a widget fill its entire cell in the Grid Geometry Manager?
A) Using the fill parameter
B) Using the size parameter
C) Using the expand parameter
D) Widgets in the Grid Geometry Manager always fill their entire cell
Answer: A
28-How can you create a widget that is centered within its cell in the Grid Geometry Manager?
A) Using the center parameter
B) Using the align parameter with the “center” value
C) Centering is not supported in the Grid Geometry Manager
D) Using the anchor parameter with the “center” value
Answer: D
29-How can you create a widget that spans multiple rows and columns with the same width and height in the Grid Geometry Manager?
A) Using the rowspan and columnspan parameters, and setting the width and height using the configure() method
B) Using the size parameter and the rowspan and columnspan parameters together
C) Spanning multiple rows and columns with the same width and height is not supported in the Grid Geometry Manager
D) Using the rowspan and columnspan parameters, and setting the width and height using the columnconfigure() and rowconfigure() methods
Answer: D
Refrences of this lesson with links
Sure, here are some references with links related to the Grid Geometry Manager in Python GUI applications using Tkinter:
Tkinter documentation on the Grid Geometry Manager:
A tutorial on the Grid Geometry Manager from Real Python:
A tutorial on using the Grid Geometry Manager for responsive GUI layouts from TkDocs:
A tutorial on using the Grid Geometry Manager for complex GUI layouts from tkinter.ttkthemes:
books
Python GUI Programming with Tkinter by Alan D. Moore:
Tkinter GUI Programming by Example: Learn to create modern GUIs using Python’s built-in toolkit by David Love:
Tkinter GUI Application Development Blueprints: Master GUI programming in Tkinter as you design, implement, and deliver ten real-world applications from scratch by Bhaskar Chaudhary:
Python GUI with Tkinter: Build desktop Apps with Python by Paul S. Wang:
Tkinter GUI Programming Cookbook: Over 100 practical recipes on using the features of Tkinter to build desktop applications by Bhaskar Chaudhary: