
Python Tkinter PanedWindow widget
Python Tkinter PanedWindow widget
Tkinter PanedWindow is a widget in the Tkinter GUI toolkit that allows the user to split the window into two or more panes, each of which can contain other widgets.
The panes can be resized by dragging the sash that separates them, and the sizes of the panes can be adjusted dynamically by the user or programmatically by the application.
The PanedWindow widget is created using the PanedWindow class.
The panes can be added to it using the add() method.
Each pane can contain other widgets, which can be added using the add() method of the pane.
The configure() method can be used to set various properties of the PanedWindow, such as the orientation (horizontal or vertical) and the size of the sash.
The PanedWindow widget can be useful for creating user interfaces that require the user to view multiple pieces of information simultaneously, such as a file manager or a video player.
By allowing the user to resize the panes, the application can provide a flexible and customizable interface that adapts to the user’s needs.
So
In this lesson, we covered the basics of PanedWindow in Tkinter, including its syntax, options, and methods. We explored how to create a PanedWindow widget and add panes to it, as well as how to adjust the size and position of panes and the divider between them.
We also discussed some common uses for PanedWindow in Tkinter, such as creating resizable interfaces and building multi-pane applications. Finally, we included some multiple-choice questions and answers to help reinforce the concepts covered in this lesson.
How to create Tkinter PanedWindow ?
To create a PanedWindow in Tkinter, you can follow these steps:
1-Import the tkinter module:
from tkinter import *
2-Create a Tkinter root window:
root = Tk()
3-Create a PanedWindow widget:
paned_window = PanedWindow(root, orient=HORIZONTAL)
Here, orient specifies the orientation of the PanedWindow.
It can be either HORIZONTAL or VERTICAL.
4-Create the panes for the PanedWindow.
You can use any other Tkinter widget, such as Frame, Label, or Button, as a pane:
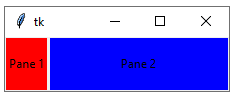
pane1 = Label(paned_window, text='Pane 1', bg='red') pane2 = Label(paned_window, text='Pane 2', bg='blue')
5-Add the panes to the PanedWindow using the add() method:
paned_window.add(pane1) paned_window.add(pane2)
6-Display the PanedWindow by packing it into the root window:
paned_window.pack(fill=BOTH, expand=1)
Here, fill=BOTH and expand=1 are used to make the PanedWindow fill the available space in both the x and y directions.
7-Start the Tkinter event loop:
root.mainloop()
Here’s the complete code for creating a PanedWindow with two panes:
from tkinter import * root = Tk() paned_window = PanedWindow(root, orient=HORIZONTAL) pane1 = Label(paned_window, text='Pane 1', bg='red') pane2 = Label(paned_window, text='Pane 2', bg='blue') paned_window.add(pane1) paned_window.add(pane2) paned_window.pack(fill=BOTH, expand=1) root.mainloop()
This will create a horizontal PanedWindow with two panes, with the first pane having a red background and the second pane having a blue background.
Example
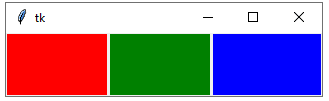
from tkinter import * root = Tk() # create a PanedWindow widget paned_window = PanedWindow(root, orient=HORIZONTAL) # add panes to the PanedWindow pane1 = Frame(paned_window, width=100, height=200, bg='red') pane2 = Frame(paned_window, width=100, height=200, bg='green') pane3 = Frame(paned_window, width=100, height=200, bg='blue') paned_window.add(pane1) paned_window.add(pane2) paned_window.add(pane3) # display the PanedWindow widget paned_window.pack(fill=BOTH, expand=1) root.mainloop()
So ,This creates a PanedWindow with three panes, each with a different background color. The add() method is used to add the panes to the PanedWindow, and the pack() method is used to display the PanedWindow in the root window.
The options of Tkinter PanedWindow and their uses with code examples
Here are some of the options available for the PanedWindow widget in Tkinter, along with their uses and code examples:
orient:
Specifies the orientation of the PanedWindow.
It can be either HORIZONTAL or VERTICAL.
paned_window = PanedWindow(root, orient=HORIZONTAL)
sashwidth:
Specifies the width of the sash that separates the panes.
paned_window = PanedWindow(root, sashwidth=10)
sashrelief:
Specifies the relief style of the sash. It can be RAISED, SUNKEN, FLAT, RIDGE, GROOVE, or SOLID.
paned_window = PanedWindow(root, sashrelief=RAISED)
handlepad:
Specifies the padding around the sash.
paned_window = PanedWindow(root, handlepad=10)
handlesize:
Specifies the size of the handle that is used to resize the panes.
paned_window = PanedWindow(root, handlesize=20)
showhandle:
Specifies whether or not to display the handle. It can be set to False to hide the handle.
paned_window = PanedWindow(root, showhandle=False)
width:
Specifies the width of the PanedWindow.
paned_window = PanedWindow(root, width=500)
height:
Specifies the height of the PanedWindow.
paned_window = PanedWindow(root, height=500)
Here’s an example that shows how to use some of these options:
from tkinter import * root = Tk() paned_window = PanedWindow(root, orient=HORIZONTAL, sashwidth=10, sashrelief=RAISED, handlepad=10, handlesize=20) pane1 = Label(paned_window, text='Pane 1', bg='yellow') pane2 = Label(paned_window, text='Pane 2', bg='pink') paned_window.add(pane1) paned_window.add(pane2) paned_window.pack(fill=BOTH, expand=1) root.mainloop()
So, This creates a horizontal PanedWindow with two panes, with a raised sash, a handle size of 20, a handle padding of 10, and a sash width of 10.

bg:
Specifies the background color of the PanedWindow.
paned_window = PanedWindow(root, bg='white')
borderwidth:
Specifies the width of the border around the PanedWindow.
paned_window = PanedWindow(root, borderwidth=5)
relief:
Specifies the border style of the PanedWindow.
It can be RAISED, SUNKEN, FLAT, RIDGE, GROOVE, or SOLID.
paned_window = PanedWindow(root, relief=RAISED)
opaqueresize:
Specifies whether or not to draw a solid line when resizing the panes.
paned_window = PanedWindow(root, opaqueresize=True)
show:
Specifies whether or not to display the PanedWindow.
It can be set to False to hide the PanedWindow.
paned_window = PanedWindow(root, show=False)
before:
Specifies the widget to insert the new pane before.
pane3 = Label(paned_window, text='Pane 3', bg='green') paned_window.add(pane3, before=pane2)
after:
Specifies the widget to insert the new pane after.
pane4 = Label(paned_window, text='Pane 4', bg='yellow') paned_window.add(pane4, after=pane2)
Here’s an example that shows how to use some of these options:
from tkinter import * root = Tk() paned_window = PanedWindow(root, bg='white', borderwidth=5, relief=RAISED, opaqueresize=True) pane1 = Label(paned_window, text='Pane 1', bg='red') pane2 = Label(paned_window, text='Pane 2', bg='blue') pane3 = Label(paned_window, text='Pane 3', bg='green') pane4 = Label(paned_window, text='Pane 4', bg='yellow') paned_window.add(pane1) paned_window.add(pane2) paned_window.add(pane3, before=pane2) paned_window.add(pane4, after=pane2) paned_window.pack(fill=BOTH, expand=1) root.mainloop()
So This creates a horizontal PanedWindow with four panes, with a white background, a raised border with a width of 5, a solid line when resizing, and a new pane inserted before and after pane 2.

Example
from tkinter import * root = Tk() paned_window = PanedWindow(root, opaqueresize=True, showhandle=True, handlesize=10, height=300, width=400) pane1 = Label(paned_window, text='Pane 1', bg='red') pane2 = Label(paned_window, text='Pane 2', bg='blue') pane3 = Label(paned_window, text='Pane 3', bg='green') pane4 = Label(paned_window, text='Pane 4', bg='yellow') paned_window.add(pane1) paned_window.add(pane2) paned_window.add(pane3, before=pane2) paned_window.add(pane4, after=pane2) paned_window.pack(fill=BOTH, expand=1) root.mainloop()
So ,this creates a horizontal PanedWindow with four panes, with opaque resizing, a visible handle, a handle size of 10 pixels, a height of 300 pixels, and a width of 400 pixels.

Refrences of this lesson
“The Tkinter PanedWindow Widget” TkDocs.com. [Online]. Available:
“Tkinter PanedWindow Widget” GeeksforGeeks.org.
“Tkinter PanedWindow” Programiz.com. [Online].
[Accessed: 14-Apr-2023].
“Tkinter PanedWindow widget” effbot.org. [Online]. Available:
[Accessed: 14-Apr-2023].