
Python tkinter geometry Pack geometry manager part 2
Using the Pack Geometry Manager in Tkinter: A Comprehensive Guide
Introduction: In this tutorial, we will explore how to use the Pack geometry manager in Tkinter to create graphical user interfaces (GUIs) for Python applications. We will cover the basics of how Pack works, including its various parameters and options. Then, we will provide several examples of how to use Pack to create applications, such as a simple calculator and an advanced GUI with multiple frames and widgets. By the end of this tutorial, you will have a comprehensive understanding of how to use Pack in your own Python projects.
The parameters and options of Pack geometry manager
Here are the parameters and options of the Pack geometry manager in Tkinter:
side:
specifies which side to pack the widget against (can be “top”, “bottom”, “left”, or “right”)
fill:
specifies how the widget should fill its allocated space (can be “none”, “x”, “y”, or “both”)
expand:
specifies whether the widget should expand to fill any extra space (default is False)
anchor:
specifies where the widget should be placed within its allocated space (can be “n”, “ne”, “e”, “se”, “s”, “sw”, “w”, “nw”, or “center”)
ipadx and ipady:
specify internal padding within the widget (in pixels)
padx and pady:
specify external padding around the widget (in pixels)
before:
pack the widget before another widget (specified as a widget object)
after:
pack the widget after another widget (specified as a widget object)
in_:
specifies the parent widget to pack the widget into (default is the current focus widget)
Here are some examples of using these parameters and options with the Pack geometry manager:
Example 1:
How to Pack widgets top to bottom?
import tkinter as tk
window = tk.Tk()
window.title("My Window")
label1 = tk.Label(window, text="Label 1")
label1.pack(side="top", pady=5)
label2 = tk.Label(window, text="Label 2")
label2.pack(side="top", pady=5)
label3 = tk.Label(window, text="Label 3")
label3.pack(side="top", pady=5)
window.mainloop()

In this example, we create three Label widgets and pack them top to bottom using the side parameter set to “top”.
We also add some padding using the pady parameter to create some space between the widgets.
Example
How to Pack widgets left to right ?
import tkinter as tk
window = tk.Tk()
window.title("My Window")
button1 = tk.Button(window, text="Button 1")
button1.pack(side="left", padx=5)
button2 = tk.Button(window, text="Button 2")
button2.pack(side="left", padx=5)
button3 = tk.Button(window, text="Button 3")
button3.pack(side="left", padx=5)
window.mainloop()

In this example, we create three Button widgets and pack them left to right using the side parameter set to “left”.
We also add some padding using the padx parameter to create some space between the widgets.
Example
How to Pack widgets using fill and expand ?
import tkinter as tk
window = tk.Tk()
window.title("My Window")
label1 = tk.Label(window, text="Label 1")
label1.pack(side="top", fill="x")
label2 = tk.Label(window, text="Label 2")
label2.pack(side="top", fill="x")
label3 = tk.Label(window, text="Label 3")
label3.pack(side="top", fill="both", expand=True)
window.mainloop()
In this example, we create three Label widgets and pack them top to bottom using the side parameter set to “top”.
We use the fill parameter to make the first two widgets fill horizontally, and the last widget fill both horizontally and vertically using the expand parameter.

Example 1:
How to Pack a widget before another widget?
import tkinter as tk
window = tk.Tk()
window.title("My Window")
label1 = tk.Label(window, text="Label 1")
label1.pack(side="top", pady=5)
label2 = tk.Label(window, text="Label 2")
label2.pack(side="top", pady=5)
label3 = tk.Label(window, text="Label 3")
label3.pack(side="top", pady=5, before=label2)
window.mainloop()

In this example, we create three Label widgets and pack them top to bottom using the side parameter set to “top”.
We use the before parameter to pack the third widget before the second widget.
Example:
How to Pack a widget after another widget?
import tkinter as tk
window = tk.Tk()
window.title("My Window")
button1 = tk.Button(window, text="Button 1")
button1.pack(side="left", padx=5)
button2 = tk.Button(window, text="Button 2")
button2.pack(side="left", padx=5, after=button1)
button3 = tk.Button(window, text="Button 3")
button3.pack(side="left", padx=5, after=button2)
window.mainloop()

In this example, we create three Button widgets and pack them left to right using the side parameter set to “left”.
We use the after parameter to pack the second widget after the first widget, and the third widget after the second widget.
Example
How to Pack a widget on the top side of a frame?
import tkinter as tk
root = tk.Tk()
root.title("My Window")
frame = tk.Frame(root, width=300, height=300)
frame.pack()
label = tk.Label(frame, text="Hello, World!")
label.pack(side="top")
root.mainloop()

In this example, we create a frame widget and pack it into the root window. We then create a label widget and pack it on the top side of the frame widget.
Example
How to Pack a widget with fill and expand options?
import tkinter as tk
root = tk.Tk()
root.title("My Window")
frame = tk.Frame(root, width=300, height=300,bg="red")
frame.pack(fill="both", expand=True)
label = tk.Label(frame, text="Hello, World!")
label.pack()
root.mainloop()

In this example, we create a frame widget and pack it into the root window with the fill option set to “both” and the expand option set to True.
This allows the frame widget to fill the entire window.
We then create a label widget and pack it into the frame widget, which will automatically fill the available space.
Example :
How to Pack widgets with padding and anchor options?
import tkinter as tk
root = tk.Tk()
root.title("My Window")
frame = tk.Frame(root, width=300, height=300)
frame.pack(fill="both", expand=True)
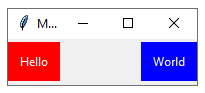
label1 = tk.Label(frame, text="Hello", bg="red", fg="white", padx=10, pady=10, anchor="w")
label1.pack(side="left", fill="both", expand=True)
label2 = tk.Label(frame, text="World", bg="blue", fg="white", padx=10, pady=10, anchor="e")
label2.pack(side="right", fill="both", expand=True)
root.mainloop()

In this example, we create a frame widget and pack it into the root window with the fill option set to “both” and the expand option set to True.
We then create two label widgets with different background colors and anchor options.
We pack them into the frame widget on the left and right sides respectively, with internal padding of 10 pixels and the fill and expand options set to “both”.
Example :
How to Pack widgets with before and after options?
import tkinter as tk
root = tk.Tk()
root.title("My Window")
frame = tk.Frame(root, width=300, height=300)
frame.pack(fill="both", expand=True)
label1 = tk.Label(frame, text="Hello", bg="red", fg="white", padx=10, pady=10)
label1.pack(side="left")
label2 = tk.Label(frame, text="World", bg="blue", fg="white", padx=10, pady=10)
label2.pack(side="right", before=label1)
root.mainloop()
In this example, we create a frame widget and pack it into the root window with the fill option set to “both” and the expand option set to True.
We then create two label widgets with different background colors and internal padding of 10 pixels.
We pack them into the frame widget on the left and right sides respectively, with the before parameter used to pack label2 before label1.
How to create a multi-pane user interface?
import tkinter as tk
class Application:
def __init__(self, master):
self.master = master
master.title("Pack Example")
self.frame1 = tk.Frame(master, bg="white", padx=10, pady=10)
self.frame1.pack(side="left", fill="both", expand=True)
self.frame2 = tk.Frame(master, bg="white", padx=10, pady=10)
self.frame2.pack(side="right", fill="both", expand=True)
self.label1 = tk.Label(self.frame1, text="This is frame 1", bg="white")
self.label1.pack()
self.button1 = tk.Button(self.frame1, text="Click me!", command=self.do_something)
self.button1.pack()
self.label2 = tk.Label(self.frame2, text="This is frame 2", bg="white")
self.label2.pack()
self.button2 = tk.Button(self.frame2, text="Quit", command=master.quit)
self.button2.pack(side="bottom")
def do_something(self):
print("You clicked the button in frame 1!")
root = tk.Tk()
app = Application(root)
root.mainloop()

In this example, the Application class creates a main window with two frames, one on the left and one on the right.
The fill and expand parameters are used to make the frames fill the available space in the window, and the padx and pady parameters are used to add padding around each frame.
Each frame contains a Label widget and a Button widget. The command parameter of the Button widget is used to specify the method that should be called when the button is clicked.
The do_something method is called when the button in frame 1 is clicked, and simply prints a message to the console.
The Button widget in frame 2 is used to exit the program when clicked.
Note that in this example, the fill and expand parameters of the pack method are used to make the frames fill the available space in the window. This allows the interface to be resized and still look good, regardless of the size of the window.
Quiz about this lesson with answer
1-Which method is used to pack widgets into a container with the Pack geometry manager?
- grid()
- place()
- pack()
- fill()
Answer: c
2-What are the valid values for the side parameter of the pack() method?
- top, bottom, left, right
- start, end, center
- left, right, top, bottom
- north, south, east, west
Answer: c
3-What are the valid values for the fill parameter of the pack() method?
- none, both, x, y
- top, bottom, left, right
- start, end, center
- north, south, east, west
Answer: a
4-What is the default value for the expand parameter of the pack() method?
- True
- False
- 0
- 1
Answer: b
5-Which parameter of the pack() method is used to set the internal padding of a widget?
- padx
- pady
- ipadx
- ipady
Answer: b
6-Which parameter of the pack() method is used to pack a widget before another widget?
- after
- before
- next
- previous
Answer: b
7-Which parameter of the pack() method is used to set the anchor position of a widget within its allocated space?
- padx
- pady
- anchor
- expand
Answer: c
8-Which option of the pack() method is used to stretch a widget to fill the available space in a given direction?
- fill
- expand
- side
- anchor
Answer: a
9-Which method is used to pack widgets into a container with the Pack geometry manager?
- grid()
- place()
- pack()
- fill()
Answer: c
10-What is the default value for the side parameter of the pack() method?
- top
- bottom
- left
- right
Answer: a
11-What are the valid values for the side parameter of the pack() method?
- top, bottom, left, right
- start, end, center
- left, right, top, bottom
- north, south, east, west
Answer: c
12-What are the valid values for the fill parameter of the pack() method?
- none, both, x, y
- top, bottom, left, right
- start, end, center
- north, south, east, west
Answer: a
13-Which parameter of the pack() method is used to set the internal padding of a widget?
- padx
- pady
- ipadx
- ipady
Answer: b
14-Which parameter of the pack() method is used to pack a widget before another widget?
- after
- before
- next
- previous
Answer: b
15-Which parameter of the pack() method is used to set the anchor position of a widget within its allocated space?
- padx
- pady
- anchor
- expand
Answer: c
16-Which option of the pack() method is used to stretch a widget to fill the available space in a given direction?
- fill
- expand
- side
- anchor
Answer: a
17-What is the default value for the expand parameter of the pack() method?
- True
- False
- 0
- 1
Answer: b
18-Which option of the pack() method is used to determine the order in which widgets are packed?
- before
- after
- side
- anchor
Answer: c
19-What is the purpose of the side parameter in the pack() method?
- To specify the order in which widgets are packed
- To set the padding around a widget
- To specify the anchor position of a widget within its allocated space
- To specify the side of the container where the widget should be placed
Answer: d
20-What is the purpose of the fill parameter in the pack() method?
- To specify the order in which widgets are packed
- To set the padding around a widget
- To stretch a widget to fill the available space in a given direction
- To specify the anchor position of a widget within its allocated space
Answer: c
21-What is the purpose of the padx parameter in the pack() method?
- To set the padding around a widget
- To specify the order in which widgets are packed
- To stretch a widget to fill the available space in a given direction
- To specify the anchor position of a widget within its allocated space
Answer: a
22-What is the purpose of the pady parameter in the pack() method?
- To set the padding around a widget
- To specify the order in which widgets are packed
- To stretch a widget to fill the available space in a given direction
- To specify the anchor position of a widget within its allocated space
Answer: a
23-What is the purpose of the expand parameter in the pack() method?
- To specify the order in which widgets are packed
- To set the padding around a widget
- To stretch a widget to fill the available space in a given direction
- To specify the anchor position of a widget within its allocated space
Answer: c
24-What is the default value for the anchor parameter in the pack() method?
- center
- north
- west
- east
Answer: a
25-What is the purpose of the before parameter in the pack() method?
- To pack a widget before another widget
- To pack a widget after another widget
- To pack a widget to the left of another widget
- To pack a widget to the right of another widget
Answer: a
26-What is the purpose of the after parameter in the pack() method?
- To pack a widget before another widget
- To pack a widget after another widget
- To pack a widget to the left of another widget
- To pack a widget to the right of another widget
Answer: b
27-What is the purpose of the side parameter in the pack_configure() method?
- To set the padding around a widget
- To specify the order in which widgets are packed
- To stretch a widget to fill the available space in a given direction
- To specify the side of the container where the widget should be placed
Answer: d
28-What is the purpose of the before parameter in the pack_configure() method?
- To pack a widget before another widget
- To pack a widget after another widget
- To pack a widget to the left of another widget
- To pack a widget to the right of another widget
Answer: a
Refrences of this lesson with links
The official Python documentation on Tkinter:
A tutorial on using Pack in Tkinter:
An article on the differences between Pack, Grid, and Place in Tkinter: