
Python Tkinter Radiobutton Widget
Python Tkinter Radiobutton Widget
Tkinter is a popular GUI toolkit for Python that allows developers to create desktop applications with graphical user interfaces. One of the widgets that Tkinter provides is the Radiobutton.
Radiobutton is a type of button that is used to select one option from a set of mutually exclusive options. In other words, when one Radiobutton is selected, all other Radiobuttons in the group are automatically deselected.
Syntax to create Tkinter Radiobutton
Here is the syntax to create a Radiobutton widget in Tkinter:
Radiobutton(parent, options...)
Here, parent is the parent widget or container where the Radiobutton will be placed.
How to create a set of Radiobuttons
Here is an example of how to create a set of Radiobuttons using Tkinter:
import tkinter as tk root = tk.Tk() # create a label to display the selected option selection_label = tk.Label(root, text="") # create a variable to hold the selected option selected_option = tk.StringVar() # create the Radiobuttons and add them to a frame options_frame = tk.Frame(root) option_1 = tk.Radiobutton(options_frame, text="Option 1", variable=selected_option, value="Option 1", command=lambda: selection_label.config(text=selected_option.get())) option_2 = tk.Radiobutton(options_frame, text="Option 2", variable=selected_option, value="Option 2", command=lambda: selection_label.config(text=selected_option.get())) option_3 = tk.Radiobutton(options_frame, text="Option 3", variable=selected_option, value="Option 3", command=lambda: selection_label.config(text=selected_option.get())) option_1.pack(anchor="w") option_2.pack(anchor="w") option_3.pack(anchor="w") # add the label and frame to the root window selection_label.pack() options_frame.pack() root.mainloop()
In this example, we create a window with three Radiobuttons that are all part of the same group (defined by the variable parameter). We also create a label that will display the selected option, and use the command parameter to update the label whenever a new Radiobutton is selected.
When the user selects one of the Radiobuttons, the value of that button is stored in the selected_option variable. The command parameter is used to call a function that updates the selection_label with the value of the selected_option variable.
This is just a basic example, and there are many other options and configurations that can be used with Radiobuttons in Tkinter.
A list of options of Tkinter Radiobutton
Here are some of the most commonly used options for the Tkinter Radiobutton widget:
activebackground: The background color of the Radiobutton when it is under the cursor.
activeforeground: The text color of the Radiobutton when it is under the cursor.
bg: The background color of the Radiobutton.
bd: The width of the border around the Radiobutton.
command: A function that will be called when the Radiobutton is selected.
disabledforeground: The text color of the Radiobutton when it is disabled.
font: The font used to display the label text.
fg: The text color of the Radiobutton.
Height: The height of the Radiobutton.
Highlightbackground: The color of the highlight border when the Radiobutton does not have focus.
Highlightcolor: The color of the highlight border when the Radiobutton has focus.
image: A photo image displayed on the Radiobutton.
indicatoron: Whether or not the Radiobutton should display a small circle indicating selection.
justify: The horizontal alignment of the label text.
padx: The amount of horizontal padding around the label text.
pady: The amount of vertical padding around the label text.
relief: The appearance of the border around the Radiobutton. Common values are “flat”, “groove”, “raised”, “ridge”, and “sunken”.
selectcolor: The color of the circle indicating selection.
selectimage: A photo image displayed on the Radiobutton when it is selected.
state: The initial state of the Radiobutton. The default is active, but it can also be set to disabled or normal.
text: The label or text displayed next to the Radiobutton.
textvariable: A Tkinter variable that holds the label text.
underline: The index of the character in the label text that should be underlined.
value: The value assigned to the variable when the Radiobutton is selected.
variable: The Tkinter variable that will hold the selected value. Radiobuttons that are part of the same group should have the same variable.
width: The width of the Radiobutton.
Note that this is not an exhaustive list, and there may be other options available depending on the version of Tkinter you are using.
code examples
Sure, here is a list of some common Radiobutton options with code examples:
import tkinter as tk
root = tk.Tk()
# create a variable to hold the selected option
selected_option = tk.StringVar()
# create a Radiobutton
option_1 = tk.Radiobutton(root, text="Option 1", variable=selected_option, value="Option 1")
# set the background color to red
option_1.configure(bg="red")
# set the font to Arial, bold, size 12
option_1.configure(font=("Arial", 12, "bold"))
# set the text color to white
option_1.configure(fg="white")
# set the width to 10 characters
option_1.configure(width=10)
# set the height to 3 characters
option_1.configure(height=3)
# set the border width to 2 pixels
option_1.configure(bd=2)
# set the relief style to ridge
option_1.configure(relief="ridge")
# set the padding to 10 pixels on the left and right
option_1.configure(padx=10)
# set the variable and value for the Radiobutton
option_2 = tk.Radiobutton(root, text="Option 2", variable=selected_option, value="Option 2")
# add the Radiobuttons to the root window using the pack method
option_1.pack()
option_2.pack()
root.mainloop()
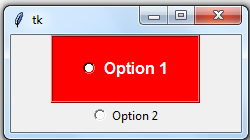
In this example, we create two Radiobuttons with the labels “Option 1” and “Option 2”, and assign them to the selected_option variable when selected. We then use various options to set the background color, font, text color, width, height, border width, relief style, padding, variable, and value for the Radiobuttons.
Finally, we add the Radiobuttons to the root window using the pack() method.
The options of Tkinter Radiobuttons Widget
Sure, here are some common options for the Tkinter Radiobutton widget with code examples:
Text
The text option is used to specify the text or label to be displayed next to the Radiobutton.
import tkinter as tk root = tk.Tk() # create a Radiobutton with the text "Option 1" option_1 = tk.Radiobutton(root, text="Option 1") # create a Radiobutton with the text "Option 2" option_2 = tk.Radiobutton(root, text="Option 2") option_1.pack() option_2.pack() root.mainloop()

variable and value
The variable option is used to associate a Tkinter variable with the Radiobutton, and the value option is used to specify the value assigned to the variable when the Radiobutton is selected.
import tkinter as tk root = tk.Tk() # create a variable to hold the selected option selected_option = tk.StringVar() # create a Radiobutton with the text "Option 1" and value "Option 1" option_1 = tk.Radiobutton(root, text="Option 1", variable=selected_option, value="Option 1") # create a Radiobutton with the text "Option 2" and value "Option 2" option_2 = tk.Radiobutton(root, text="Option 2", variable=selected_option, value="Option 2") option_1.pack() option_2.pack() root.mainloop()
command
The command option is used to specify a function that will be called when the Radiobutton is selected.
import tkinter as tk
root = tk.Tk()
# create a function to be called when the Radiobutton is selected
def select_option():
print("Option selected!")
# create a Radiobutton with the text "Option 1" and a command to call the select_option function
option_1 = tk.Radiobutton(root, text="Option 1", command=select_option)
option_1.pack()
root.mainloop()

activebackground and activeforeground
The activebackground option is used to set the background color of the Radiobutton when it is under the cursor, and the activeforeground option is used to set the text color of the Radiobutton when it is under the cursor.
selectcolor
The selectcolor option is used to set the color of the circle that indicates selection.
import tkinter as tk root = tk.Tk() # create a Radiobutton with the text "Option 1" option_1 = tk.Radiobutton(root, text="Option 1") # set the color of the selection circle to red option_1.configure(selectcolor="red") option_1.pack() root.mainloop()

justify
The justify option is used to specify the alignment of the Radiobutton’s text.
import tkinter as tk root = tk.Tk() # create a Radiobutton with the text "Option 1" aligned to the left option_1 = tk.Radiobutton(root, text="Option 1", justify="left") # create a Radiobutton with the text "Option 2" aligned to the center option_2 = tk.Radiobutton(root, text="Option 2", justify="center") option_1.pack() option_2.pack() root.mainloop()
wraplength
The wraplength option is used to specify the maximum length of a line of text before it wraps to the next line.
import tkinter as tk root = tk.Tk() # create a Radiobutton with the text "Option 1" wrapped to a maximum of 100 pixels per line option_1 = tk.Radiobutton(root, text="Option 1", wraplength=100) option_1.pack() root.mainloop()
font
The font option is used to set the font of the Radiobutton’s text.
import tkinter as tk
root = tk.Tk()
# create a Radiobutton with the text "Option 1" in a bold font
option_1 = tk.Radiobutton(root, text="Option 1", font=("Arial Bold", 12))
option_1.pack()
root.mainloop()

width and height
The width and height options are used to specify the width and height of the Radiobutton.
import tkinter as tk root = tk.Tk() # create a Radiobutton with a width of 20 and a height of 10 option_1 = tk.Radiobutton(root, text="Option 1", width=20, height=10) option_1.pack() root.mainloop()
padx and pady
The padx and pady options are used to specify the amount of padding to add to the left and right, and top and bottom, respectively, of the Radiobutton’s text.
import tkinter as tk root = tk.Tk() # create a Radiobutton with the text "Option 1" with 10 pixels of padding on each side option_1 = tk.Radiobutton(root, text="Option 1", padx=10, pady=10) option_1.pack() root.mainloop()
indicatoron
The indicatoron option is used to specify whether or not the Radiobutton displays an indicator.
By default, the indicator is displayed, but you can turn it off by setting indicatoron=0.
import tkinter as tk root = tk.Tk() # create a Radiobutton with no indicator option_1 = tk.Radiobutton(root, text="Option 1", indicatoron=0) option_1.pack() root.mainloop()

activebackground and activeforeground
The activebackground and activeforeground options are used to specify the background and foreground colors, respectively, of the Radiobutton when the mouse pointer is over it.
import tkinter as tk root = tk.Tk() # create a Radiobutton with the text "Option 1" and a blue background and white foreground when active option_1 = tk.Radiobutton(root, text="Option 1", activebackground="blue", activeforeground="white") option_1.pack() root.mainloop()
value
The value option is used to set the value of the Radiobutton when it is selected.
import tkinter as tk root = tk.Tk() # create two Radiobuttons with different values option_1 = tk.Radiobutton(root, text="Option 1", value=1) option_2 = tk.Radiobutton(root, text="Option 2", value=2) option_1.pack() option_2.pack() root.mainloop()
state
The state option is used to set the state of the Radiobutton. By default, it is set to ‘normal’, but you can disable the Radiobutton by setting state=’disabled’.
import tkinter as tk root = tk.Tk() # create a Radiobutton that is disabled option_1 = tk.Radiobutton(root, text="Option 1", state='disabled') option_1.pack() root.mainloop()

command
The command option is used to set a function to be called when the Radiobutton is selected.
import tkinter as tk
root = tk.Tk()
# create a function that will be called when the Radiobutton is selected
def on_select():
print("Selected")
# create a Radiobutton with the function set as its command
option_1 = tk.Radiobutton(root, text="Option 1", command=on_select)
option_1.pack()
root.mainloop()

overrelief and offrelief
The overrelief and offrelief options are used to set the relief of the Radiobutton when the mouse pointer is over it and when it is not selected, respectively.
import tkinter as tk root = tk.Tk() # create a Radiobutton with a dashed relief when the mouse pointer is over it, and a solid relief when it is not selected option_1 = tk.Radiobutton(root, text="Option 1", overrelief='ridge', offrelief='solid') option_1.pack() root.mainloop()
wraplength
The wraplength option is used to set the width, in pixels, of the text area in the Radiobutton. If the text is longer than this width, it will wrap to the next line.
import tkinter as tk root = tk.Tk() # create a Radiobutton with a wraplength of 100 pixels option_1 = tk.Radiobutton(root, text="A very long option that will wrap to the next line if the wraplength is set to 100 pixels", wraplength=100) option_1.pack() root.mainloop()

anchor
The anchor option is used to set the alignment of the text in the Radiobutton.
import tkinter as tk root = tk.Tk() # create a Radiobutton with the text aligned to the right option_1 = tk.Radiobutton(root, text="Option 1", anchor='e') option_1.pack() root.mainloop()